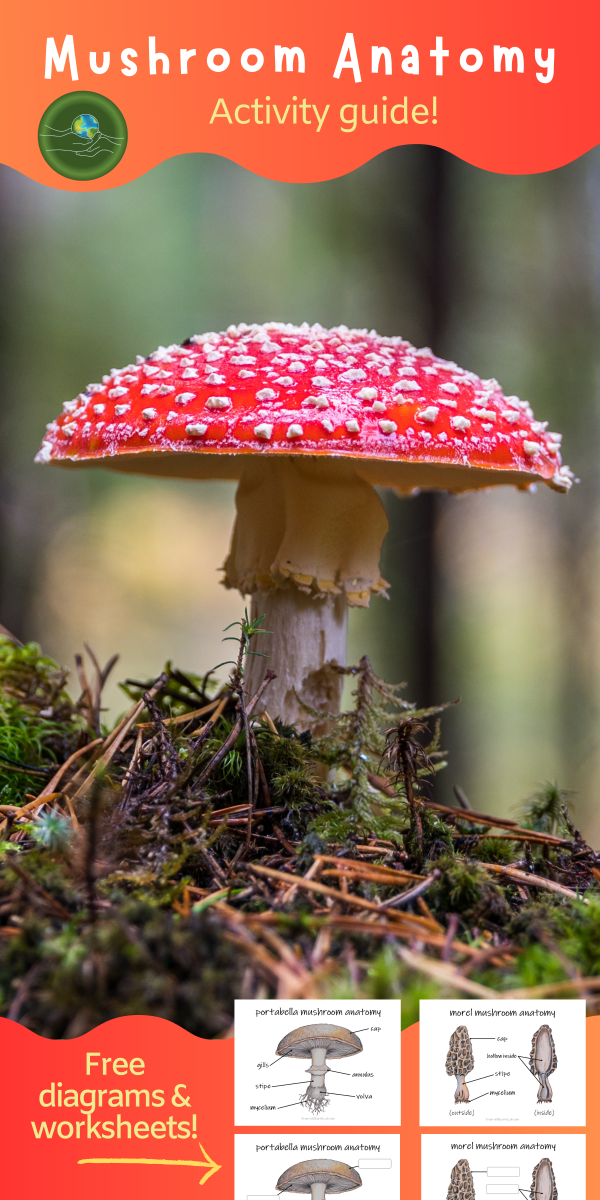
Mushroom anatomy is a great science activity for students of any age! Try dissecting a mushroom at home, such as a portabella mushroom or shiitake, and identifying these parts! Continue reading to learn about the main parts of a mushroom, or skip to the bottom to download some mushroom anatomy diagrams!
1. Cap
The top portion of the fruiting body of a mushroom, which provides a protective covering.
2. Gills
The gills are located on the underside of the cap. The spores are released from the gills.
The stipe is the main supportive stalk of the fruiting body of the mushroom.
4. Annulus
The annulus is located around the stipe of some mushroom, below the gills in some mushrooms. The annulus is the remains of a protective veil that once covered the gills. When it is time to release the spores, the veil breaks away from the gills.
5. Volva
The volva is a cup-like structure at the base of the fruiting body of a mushroom, above the mycelium in some mushrooms. It is also made of remnants of a veil.
6. Mycelium
There is a lot more to a mushroom than what meets the eye! The mycelium is a network of underground filaments, below the fruiting body. A single filament is called a hyphae. Some of a mycelium’s functions are similar to the functions of a plant’s roots. The mycelium helps anchor the mushroom in the soil. However, mycelia do much more than that! They break down and digest organic matter in the soil, which feeds the mushroom. They also connect mushrooms to one another underground.
Free Mushroom Anatomy Diagrams:
I created these mushroom diagrams in the early days of Wild Earth Lab, and now I’d like to gift them to you and your classroom as a little thank you for your support! They feature my colored pencil illustrations and they are free to download for email subscribers. 🙂
Are you creating a mushroom lesson plan to teach in your classroom or homeschool? You can save time by purchasing my mushroom anatomy resources, available as instant downloads for quick and convenient printing.
NOTE: You can also find these mushroom anatomy worksheets within my complete Mushrooms Unit, which includes materials for studying mushroom anatomy, fungi life cycles, and more!
More mushroom printables from Wild Earth Lab:
I offer a variety of mushroom-themed activities and learning materials in my Etsy shop! Your purchase helps me continue delivering fun educational content and resources! Your purchase from my shop or Etsy store will help me continue delivering fun educational content and resources!
Are you interested in reading more posts like this? Subscribe or follow Wild Earth Lab using the links below!
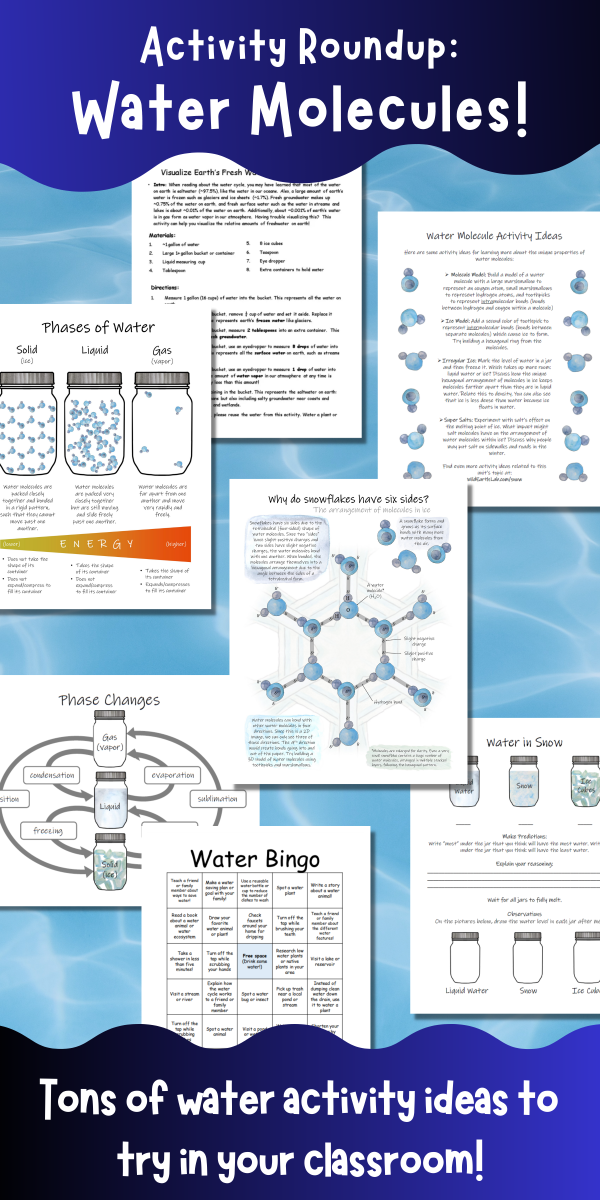
Water. It covers over 70% of the earth’s surface and even makes up about 60% of the human body. But did you know that water has some incredible properties that make it different from other liquids? This is due to water molecules’ unique molecular structure. If you are studying water in your classroom, here are a few fun water molecule activities to help your students “discover” some of water molecules’ weirder properties:
But first, here is a little background info on water molecules. We can think of water molecules as tetrahedral, meaning they behave like a 4-sided shape. Since two “sides” have slight positive charges and two sides have slight negative charges, the water molecules bond with one another. When bonded, the molecules arrange themselves into a hexagonal arrangement due to the angle between the sides of a tetrahedral form.
1. Build a water molecule activity
Build a model of a water molecule with a large marshmallow to represent an oxygen atom, small marshmallows to represent hydrogen atoms, and toothpicks to represent intramolecular bonds (bonds between hydrogen and oxygen within a molecule)
2. Molecular model of ice
After building a water molecule model (see above), continue on to build the hexagonal structure of ice! Add a second color of toothpick to represent intermolecular bonds (bonds between separate molecules) which cause ice to form. Try building a hexagonal ring from the molecules.
3. Volume change: ice vs water
Mark the level of water in a jar and then freeze it. Which takes up more room: liquid water or ice? Discuss how the unique hexagonal arrangement of molecules in ice keeps molecules farther apart than they are in liquid water. Relate this to density. You can also see that ice is less dense than water because ice floats in water.
4. Salt and water – melting point experiment
Experiment with salt’s effect on the melting point of ice. What impact might salt molecules have on the arrangement of water molecules within ice? Discuss why people may put salt on sidewalks and roads in the winter.
Salt impacts the melting and freezing points of water. Photo by Castorly Stock on Pexels.com
5. Study snow with Wild Earth Lab!
If you like these activity ideas, I think you’ll love my Science in the Snow Unit. It’s a complete set of interdisciplinary learning materials to help you teach a fantastic unit on the scientific study of snow and ice for your middle school or high school class. Students will learn about the molecular structure of ice, phase changes, snow water equivalent measurements, snow hydrology, weather stations, and more! Click the link below to learn more!
Wild Earth Lab is supported by readers like you. This post includes links to my own products and affiliate products. If you purchase through links on my site, I may earn a small commission at no additional cost to you.
Ponds are an amazing place to teach children about ecology, biodiversity, and wildlife. Here are 10 fun pond activity ideas to try out with your students! I hope these lesson ideas help you have a great pond field trip or pond unit study with your class.
A Special Note For Teachers: are you planning to teach your students about ponds? For great printable handouts, worksheets, and activity directions, look no further than my complete Pond Ecology Unit. Plus, you’ll support this blog with your purchase! 💚
Grab your binoculars and go birdwatching for waterfowl at a local pond or wetland! How many different types of birds can you spot? Find a bird guidebook or waterfowl species checklist for your local area. Can you identify any of the birds you see? And if you are ready to take flight into the amazing world of wetland birds, I recommend trying my Waterfowl and Waterbirds Unit or reading my blog post about Waterbird Activities.
Did you know that the larvae of many common insects like dragonflies and mayflies live in pond water? Flip over rocks and logs in shallow water and see how many aquatic insects you can find! Learn more about the different types of aquatic insects in my recent blog post or grab some materials and worksheets for identifying common aquatic insects in my Aquatic Insects Mini Study! Finding aquatic insects is one of my personal favorite pond activities and I think your students are going to love it too!
Study aquatic insects – the cool critters living at the bottom of ponds and streams- with these unique printable study aids!
3. Pond Dipping:
Learn about some of the tiniest of pond plants & critters. Grab a sample of pond water and look at it under a microscope or with a magnifying glass. What can you see?
Create your own mini model of a pond habitat in an aquarium or tank. Include abiotic features like rocks and sand, and biotic features like pond plants, algae, and sticks. You can even go a step further and capture a few aquatic insects such as water beetles to release into your habitat!
Prefer a kit? Skip the hassle of gathering materials by trying a Wabi Kusa Ecosystem Kit – perfect for making your very own pond ecosystem in a pretty vase!
5. Froggy Fun:
Study the frog life cycle and learn about the roles that frogs play in pond ecosystems. Then learn to fold an origami frog with this tutorial!
Teach students about riparian areas: the ecologically important boundary zones between water and land. After teaching students aboutriparian areas, ask students to research a favorite plant or animal that lives in or uses riparian areas – there are many possibilities, including cattails, willows, waterfowl, and frogs. I’ve created some complimentary animal research project worksheets that you can download for free. To access these worksheets and my full library of free learning resources, sign up for my newsletter using the link below:
Participate in a clean-up day at a local pond or wetland. Help pick up trash to improve a pond ecosystem! Then you can stick around afterwards to complete some of the other pond activities. You can also read about the signs of a healthy aquatic ecosystem in these two blog posts:
Use different senses to observe the pond! Then write or draw about it. You can find guided natural journals with weekly prompts on Etsy like this one (external link). Or, for a free option, I’ve put together this free pond nature journaling page for kids. To access the free journaling page (and more free resources), sign up for my email newsletter below:
If you enjoyed these pond activity ideas, I think you’re going to love my Pond Ecology Unit! It includes tons of activities, worksheets, posters, and more for an awesome pond unit study – all featuring my artwork!
Before diving into definitions and examples of some common water features, let us ask: “What is a water feature?” Water features are any water body or waterway found on the Earth’s surface!
Water features come in a wide variety of shapes and sizes! For example, some water features are lotic (flowing, like a stream), while others are lentic (stagnant, non-flowing, like a pond). Additionally, water features can have freshwater, saltwater, or a combination of the two (such as brackish water found in coastal wetlands and estuaries). Furthermore, many water features are natural, but also sometimes human-made, like reservoirs and canals.
A Special Note For Teachers: if you are an educator planning a water features unit, you’ll find more information about these different types of water features within my water features unit. You can check it out in my shop, where I offer learning materials for a variety of environmental science units.
Water moves between different water features (and into the air, ground, and ice) through the water cycle. The water cycle is an ongoing process moving water from the oceans to the land and back. To start, the sun powers the water cycle, providing energy for water to evaporate. This creates freshwater and makes it possible for water to move from oceans and low areas to higher places. Then, water flows downhill and makes its way back to the ocean. You can also learn about how humans impact the water cycle in my post from last year.
Bays & Gulfs
A bay is a body of salt water along a coast that is partially enclosed by land. The mouth of a bay is the side that is open to a larger body of water like a sea or ocean. Sometimes, a bay may be called a cove. Gulfs are similar to bays but larger.
A delta is a landform of deposited sediments where a river or stream meets the ocean. Sediments settle out of the river water as it flows into the slower-moving ocean or sea. The movement of water through a delta is controlled by the flow of the river.
An estuary is a partially enclosed body of water where a slow-moving river or stream meets the ocean. Notably, estuaries contain mixed freshwater and salt water. The movement of water through estuaries is controlled by waves and tides as well as by the flow of the river.
A lake is a stagnant or non-flowing body of surface water. However, many lakes are fed by small inlet streams. Similarly, ponds are also non-flowing bodies of surface water. However, ponds are shallower and usually smaller than lakes.
Oceans are vast bodies of salt water. Earth’s ocean is a continuous body of water, but geographically we divide it into 4 oceans: the Arctic, Atlantic, Indian, and Pacific. Similarly, seas are smaller areas of salt water, also connected to the ocean. All together, oceans and seas cover about 70% of earth.
View of the Atlantic Ocean, off the coast of North Carolina, USA
Ponds
A pond is a stagnant or non-flowing body of surface water. However, many ponds are fed by small inlet streams. Ponds are shallower and typically smaller than lakes.
Examples of Ponds
Spy Pond, Massachusetts, USA – frozen in winter time!
Small pond in Colorado beneath Vestal and Arrow Peaks.
Springs
A spring is where groundwater naturally flows onto the earth’s surface. Specifically, a spring forms when the water table is at the same or a higher level than the land’s surface. Springs are often found on steep hillsides or in valley bottoms. Springs may form the beginnings of streams and rivers.
A stream is a flowing channel of surface water. Streams may also be called creeks and brooks. Large streams are called rivers. However, the size at which a “creek” or “brook” becomes a “river” varies dramatically between regions. Perennial streams flow year-round. Seasonal and intermittent streams will dry up at certain times of year or when the weather is hotter and drier.
A waterfall is where a stream becomes vertical or nearly vertical. Waterfalls are found in places that streams flow over steep mountainsides and cliffs. Often, deep plunge pools are found at the bottom of waterfalls.
Find these printable handouts, flashcards, and worksheets in my complete Water Bodies Unit
Wetlands
Wetlands are areas of land flooded or saturated with water. Additionally, wetlands are filled with plants that are adapted for life in flooded environments. Furthermore, wetlands may either last year-round or dry up seasonally. Other names for wetlands include bogs, marshes, and swamps.
A wetland during a part of the year with low waters, along the Appalachian Trail
Ditches & Canals
A ditch is a human-made stream, created to transport flowing water from one area to another. Ditches can move floodwater away from an area where it is not wanted or bring water to an area where it is needed. Similarly, Canals are also human-made streams. However, canals are large enough to allow for boats to pass through them.
Examples of Ditches
The Grand Ditch, Colorado, USA – used to divert water from one side of the continental divide to the other!
A small human-made ditch in Fort Collins, Colorado moves water from a reservoir to farm fields.
Reservoirs
A reservoir is a man-made lake or pond, created to store water for later use. Reservoirs are built by damming a river or stream which forces water to pool upstream. Reservoirs supply year-round water in regions where most of the annual precipitation falls during a short period.
Examples of Reservoirs
Lake Mead & the Hoover Dam, USA – very large reservoir & dam
Teach Water Bodies and Landforms with Wild Earth Lab:
Are you planning to teach landforms and water features? You may enjoy the learning materials I’ve created on these topics! All my learning materials feature my artwork! Find them in my shop or click on the links below:
Wild Earth Lab is supported by readers like you. This post includes links to my own products and affiliate products. If you purchase through links on my site, I may earn a small commission at no additional cost to you.
If you’re learning about pollination with your students or kids this school year, try out some of these fun pollination activity ideas in your classroom!
Special note for educators: if you’re planning to teach pollination, you can find all the activity directions, handouts, and printable materials you’ll need in my complete Pollination Unit– and you will support this blog with your purchase.
A flower that looks fairly plain to the human eye may look completely different through the eyes of an insect! Flower petals sometimes reflect UV and infrared light, which are colors that the human eye cannot see but are visible to some insect pollinators.
Grab a UV marker plus black light set, paper, and regular markers. Start by using a regular marker to draw the outline of a flower and cut it out. Then, create “invisible” patterns on the petals with the black light marker. Then shine the black light on your flower to reveal the hidden designs!
A flower that looks fairly plain to the human eye may look completely different through the eyes of an insect!
2. Pollinator Garden
Plant a pollinator garden with native wildflower species to attract pollinators to your yard. Start by researching native wildflower species in your local area. A plant nursery or garden center can be a great place to start, and you can also find seeds online. To further promote pollinator habitat in your yard, you can even build a pollinator hotel!
3. Flower Dissection
Dissect a flower to learn about flower anatomy. Can you find the stamen, carpel, petals, and sepals? Talk about how brightly colored petals can attract pollinators, how stamens spread pollen onto the pollinator’s body or legs, and how carpels have pollen tracked onto them by the pollinators.
Anatomy of a flower!
4. DIY Flower Anatomy Diagram
Here’s a fun pollination activity idea that’s completely free! I created this free printable flower anatomy coloring activity. You can download and print it from my free resources page. To access the free resources page, simply join my newsletter (you can unsubscribe at any time, but stay subscribed if you’d like my fun science and nature-related activities and more sent to your inbox!)
Visit a butterfly pavilion or butterfly house to observe pollination up close!
Better yet, raise your own butterflies from caterpillars, then release them into your garden where they can feed on your flowers! You do this using a butterfly grower’s kit or by finding caterpillars in your yard to raise.
Raise and release monarch or painted lady butterflies. You can even find kits to band monarch butterflies and discover if they migrated successfully! For more information on monarch banding and tracking, visit Monarch Watch.
7. Healthy Habitats
Participate in an invasive species removal workday at a local natural area. This will help create room for the native wildflowers to grow and feed pollinators!
8. Honey Fun
Learn about how bees make honey (for example, here’s an article about bees making honey from Southern Cross University). Then cook or bake something with honey!
Read about or watch a video of the “waggle dance” that bees use to tell hive members the distance and direction to flowers (e.g., here’s a waggle dance video on YouTube from Bienentanz GmbH). Then, try doing your own waggle dance in the same pattern as the bee!
10. Pollination at Night
If you have night-time opening flowers in your area (e.g., evening primrose, moonflower, night phlox), go for a nighttime walk with a flashlight to observe the open flowers. Go back during the day to see them when they are closed.
Learn about some unusual pollinators with this fun ice-breaker game! I’ve created a printable handout with the game directions and free cards. You can download and print it from my free resources page. To access the free resources page, simply join my newsletter.
Did you know that pollination is a type of symbiotic relationship between a plant and a pollinator? Learn more about symbiotic relationships with my mini study pack:
Many forces work together to shape the landscape. Plate tectonics, volcanic activity, erosion, and deposition work slowly over time to form and change Earth’s surface. All these forces working together create some pretty unique and cool landforms! In this post, we’ll take a closer look at 12 common landforms – what they look like and how they form!
Landforms are the naturally formed, solid features of the Earth’s surface. They shape the Earth’s topography, or form. Landforms shape the way the Earth’s surface looks and how humans, plants, and animals live in different areas. Next time you head out on a road trip or visit a park, see which of these 12 common landforms you can spot!
For Teachers: If you’re an educator planning to teach landforms, great activities and visuals are key to deepening understanding! I think you and your students will love my complete Landforms Unit, which you can also find in my Landforms and Waterbodies Bundle –plus you’ll support my blog with your purchase! ❤️
A canyon near Elephant Butte, in Arches National Park, Utah
Canyon
Definition: A deep, narrow passage bounded by cliffs on both sides. Canyons are like valleys but with much steeper walls.
Formation: Canyons form due to erosion by running water. The running water may be seasonal and only flow for a few months of the year, or flow year-round.
Definition: A naturally formed, underground chamber, below the earth’s surface or on the side of a hill or cliff.
Formation: Many caves are formed by erosion. Caves can form when slowly seeping groundwater dissolves buried rock, leaving behind hollowed-out caverns. For example, the rock limestone dissolves when in contact with mildly acidic groundwater. Erosion can also form caves when waves carve sea caves into cliffsides.
El Capitan, Yosemite National Park, California, USA
Ampetheatre, Giants Castle Game Reserve, South Africa
A hill along the Colorado Trail, Colorado, USA.
Hill
Definition: A rounded, naturally elevated area of land.
Formation: Hills form in many ways. Some hills form as formerly larger mountains erode. Others form when sediments are deposited and then colonized with plants, such as the hills left behind in areas once covered by glaciers. Some hills form due to plate tectonic activity.
Definition: A body of land surrounded by water. Islands are smaller than continents and can be found in many types of water bodies such as oceans, lakes, and rivers.
Formation: Islands may be formed by volcanic activity or by the deposition of sediments like sand. Plate tectonics also plays a role – where ocean plates converge, uplift and volcanic activity occur – increasing the elevation of the ocean floor until it breaches the water’s surface, forming islands.
Examples of Islands
A Small Island near Pulau Guraici, North Maluku, Indonesia
Isle Royale National Park, Michigan, USA: the largest island in Lake Superior. Isle Royale is so large it has smaller lakes on it, which have smaller islands within them!
Bird Island, near South Georgia and the South Sandwich Islands off the coast of Antarctica
Definition: A narrow strip of land with water on two sides, connecting two bodies of land.
Formation: Isthmuses form when the water level exposes an elevated ridge of land above the water’s surface. Some isthmuses, such as the Isthmus of Panama, form where tectonic plates converge. Others, like the Madison Isthmus, result from the lakes and glacial drumlins (ridges of loose rock and coarse sediment deposited by glaciers) left behind in a post-glacial landscape.
Definition: A naturally elevated, flat-topped area of land with steep sides. It is larger than a butte but smaller than a plateau.
Formation: Mesas form as running water erodes the rocks and sediments surrounding an area, leaving it elevated above the surrounding landscape. A “capstone” made of harder rock than the surrounding area may prevent the mesa itself from eroding as quickly.
The Landforms Unit includes three-part flashcards and this printable classroom poster with watercolor artwork of 12 common landforms.
A glacial valley near Byron Glacier, outside of Anchorage, Alaska.
Valley
Definition: A low area of land between two hills or mountains. Valleys often have streams flowing through them.
Formation: Valleys are formed by erosion. Running water or glaciers can carve out valleys over long time periods. Flowing water tends to cut “V” shaped valleys, while glaciers carve out “U” shaped valleys.
View from inside the crater of a dormant volcano in Haleakalā National Park, Maui, Hawaii.
Volcano
Definition: A mountain or hill with a crater through which lava is projected.
Formation: Volcanoestypically form due to plate tectonic activity, which can allow the molten rock to breach the Earth’s surface. The buildup of solidified lava forms a cone with a crater in it.
Are you planning to teach landforms and water features? You may enjoy the learning materials I’ve created on these topics! All my learning materials feature my artwork! Find them in my shop or click on the links below:
I don’t know about you, but I think math is more interesting when we can apply it to real-world situations! If you’re teaching trigonometry, right triangles, or angles in your classroom or homeschool, you and your students will love this tree-height applied math activity! In this simple learning activity, students will learn how to make a homemade inclinometer – a device for measuring the angle of inclination. Then, they will take measurements and calculate the height of a tree.
A note for educators: This tree height activity comes from my Math in the Forest Unit. If you’re an educator planning to try this activity, I recommend checking out the unit. It includes the necessary printable directions, diagrams, and worksheets for this activity—perfect for teachers and homeschoolers looking to bring applied math fun to the classroom! 💚
Unless you are measuring a short seedling, you probably won’t be able to measure tree height directly because you can’t reach the top. So how do you measure something so tall? Answer: Use an inclinometer and trigonometry!
How do you measure the height of something taller than you? Answer: use trigonometry!
An inclinometer is a device for measuring an angle of inclination above the horizontal. We can use an inclinometer to help us find the height of tall objects, such as trees! When you’re looking up at the top of a tree, you can use the angle of inclination and your distance from the tree to calculate the tree height. This is possible thanks to trigonometry – a branch of mathematics dealing with angles and the sides of triangles.
So how do we do this? In this blog post, I’ll walk you through all the steps to calculate tree height with your students. The first step is to make your own inclinometer out of common household objects…
Part 1: Make an inclinometer
Follow these steps to make your own inclinometer from common household items. You’ll use the inclinometer to find an angle of inclination, which you’ll use to calculate tree height.
Tape the straw across the center of the protractor at 90̊.
Use the scissors to shorten the straw (as needed).
Cut a short piece of thread or dental floss.
Tie the small weight to the end of the floss.
Tie the other end of the floss to the straw.
Check that the thread hangs over the 0̊ mark when holding the inclinometer with the straw parallel to the ground. Adjust the position of the thread on the straw as needed.
1. Tape the straw across the center of the protractor at 90̊.
2. Use the scissors to shorten the straw (as needed).
3. Cut a short piece of thread or dental floss.
4. Tie the small weight to the end of the floss.
5. Tie the other end of the floss to the straw.
6. Check that the thread hangs over the 0̊ mark when holding the inclinometer with the straw parallel to the ground. Adjust the position of the thread on the straw as needed.
Part 2: Using your homemade inclinometer
Use your homemade inclinometer to measure the angle of inclination when looking up at the top of the tree. The homemade inclinometer requires two people to operate – one person to look through the inclinometer and one person to read the angle off of the side.
Materials
Homemade inclinometer
Tape measure
A friend
Directions
Stand a short distance away from the tree, far enough away that you can see the top of the tree. This works best if you are on flat ground – not uphill or downhill from the tree. Measure your distance from the tree.
Look through the straw with the curved edge of the protractor facing your eyeball. Do not touch the straw to your eyeball.
As you look through the straw, tip the inclinometer upwards until you can see the top of the tree through the straw.
Hold still and have a friend look at the side of the inclinometer. Have them read the angle where the thread crosses.
Measure the height to your eye level.
Measure your distance from the tree
Look through the straw with the curved edge of the protractor facing your eyeball. Do not touch the straw to your eyeball.
As you look through the straw, tip the inclinometer upwards until you can see the top of the tree through the straw. Have a friend read the angle on the side of the inclinometer where the thread crosses.
Part 3: Calculate tree height
You can use trigonometry to calculate the tree height from the measurements you took with the tape measure and inclinometer. The imaginary horizontal line at eye level, the imaginary line from your eyes to the top of the tree, and the tree itself create a right triangle (see figure below).
There is a relationship between the angles in a right triangle and the lengths of its sides. If you know two angles and the length of one side, you can calculate the length of the other sides of the triangle. Look at the diagram and then check out the example calculation below.
Question: I want to know the height of a tree in my backyard. When I was standing 15 feet away from the tree and looking up at its top, I used my inclinometer to find an angle of 20̊. The height to my eye level is 5.2 feet.
distance x TAN(angle) = tree height above eye level
15 feet * TAN (20̊) = 5.5 feet
tree height above eye level + eye level = tree height
5.5 feet + 5.2 feet = 10.7 feet
Answer: The tree is about 10.7 feet tall!
Printable Directions & Worksheets
Trying this activity in your classroom? You can find worksheets and printable directionsfor measuring tree height in my Math in the Forest Unit:
In my last post, I shared my experience working as a science technician studying aquatic ecosystems like streams, ponds, and wetlands. These water features are critically important to many ecosystems and the creatures that live there. They also provide us with a lens through which we can glimpse the overall health of an ecosystem. In this post, I’ll teach you some signs to look for to recognize healthy aquatic ecosystems in your area. How do your local ponds, streams, and wetlands measure up?
Watkin’s Glen in New York state is home to some incredible water features and lush vegetation
Free of Trash
This one seems obvious, but it is worth including first because of how important it is, and because it is something we can all help prevent and fix. Litter and trash can be harmful to wildlife and plants. Lots of trash floating on the surface of water can impact the amount of light and oxygen in a pond or stream. Below the water’s surface, aquatic plants need sunlight and oxygen for photosynthesis, the process through which plants make their own food. Furthermore, our trash, especially plastics, contains harmful chemicals that may harm aquatic animals. Animals like fish, birds, and turtles confuse trash for food and eat it, which can be very toxic to them. Healthy aquatic ecosystems should be free of human trash.
Any time you see an area dominated by just one plant, that might be a clue that something is wrong. Unhealthy ecosystems are more susceptible to invasive plant species. When an invasive plant species is introduced to an ecosystem, it can outcompete native plant species. Where there were once many diverse plant species, a single invasive plant may take over. This will send ripple effects through the whole local food chain. Examples of invasive plants species in North America include cheat grass, kudzu, garlic mustard, and buckthorn trees.
The Poudre River in Northern Colorado is an example of an ecosystem impacted by an invasive plant. Invasive cheat grass is found along its floodplain in some areas.
Some Algae, but not Too Much
It is natural for stagnant bodies of water (non moving bodies of water like ponds and wetlands), and slower moving streams to have a good bit of algae. Fish, aquatic insects, and other invertebrates need algae as a source of food. But how much is too much? When ponds are near farm fields, the runoff into them may contain too much of the nutrients phosphorous and nitrogen, which is found in many fertilizers. After rain, water flowing off of farm fields and lawns will wash fertilizers containing phosphorous, nitrogen, and other chemicals into low-lying ponds and wetlands. This can cause massive, unnatural plumes of algae to form, which block out sunlight, deplete oxygen, and make it difficult for any other life forms to survive in the pond. When one species takes over, such as a massive plume of algae, it is often a sign that something is out of balance in an ecosystem.
A remote pond below Vestal and Arrow Peaks near Silverton, Colorado, in the San Juan Mountains contains clear water with a small amount of algae.
Abundant and Diverse Aquatic Macroinvertebrates
Have you ever flipped over a rock in a pond or stream? Chances are you saw tons of wriggling little creatures underneath! These creatures are aquatic insect larvae, such as mayflies, dragonflies, and caddisflies (“case-makers”) and other aquatic macroinvertebrates! “Aquatic macroinvertebrates” is a general word for tiny creatures with no backbones that live in water. They include insect larvae, worms, snails, crayfish, and more. Many aquatic macroinvertebrates are herbivores of algae and provide an important food source for many fish species. A healthy ecosystem should have a variety of different aquatic macroinvertebrates!
Many macroinvertebrate species are sensitive to disturbances and contaminants in an ecosystem, so their populations will reflect an ecosystem’s health. The aquatic macroinvertebrates in a pond or stream are actually such an excellent indicator of ecosystem health that scientists routinely use studies of the aquatic macroinvertebrates in a stream or pond as a holistic measure of aquatic ecosystem health! A healthy aquatic community will have abundant and diverse macroinvertebrates.
This is me, collecting aquatic insects from a lake while I was an undergraduate in college. Using a mesh net and a pan, I found all sorts of benthic macroinvertebrates, including stonefly larvae, caddisfly larvae, and mayfly larvae.
Multiple Trophic Levels
A healthy ecosystem should also contain a variety of different living things including plants, herbivores, predators, and decomposers. These life forms represent different trophic levels, or positions in the food chain, and all play different roles in the ecosystem to maintain balance. A classic example is the relationship between wolves, elk, and riparian plants. When an ecosystem is healthy, all three thrive. However, if wolves (or other top predators) are driven out of an area, the elk population will increase since no one is eating them any more. That will cause the plant populations to suffer, because more elk eat more plants. Additionally, without fear of predation, herbivores like elk will be emboldened to graze out in the open near wetlands and streams, rather than hiding in the woods. This leads to greater stress on the plants around aquatic ecosystems.
Scientists study this effect by building fences around small areas of an ecosystem, to keep out elk, and to see what an area would look like without exaggerated grazing. This same sort of imbalance between plants, herbivores, and predators can happen on a smaller scale too. In some pond ecosystems, the top predators (predators that are not prey to any other animals) might be herons, hawks, or otters, rather than wolves. See if you can identify a top predator in a local pond or stream ecosystem near you. In a healthy ecosystem, look for a variety of insects, fish, birds, amphibians, and other animals.
A bald eagle, a top predator, perches overlooking the Wisconsin river
Many turtles are omnivores that eat a variety of both plant and animal foods
Free of Chemicals
Chemicals can get washed into water from surrounding human settlements and agriculture. Some chemicals might be noticeable, and appear as a white or yellow froth on top of water, an oily sheen floating on the surface, or an unnatural metallic or rusty color. Some chemical pollutants are invisible, but their impact on wildlife is not! For example, road salts, when dissolved in water might be invisible, but it can impact the number of female frogs that are born in a pond – which can impact a frog species’ ability to reproduce.
Another example of a harmful but nearly invisible chemical is a mosquito pesticide called DDT. When DDT gets into pond and stream water, it accumulates in the tissues of plants. These contaminated plants are eaten by macroinvertebrates and small fish, which are in turn eaten by larger fish, which are eaten by raptors like bald eagles. On each step up the food chain, the amount of the DDT chemical would build up in the organisms, in an effect called biomagnification. The bioaccumulated DDT in the eagles caused the shells of the eggs they laid to be too weak, which caused an enormous threat to this species. Luckily a biologist named Rachel Carson figured out the cause of the problem and DDT was later banned in the United States. DDT is still legal in some countries.
We love visiting streams and wetlands, but too many human or livestock visitors traveling over fragile surfaces can have a big impact. Human visitors and livestock that are not natural to an area can cause soil compaction by repeatedly walking over the same area, this can make it very difficult for plants to grow. Plants are an important part of a pond or stream ecosystem because their roots help stabilize the banks or shores, preventing erosion. Signs of excessive erosion like undercut banks and over compacted, plant-less soil can be signs that an ecosystem isn’t doing so well. Water also cannot infiltrate into soils as easily when they are too compacted – which may cause floodwaters to pool rather than seep back into the ground. To help prevent impacts to soils, you can stay on designated trails and recreation areas when visiting a local stream, pond, or wetland.
Spring Creek in Fort Collins, Colorado. A corridor of grassy, natural areas along the creek’s floodplain provide an area to accommodate floodwaters and promote water infiltration into the soils.
Ways we can all help promote healthy aquatic ecosystems!
Stay on trails, boardwalks, and already-impacted surfaces when visiting local streams, ponds, and wetlands.
Pack out your trash or dispose of it properly in a trash can or dumpster.
Consider bringing an extra baggie or container on hikes to pick up litter.
Help prevent the spread of invasive plant species by checking your shoes and clothing for burs, seeds, or other plant materials.
Help prevent the spread of invasive animal species by not releasing aquatic pets into local ecosystems.
Consider reducing the amount of chemicals you use in your lawn or garden to prevent chemical run-off into nearby wetlands, ponds, or streams. More about this in my post on improving you backyard wildlife habitat, if you haven’t read it yet!
Consider joining a volunteer group in your area that helps pull up invasive plant species in parks and on public lands.
Teach your family about healthy aquatic ecosystems. I’ve made a free aquatic ecosystem scavenger hunt for you to download, shown at the bottom of this page! Or purchase my Pond Ecology Unit – which includes activities, flashcards, and posters for learning about ecosystems!
Boardwalks provide a route for visitors to cross fragile riparian areas while minimizing impacts to plants and soils
Are you interested in learning more about ecosystems and conservation? Subscribe at the bottom of this page, or follow Wild Earth Lab using the links below!
Author’s note: As a master’s student who works with water, this is an exciting topic for me to write about! Water is a vital resource that needs careful management in the Mountain West region of the United States. Mountain region watersheds are expected to face climate change-related challenges due to decreasing winter snowpack, changing stream flows, and growing downstream human settlements. Understanding our watersheds and the challenges they are facing is very important, not just for scientists but for everyone. It is never too early or too late to start learning about environmental processes like the water cycle that make life possible for all beings. This is truly a force of nature that impacts all of us, regardless of where we live or our occupations. We all use water, and we all can find ways to use water more sustainably, work to ensure everyone can access reliable and clean water resources, and protect aquatic ecosystems (which provide some cool ecosystem services… this will be a topic for another post soon!)! The water cycle is so huge and important, I’ve decided to make a whole series of posts about it. My goal in writing this first part is to overview the water cycle in a straightforward but detailed way – not just for science students but for anyone and everyone who is curious about our Earth’s water cycle. In the second part, I plan to introduce some of the ways humans impact the water cycle, and steps we can take to better use and manage our water resources and ecosystems. I hope this two-part post provides you with some useful background information about how the water cycle works and how we interact with the water cycle. I’ve also included some free digital learning resources related to the water cycle, linked at the bottom of this article!
Ever wondered what keeps our streams flowing? Or why rivers don’t run out of water? Or where does the water bubbling out of the ground at natural springs come from? The answer to all these questions actually begins with our sun! The sun is like an engine, providing the necessary energy to drive the water cycle. The water cycle isan ongoing process of moving water from the oceans to the land and back.
The water cycle begins over our oceans, where the energy from our sun causes huge amounts of water to evaporate every day. When water evaporates, it doesn’t disappear – it becomes water vapor: water in gas form rather than liquid form. Ocean water can evaporate, but salts in the ocean cannot. Because salt cannot evaporate, evaporation separates freshwater out of the ocean. Freshwater is non-ocean water that is usable by land plants and animals, including humans! Evaporation is an important Earth process that makes human life possible because it separates the freshwater from the saltwater.
The sun fuels the water cycle by providing the energy for water to evaporate
As the evaporated water vapor rises up in the atmosphere, it cools and condenses, or starts forming tiny liquid droplets. As larger droplets form, they fall from the clouds as precipitation, such as rain or snow. Most precipitation will fall directly back into the ocean. However, sometimes clouds that form over the ocean will move over a continent and precipitation falls on the land. When rain falls on the land, some of it flows over the surface of the land, which we call runoff. Little streams may flow into larger streams and rivers, or temporarily be stored in non-moving bodies of water like ponds and lakes. Any water on the earth’s surface, including streams, rivers, ponds, lakes, and oceans, is called surface water. Ultimately, all surface water will do one of three things: evaporate again, flow all the way back to the ocean, or infiltrate…
Precipitation falls over the Rocky Mountains, beginning its long journey back to the oceans.
To infiltrate,in other words, means to seep into the ground. When water infiltrates, it fills the tiny gaps in the soils and rocks below our feet! This water is called groundwater! In the water cycle, water may infiltrate into the ground at any point between where it falls on the land as precipitation and when it flows back into the ocean. Like surface water, groundwater also moves or flows, but much more slowly than surface water. Some groundwater bubbles back out of the ground onto the surface in a spring or a gaining stream: a stream that is fed by groundwater rather than runoff. Plants will also take up groundwater through their roots and release it back into the air as water vapor through the tiny pores in their leaves, in a special type of evaporation called transpiration.
So far, we’ve looked at water in liquid and vapor forms. But what about water in solid form such as ice and snow? It turns out ice and snow play an important part in the water cycle too. When snow falls on land, it can build up in one place, or accumulate. When temperatures increase, such as in springtime, the snow that built up through the winter will melt and flow into our surface and groundwater. In certain cold and snowy areas, such as in tall mountains or near the poles, snow accumulates faster than it melts. This forms glaciers and ice sheets: long-lasting bodies of ice, made from compacted snow. Most of the fresh water on our planet is currently stored as ice in glaciers, ice sheets, and snow! Scientists in the field of snow hydrology study these important stored waters!
Glaciers, such as this one near Anchorage, Alaska, are an important place where fresh water is stored in the water cycle
Saltwater, like ocean water, is toxic to humans and land plants and animals. All the water we drink, bathe in, clean with, and use to grow plants must be freshwater. Freshwater is only a tiny fraction of the water on Earth: about 97.5% of Earth’s water is saltwater. That means only 2.5% of the Earth’s water is freshwater. Of that 2.5% freshwater, most is not usable by humans. Over two-thirds of the Earth’s freshwater is frozen in glaciers, ice caps, and snow, and a little less than a third is groundwater. Surface water like rivers, lakes, and ponds is just a fraction of a percentage of Earth’s total freshwater – and just a tiny part of a fraction of a percentage of Earth’s total water overall! If you’re having trouble visualizing this, check out thefree at-home activity guide to help you and your child or students visualize the percentages of freshwater from home in the kitchen or bathtub!
Continue to Part 2 of this post about the water cycle – covering the ways humans interact with the water cycle!
Skip to Part 3about the water cycle – covering the role of mountain watersheds!
Subscribe to get new posts sent straight to your inbox, or follow Wild Earth Lab using the links below.