Posted on Leave a comment

Flower Dissection: try this simple hands-on science activity in your classroom!

pink flower, tweezers, and scissors with worksheets.

Are you teaching your students about the parts of a flower or plant anatomy? Sometimes the best way to understand how something works is by taking it apart. A flower dissection is a simple and engaging hands-on activity that brings plant anatomy to life in your classroom. In this activity, students will carefully examine and identify key flower structures like petals, sepals, carpels, and stamens. Plus, they’ll explore the fascinating connection between flowers and Fibonacci numbers in nature!

If you’re looking for more background information about flower anatomy, be sure to check out my blog post where I cover the four main whorls of a flower. You can also learn more about the functions of flowers and their various parts in the plant life cycle in this post about pollination and the plant life cycle!

Please Note: I’ve made the directions for this flower dissection activity available for free here in this post. If you would like printable directions and worksheets for this activity, you can find them in my complete Flowers Unit in my shop.

Materials

Each student will need the following materials:

  • Flowers
  • Tweezers
  • Glue
  • Pencils or pens
  • Printed student directions and lab worksheet (available in my Flower Unit)

Tips for Success

  • Have flower and plant anatomy diagrams on hand so your students can reference them as they dissect their flowers.
    • You can find my hand-drawn flower & plant anatomy diagrams in my flowers unit (linked above)
    • You can also find a free flower diagram on my free resources page (pictured below)!
  • Use a large flower so that students can easily see all the parts.
  • Use a complete flower with all four main flower parts: sepals, petals, carpels, and stamens. For example, lilies, hibiscuses, or tulips are all good choices.
diagram showing the parts of a flower

Directions

Part 1: Flower Dissection

Pass out the materials to your students. Give a brief overview of the main parts of a flower. Then, assist your students as they work through the following steps to dissect their flowers:

  1. Use the tweezers or your fingers to carefully remove the sepals and then the petals from your flower.
  2. Break apart the carpel(s) and stamens.
  3. Count the number of sepals, petals, carpels, and stamens and record the number of each.
  4. Glue one of each part to the lab worksheet.
  5. Use a pencil or pen to draw arrows and label the stigma, style, and ovary on the carpel glued to the lab worksheet.
  6. Use a pencil or pen to draw arrows and label the anther and filament on the stamen glued to the lab worksheet.

Part 2:  Fibonacci Numbers in Nature

Fibonacci numbers form a sequence so that each number is the sum of the previous two numbers (e.g., 1+1 = 2; 2+1 = 3, 3+2 = 5; 5+3=8; and so on). Fibonacci numbers are often found in nature. Students should answer the following questions:

  1. Calculate and write down the next 5 numbers in the Fibonacci sequence: 1,1,2,3,5,8,… ___, ___, ___, ___, ___
  2. Look back at your lab worksheet. How many petals did your flower have? Is this a Fibonacci number? What about the sepals? Carpels? Stamens?

Study Flowers with Wild Earth Lab!

If you enjoyed this activity, I know you’ll love my Flowers Unit! It includes everything you need for this activity and other flower projects too!

OR – take your botany learning to the next level with my Botany Collection. It’s a bundle of three plant units: Flowers, Pollination, and Fruit!

Ready for another dissection?

Read my blog post on how to do a Mushroom Dissection Lab!

Explore more lessons from Wild Earth Lab:

If you enjoyed this post, I know you will love trying my other science and nature units in your classroom too!


Are you interested in reading more posts with directions for science activities? You can subscribe or follow Wild Earth Lab using the links below!


Subscribe, share, and comment:

Posted on 1 Comment

The Saguaro Cactus Life Cycle: step-by-step guide with pictures!

A picture of the saguaro cactus life cycle with the text "saguaro cactus life cycle: a step-by-step guide"
text that says share this post

Some saguaro cacti live for 200 years or longer! Saguaro cacti grow very slowly. The speed of growth depends on many factors such as precipitation, temperature, and soil quality. Let’s explore the saguaro cactus life cycle in five steps! Notice that desert animals play a key role in two of these steps.

For Teachers and Parents: If you’re an educator planning to teach kids about cacti in your classroom or at home, great activities and visuals are key to deepening understanding! I think you and your students will love my complete Cactus Unit (plus you’ll support my blog with your purchase! ❤️)

1. Germination

Saguaro cactus seedling

A seed germinates. The two cotyledons open to form a tiny plant. Seeds that germinate in shady areas such as beneath palo verde trees are most likely to survive through the fragile young stages and reach maturity.

The seedling cactus grows through its first summer and develops more areoles and spines. At just a few millimeters in height, the seedling is so small that it can be difficult to spot.

2. Maturity

It may take ~35 years for a saguaro cactus to reach maturity and produce its first flowers.

The rate of growth depends on environmental conditions such as precipitation, temperature, soil quality, and the type of cactus. For saguaro cacti, growth happens very slowly over many years.

When a cactus reaches reproductive maturity, it can produce its own flowers. Time to reach maturity depends on the cactus species. For example, the saguaro cactus takes several decades to reach maturity.

3. Flowering & Pollination

The lesser long-nosed bat is a nighttime pollinator of the saguaro cactus

The cactus flowers bloom. Cactus flowers make tasty nectar to attract pollinators like bats, bees, and doves. Pollen is transferred between plants by the pollinators. This is a type of symbiotic relationship called mutualism because both the pollinator and the plant benefit. The pollinator gets a tasty meal of nectar, and the plant gets pollinated.

4. Fruiting

Saguaro fruits are a food source for many animals in the Sonoran desert. People sometimes eat the fruit too.

Once pollinated, the cactus fruit begins forming from the ovary of the flower. Cacti can produce huge amounts of fruit. For example, a single saguaro cactus may produce upwards of 100 fruits each year. That’s a lot of fruit! The ripened fruit splits open, revealing sweet flesh and seeds.  This sends the signal to animals that the fruit is ready to eat!

5. Seed Dispersal

When an animal eats the saguaro fruit, it ingests some seeds. The seeds are then dispersed in the animal’s scat.

Desert animals like birds, coyotes, and tortoises eat cactus fruit and disperse seeds in their scat. This is another example of a mutualistic relationship between an animal and a cactus. The animal gets a meal of fruit, and the cactus gets its seeds dispersed. If the cactus is lucky, some of its seeds will be deposited in locations with good growing conditions. Over its lifespan, a single saguaro may produce millions of seeds. However, only a few of those seeds will germinate, grow, and reach maturity.

Classroom cactus materials:

Explore units from Wild Earth Lab:

If you enjoyed this post, I know you will love using my environmental science materials in your classroom!


Are you interested in reading more posts like this? Subscribe or follow Wild Earth Lab using the links below!


References and Further Reading

  1. Ceotto, E. (2009). Cultivation of Carnegiea gigantea from seeds: a journey in desert ecology. Desert Plants25(1), 10. Available: https://repository.arizona.edu/bitstream/handle/10150/556548/dp_25_01-010-015.pdf?sequence=1
  2. Dimmitt, M. (n.d.). Cactaceae (cactus family). Arizona-Sonora Desert Museum. Available: https://www.desertmuseum.org/books/nhsd_cactus_.php
  3. Helmy, Olga. 2021. Carnegiea gigantea, saguaro. In: Fire Effects Information System, (Online). U.S. Department of Agriculture, Forest Service, Rocky Mountain Research Station, Missoula Fire Sciences Laboratory (Producer). Available: www.fs.usda.gov/database/feis/plants/cactus/cargig/all.html
  4. National Park Service (n.d.). The Saguaro Cactus (Carnegiea gigantea). Organ Pipe Cactus National Monument. Available: https://www.nps.gov/orpi/learn/nature/saguaro-cactus.htm
  5. National Park Service (2017). How Saguaros Grow. Saguaro National Park. Available: https://www.nps.gov/sagu/learn/nature/how-saguaros-grow.htm

Sharing options and discussion for this post:

Posted on 1 Comment

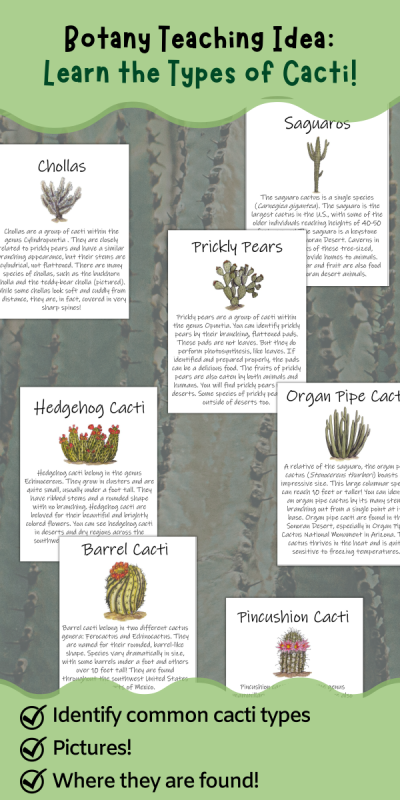
Types of Cacti: explore the diversity of cactus species – with pictures!

banner with the text "Botany teaching idea: learn the types of cacti"

There are many types of cacti, which are found in dry places and deserts. Cacti are succulent plants. Succulent plants are thick and fleshy for storing water. While all cacti are succulents, not all succulents are cacti. Cacti are unique because they have areoles – cushion-like bumps that cover the outside of a cactus. One or more sharp, pointy spines are attached to each areole. Spines are a type of modified leaf. Most cacti species have no true leaves. They do, however, produce flowers and fruit, which provide an important food source to desert animals.

A note for teachers and parents: Are you teaching your students or children about cacti? I think you will love my complete set of printable cactus learning materials. Plus, you’ll support this blog with your purchase! ❤️

Cacti are a diverse group. There are more than one thousand different species of cacti. Some look like a single rounded shape (like a barrel cactus). Others have complex, branching arms or pads (like a prickly pear). They can be as tiny as a grape or grow taller than a house.

Without further ado, let’s explore some of the types and groups of cacti in the United States:

Saguaro Cactus

The saguaro is the largest cactus in the U.S., with some of the older individuals reaching heights of 40-50 feet or more! While it is probably the best-known cactus in the United States, the mighty saguaro actually has a fairly small range and is native to the Sonoran Desert only. The saguaro is actually a keystone species of the Sonoran Desert. Cavities in the large trunks of these tree-sized, columnar cacti provide homes to animals. Their flower nectar and fruit are also food for many Sonoran desert animals. The saguaro cactus is a single species (Carnegiea gigantea).

close up photo of prickly cactus plant
Photo by Nicole Ashley Rahayu Densmoor on Pexels.com

Organ Pipe Cactus

A relative of the saguaro, the organ pipe cactus (Stenocereusthurberi) boasts an impressive size. This large columnar species can reach 10 feet or taller! You can identify an organ pipe cactus by its many stems branching out from a single point at its base. Organ pipe cacti are found in the Sonoran Desert, especially in Organ Pipe Cactus National Monument in Arizona. This cactus thrives in the heat and is quite sensitive to freezing temperatures.

Prickly Pears

Prickly pears are a group of cacti within the genus Opuntia. You can identify prickly pears by their branching, flattened pads. These pads are not leaves. But they do perform photosynthesis, like leaves. If identified and prepared properly, the pads can be a delicious food. The fruits of prickly pears are also eaten by both animals and humans. You will find prickly pears in many deserts. Some species of prickly pears grow outside of deserts too.

selective focus photography of prickly pear cactus
Photo by mali maeder on Pexels.com

Chollas

Chollas are a group of cacti within the genus Cylindropuntia . They are closely related to prickly pears and have a similar branching appearance, but their stems are cylindrical, not flattened. There are many species of chollas, such as the buckhorn cholla and the teddy-bear cholla (pictured). While some chollas look soft and cuddly from a distance, they are, in fact, covered in very sharp spines!

Hedgehog Cacti

Hedgehog cacti belong in the genus Echinocereus. They grow in clusters and are quite small, usually under a foot tall. They have ribbed stems and a rounded shape with no branching. Hedgehog cacti are beloved for their beautiful and brightly colored flowers. You can see hedgehog cacti in deserts and dry regions across the southwest United States and Mexico.

Barrel Cacti

Barrel cacti belong in two different cactus genera: Ferocactus and Echinocactus. They are named for their rounded, barrel-like shape. Species vary dramatically in size, with some barrels under a foot and others over 10 feet tall! They are found throughout the southwest United States and parts of Mexico.

Pincushion Cacti

Pincushion cacti belong in the genus Mammillaria. Types of cacti in this genus are also sometimes called nipple cacti. Pincushion cacti are characterized by hooked spines and a very small size. Often, they are just a few inches tall. There are many species of pincushion cacti. You will find pincushions across Central America and Mexico. A handful of pincushion species have ranges extending into the southwest United States.

Study types of cacti with Wild Earth Lab!

Want to learn about cacti with your students or children? Look no further than my cactus unit study. It includes posters featuring my watercolor cactus artwork and all the worksheets, flashcards, and lessons you need!

Explore more units from Wild Earth Lab:

If you enjoyed this post, I know you will love using my environmental science materials in your classroom!


Are you interested in reading more posts like this? Subscribe or follow Wild Earth Lab using the links below!


References and Further Reading

  1. The American Southwest (n.d.). Cacti of West and Southwest USA. Available: https://www.americansouthwest.net/plants/cacti/index.html
  2. CactiGuide.com (n.d.). Notes for the Genus: Mammillaria. Available: https://cactiguide.com/cactus/?genus=Mammillaria
  3. DesertUSA (n.d.). Barrel Cactus. Available: https://www.desertusa.com/cactus/barrel-cactus.html
  4. Dimmitt, M. (n.d.). Cactaceae (cactus family). Arizona-Sonora Desert Museum. Available: https://www.desertmuseum.org/books/nhsd_cactus_.php
  5. Gauna, F. J. (n.d.). Prickly Pear (Opuntia basilaris P. Mill.). Plant of the Week. U.S. Forest Service. Available: https://www.fs.usda.gov/wildflowers/plant-of-the-week/opuntia_basilaris.shtml
  6. Gauna, F. J. (n.d.). Barrel Cactus (Ferocactus sp., Britt. & Rose). Plant of the Week. U.S. Forest Service. Available: https://www.fs.usda.gov/wildflowers/plant-of-the-week/ferocactus_sp.shtml
  7. National Park Service (2005). Ecology of the Saguaro: II. NPS Scientific Monograph No. 8. Chapter 5. Available: https://www.nps.gov/parkhistory/online_books/science/8/chap5.htm
  8. National Park Service (n.d.). The Organ Pipe Cactus (Stenocereus thurberi). Organ Pipe Cactus National Monument. Available: https://www.nps.gov/orpi/learn/nature/organ-pipe-cactus.htm
  9. North Carolina State University (n.d.). Echinocactus. Extension Gardener Plant Toolbox. Available: https://plants.ces.ncsu.edu/plants/echinocactus/
  10. Notes from the Road (2022). Types of Cactus in the Desert Southwest. Available: https://www.notesfromtheroad.com/desertsouthwest/cactus-species.html

Sharing options and discussion for this post:

Posted on 2 Comments

Tree Anatomy: the parts of trees and their functions

a banner with pictures of trees that says "Let's learn about tree anatomy"

In this post, we will examine overall tree anatomy and the key parts of a tree. Then, we will peek inside the tree to examine the layers of a tree’s trunk and their functions.

A special note for educators: Are you planning to teach your students about trees? I offer a complete Trees Unit as well as a Forest Ecology Unit. And they are both found within my discounted Forest Bundle. I know your students will love the beautiful diagrams and hands-on activities – and you’ll support this blog with your purchase! ❤️

Recommended products

Overall Tree Anatomy

We can think of trees as having three main parts. Let’s take a look at each.

  1. Roots are the underground parts of a tree that take up water and dissolved minerals. They also help anchor the tree to the soil.
  2. The trunk is the main woody stalk of a tree which supports all other branches.
  3. The crown is the top portion of a tree. It includes the branches and leaves or needles extending from the main trunk. The crown of a tree will look quite different in different types of trees. Picture the crown of a deciduous tree, conifer tree, or palm tree. Let’s take a closer look at the parts of the crown:
    • A branch is any woody stalk extending from the main trunk.
    • The leaves  are parts of a tree that produce the tree’s food through photosynthesis. In deciduous trees, leaves are broad and flat, and fall off the tree at the end of each growing season.
    • The needles are the leaves of a coniferous tree, which produce the tree’s food through photosynthesis. Needles do the same job as broad, flat leaves but stay attached to the tree throughout the entire year.

Tree Trunk Anatomy

Inside a human body, you will find different organs: a heart, intestines, lungs, kidneys, etc. Just like humans, trees have different organs inside their trunks too. The trunk of a tree is made up of several layers, each performing a different function. Let’s take a look.

The anatomy of a tree trunk coloring activity for kids to learn about tree science
brown tree log
Photo by Pixabay on Pexels.com
  1. Bark is the rough, protective outer coating. Bark helps protect the tree from insect and fungi invaders.
  2. The phloem underlies the bark. The phloem’s function is to transport sugars. Sugars form in the leaves during photosynthesis, and the phloem moves the sugars to other parts of the plant where they are needed for growth.
  3. The cambium is a thin layer of dividing cells between the xylem and phloem. This is where secondary (outward) growth occurs. In temperate climates, the most growth happens during the summer. This is why tree rings form.
  4. The sapwood underlies the cambium. The sapwood is the living part of the xylem, which actively moves water upwards through the tree. Water is drawn up through the ground via the tree’s roots. Water leaves the tree through tiny pores called stomata in the leaves, in a process called transpiration. The xylem grows from the cambium – we can see tree rings in the xylem.
  5. The heartwood is old, inactive xylem tissue. Heartwood no longer has living cells and does not move water. Heartwood provides structural support. Both living and dead xylem parts (sapwood and heartwood) contain tree rings that formed each year as the tree grew inwards from the cambium.
  6. The pith is at the very center of the tree trunk and plays a role in the movement of nutrients. In older trees the pith is often very tiny or diminished, relative to the size of the heartwood.

Free Tree Anatomy Materials:

My email newsletter subscribers can access my full collection of free learning resources. Sign up today to access all the freebies, including these:

  1. Tree Trunk Anatomy Coloring Activity:

2. Print this free tree anatomy poster.

Wild Earth Lab’s Tree Teaching Materials

If you enjoyed this post and the freebies, I know you will love the Tree Unit and my other units too!

Explore more units from Wild Earth Lab:

I know you will love using my environmental science materials in your classroom!


Are you interested in reading more posts like this? Subscribe or follow Wild Earth Lab using the links below!


Sharing options and discussion for this post:

Posted on 4 Comments

Desert Adaptations: 8 strategies plants and animals use to survive in the desert!

banner with cacti and the text "life with less water... desert adaptations!"
text that says share this post

Wild Earth Lab is supported by readers like you. This post includes links to my own products and affiliate products. If you purchase through links on my site, I may earn a small commission at no additional cost to you.

A desert is a place that is very dry. Deserts typically get only about 25 centimeters (10 inches) of precipitation or less each year. That’s not very much water! But life is still possible in these dry conditions, thanks to desert adaptations!

Desert plants and animals have adapted to survive in dry conditions over many, many generations. An adaptation is a trait or behavior that helps an organism survive in its environment. Adaptations evolve through a process called natural selection.

To understand natural selection, take the following example. Imagine that one individual plant of a plant species develops a random mutation that impacts the depth of its roots. The deeper-rooted version is better at getting water during droughts, so it more easily survives and passes on its genes. Repeat this over many generations, and you will see more and more of the deep-rooted version of the plant in the habitat. That’s natural selection at work!

Now, let’s take a look at 8 amazing strategies that plants and animals use to survive in the desert!

Before we dive in: If you’re an educator planning to teach desert adaptations, great activities and visuals are key to deepening understanding! I think you and your students will love my Desert Ecology Unit and my Cacti Unit (plus you’ll support my blog with your purchase! ❤️)

1. Store water

close up shot of an african desert turtle
Desert tortoise. Photo by Rutpratheep Nilpechr on Pexels.com

A desert tortoise survives dry spells by storing extra water within its bladder. This can sustain it through times without rainfall and during periods of inactivity.

2. Escape the heat

close up photo of prickly cactus plant
An owl in a cavity nest within a saguaro cactus. Photo by Nicole Ashley Rahayu Densmoor on Pexels.com

Animals escape the desert sun inside a den or cavity. For example, elf owls will hide inside cavity nests in cacti during the heat of the day. Jackrabbits and prairie dogs find shade inside dens underground when it is hot out.

3. Get water from food

feral pigeon on stone in nature
A dove. Photo by Ellie Burgin on Pexels.com

Kangaroo rats are known for getting all the water they need through their food. They do not need to drink liquid water because the juices in the insects and plants they eat will sustain them. Kangaroo rats are not the only desert animals using this strategy. Some birds such as white-winged doves get water through food too.

4. Rest when it is hot

photo of a cougar near a log
A mountain lion resting during the day. Photo by Nicky Pe on Pexels.com

Crepuscular and nocturnal animals rest during the daytime when it is hottest. These animals hunt and forage in the evenings and at night to reduce the amount of energy they spend keeping their bodies cool. Examples of nocturnal animals include owls, bats, and kangaroo rats. Examples of crepuscular animals include mountain lions, deer, and jackrabbits.

5. Reduce water loss through thick skin

close up shot of a scorpion
Scorpions have thick exoskeletons. Photo by Annalise Tingler on Pexels.com

Both animals and plants try to avoid water loss in the desert. Animals such as scorpions have thick exoskeletons to avoid losing water. Many desert plants have thick, waxy skin or bark for this same purpose.

6. Reach deeper water

American Ginseng root, Panax quinquefolius

Many desert trees and plants have deep taproots to reach down to deep groundwater sources. A great example of this is a mesquite tree. Trees like mesquites have such deep taproots that they try to tap into the water table. Plants like this are known as phreatophytes.

7. Lose your leaves

Ocotillo without leaves. Photo taken by the author, near Tuscon, AZ.

Big leaves are great for performing lots of photosynthesis, but big leaves also lose lots of water through transpiration. And in the desert, that’s no good! Desert plants have developed ways to live with fewer (or no) leaves. The ocotillo plant only briefly grows leaves when conditions are moist. Palo verde trees just have tiny leaves, but make up for this by also doing photosynthesis through their green bark. Most cacti have done away with leaves altogether and perform photosynthesis through their green skin instead.

8. Defend your water

Desert plants must live on very little water. And to make things even harder, desert animals want to eat plants for both nutrients and water. Desert plants like cacti defend themselves from hungry, thirsty animals with sharp spines.

Nature Journaling Prompts

Desert Adaptations

close up of woman writing in a journal outdoors

Ask your students to reflect on the following questions in their nature journals:

  1. Humans use a lot more water than animals. How can you live life using less water?
  2. Humans grow non-native plants in many places, for food, livestock feed, and landscaping. What problems might arise from growing non-desert plants in a desert?

New to nature journaling? There are many wonderful options for guided nature journals and hand-made notebooks on Etsy. Here are a few popular options to help get you started with nature journaling:

Teaching Desert Ecology & Adaptations!

If you enjoyed this post, I know you will love my Desert Ecology Unit! Plus, your purchase in my shop supports Wild Earth Lab to create more environmental science content!

Explore more units from Wild Earth Lab

If you enjoyed this post, I know you will love using my environmental science materials in your classroom!


Are you interested in reading more posts like this? Subscribe or follow Wild Earth Lab using the links below!


References and Further Reading

  1. Arizona-Sonora Desert Museum (n.d.). Sonoran Desert Fact Sheets. Available: https://www.desertmuseum.org/kids/oz/long-fact-sheets/
  2. National Park Service (n.d.). Animals. Organ Pipe Cactus National Monument Arizona. Available: https://www.nps.gov/orpi/learn/nature/animals.htm
  3. Nevada Dept. of Wildlife (n.d.). Desert Kangaroo Rat. Available: https://www.ndow.org/species/desert-kangaroo-rat/
  4. National Park Service (n.d.). Animals. Saguaro National Park. Available: https://www.nps.gov/sagu/learn/nature/animals.htm
  5. San Diego Zoo Wildlife Alliance (n.d.). Desert. Available: https://animals.sandiegozoo.org/habitats/desert
  6. Texas Parks and Wildlife (n.d.). Black-tailed Jackrabbit (Lepus californicus). Available: https://tpwd.texas.gov/huntwild/wild/species/rabbit/
  7. U.S. Fish and Wildlife Service (n.d.). Desert Tortoise. Available: https://www.fws.gov/species/desert-tortoise-gopherus-agassizii

Sharing options and discussion for this post:

Posted on 1 Comment

Deciduous vs Coniferous Trees: differences between, examples, and learning activity!

banner of a hand holding a pinecone with the text "let's learn about coniferous and deciduous trees"
text that says share this post

Trees are perennial plants with long, woody trunks. Trees of temperate latitudes are often grouped into two main categories: deciduous trees that lose and regrow their leaves each year, and coniferous trees that stay green year-round! Let’s take a closer look at deciduous vs coniferous trees…

Before we dive in: If you’re an educator planning to teach about trees in your classroom, great activities and visuals are key to deepening understanding! I think you and your students will love my complete Trees Unit (plus you’ll support this blog with your purchase! ❤️)

Deciduous Trees

View looking up at the rough bark of a tall deciduous tree

Here are a few properties of deciduous trees. A tree is a deciduous tree if it:

  • Has broad, flat leaves
  • Does photosynthesis during the warm growing season only
  • Leaves change color at the end of the growing season
  • Loses its leaves and regrows its leaves once a year

Examples of Deciduous Trees

  • Ash
  • Birch
  • Maple
  • Oak
  • Willow

Coniferous Trees

pine tree

Here are a few characteristics of coniferous trees. A tree is coniferous if it:

  • Has needles
  • Does photosynthesis year-round, but may slow down in winter
  • Needles stay green year-round (“evergreen”)
  • Needles stay on branches year-round
  • Has cones

Examples of Conifers

  • Cedar
  • Fir
  • Juniper
  • Pine
  • Spruce

Other Evergreens

It’s worth noting that conifers are not the only trees that stay green year-round. You will find many evergreen trees growing at tropical latitudes around the equator. This is because close to the equator, there is little to no temperature difference between summer and winter. Consequently, you will find many unique types of trees growing in the tropics that do not need to shed leaves in wintertime. One example is a palm tree.

Learning Activity Idea:

Close up of tattered, damp pinecone help up in front of a forested background.

Play “Deciduous or Coniferous?” Collect samples of parts from several different deciduous and coniferous trees (leaves, needles, seedpods, flowers, fruits, cones, etc.). Grab two jars and label one “deciduous” and one “coniferous”. Ask your child to sort the parts into the jars.

Support Wild Earth Lab with your purchase?

If you enjoyed this post, I think you will love my Trees Unit! It’s a complete set of printable learning materials for teaching kids all about trees – featuring my illustrations! You’ll learn about deciduous vs coniferous, tree anatomy, life cycles, tree ring science, and more!

Read More About Trees:

More Learning Resources From Wild Earth Lab:


Are you interested in reading more posts like this? Subscribe or follow Wild Earth Lab using the links below!


Sharing options and discussion for this post:

Posted on 2 Comments

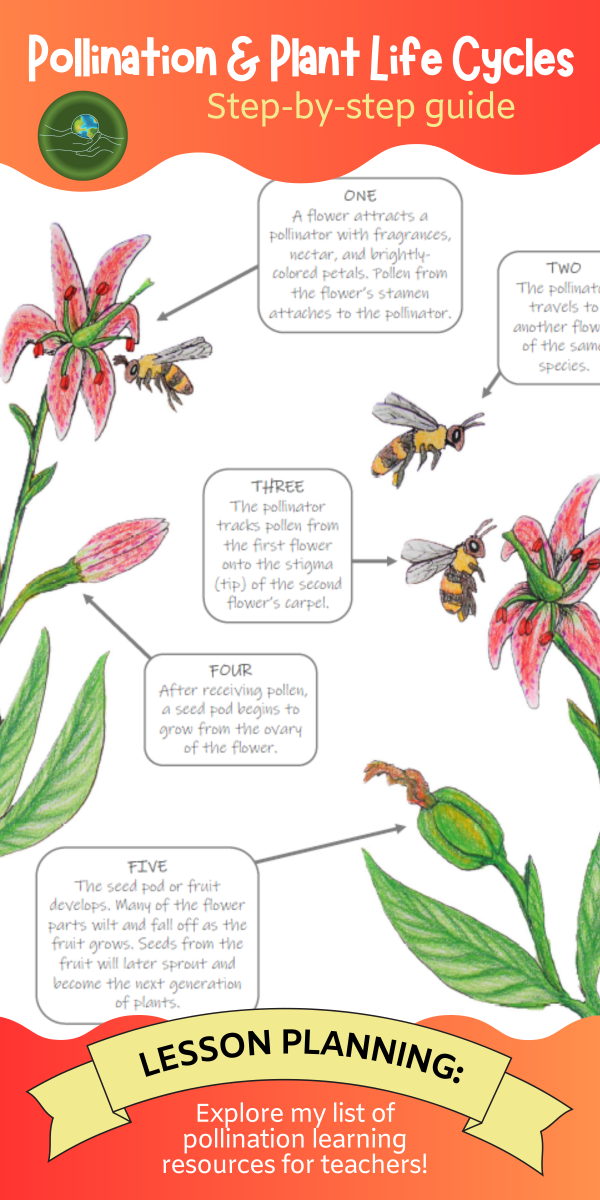
How does pollination work? A step-by-step guide to pollination and the plant life cycle

banner advertising a blog post about pollination and plant life cycles with a diagram of bees pollinating flowers
text that says share this post

In this post, we will take a closer look at the steps of animal pollination and the plant life cycle. You might already know that pollination is the transfer of pollen from the stamen to the carpel of a flowering plant (psst – brush up on your plant anatomy by reading my flower anatomy post or checking out my Flowers Unit!). Once pollinated, the plant forms a fruit. Fruits contain seeds, which will grow into the next generation of plants.

A variety of animals can be pollinators, such as bees, butterflies, and many others that may surprise you. The relationship between a pollinator and a plant is key to the survival of both species. This relationship is so important to both the plant and the pollinator that it influences how they evolve. In other words, plants and pollinators coevolved. Plant species developed traits to help them attract pollinators, such as brightly colored petals, sweet nectars, and strong scents. As pollinator species grew reliant on nectar as a food source, they developed body parts and habits for collecting flower nectar more efficiently.

Before we dive in: If you’re an educator planning to teach pollination in your classroom, great activities are key to deepening understanding! I think you and your students will love my Pollination Unit, which is also found within my Botany Collection (plus you’ll support my blog with your purchase! ❤️)

Recommended products

Now, let’s take a look at the steps of pollination and the plant life cycle!

Step 1: Attracting pollinators

A flower attracts a pollinator with fragrances, nectar, and brightly-colored petals. Pollen from the flower’s stamen attaches to the pollinator.

A pollinator visiting a flower.

Step 2: Pollen transfer

The pollinator travels to another flower of the same species.

A pollinator traveling between flowers of the same species.

Step 3: Pollination

The pollinator tracks pollen from the first flower onto the stigma (tip) of the second flower’s carpel. Pollen travels via the style to the flower’s ovary.

The pollinator transfers the pollen to a second flower.

Step 4: Fruit growth

 After receiving pollen, a fruit or seed pod begins to grow from the ovary of the flower. Many of the flower parts wilt and fall off as the fruit/seed pod grows.

A fruit starts to form from the flower’s ovary.

Step 5: Seed dispersal

The seed pod or fruit develops. Once the fruit is ripe, the plant must disperse its seeds. At this point, some plants rely on another animal (separate from the pollinator) to help with seed dispersal. After the animal eats the fruit, it travels away from the parent plant and deposits the seeds in its scat. However, many plants do not rely on animals for seed dispersal. Alternative methods for seed dispersal utilize forces such as wind, water, and gravity.

Almost ready for seed dispersal.

Step 6: Germination and growth

After seed dispersal, seeds will germinate (or sprout) into tiny plants. The luckiest of the tiny plants will grow and reach maturity. Once mature, the plants make flowers of their own to attract pollinators, and the cycle begins again!

Germination process.

Teaching Pollination and Plant Life Cycles

Are you teaching pollination in your classroom? Here are some additional activity ideas and resources!

1. Try my free pollinator guessing game in your classroom:

Directions and cards for a pollinator guessing game are available on the free resources page of my website. My email subscribers gain access to the free resources page (plus receive my newsletters with new activity ideas, project guides, and science teaching inspiration!).

2. Read my post about weird and wild pollinators!

3. Check out my list of pollinator activity ideas for classrooms!

4. Try the flower anatomy activity in this blog post:

5. Study pollination with Wild Earth Lab!

Your students will love my Pollination Unit and other science units! I created this set of printable pollination learning materials and it is packed with activities and information, as well as my pollination artwork!

Recommended products

Here are some more units that I think you’ll love:


Are you interested in reading more posts about environmental science topics? Subscribe or follow Wild Earth Lab using the links below!


Sharing options and discussion for this post:

Posted on 1 Comment

What are the different types of pollination? How animal, water, and wind pollination methods work

Poster that says "study pollination methods" and "wind, water, and animal pollinators" and "with tons of pollination activity ideas to try in your classroom!"

You might already know that pollination is the transfer of pollen from the stamen (male flower part) to the carpel (female flower part) of a flowering plant. Once pollinated (via any of the pollination methods), the plant forms a fruit. Fruits contain seeds, which will grow into the next generation of plants. Read more about flower anatomy and download a free flower anatomy diagram here.

Pollination Methods Diagram featuring my colored pencil art!

Different plants are pollinated in different ways. Some plants self-pollinate, meaning a flower is pollenated with pollen from the same plant or even the same flower. Alternatively, many plants cross-pollinate, meaning they receive pollen from a different plant of the same species. Since plants cannot move, they usually need some help to transfer their pollen to other flowers or plants. For instance, many plants need the help of animals called pollinators. However, some plants are pollinated by the wind carrying their pollen to other flowers. Additionally, some aquatic (water-living) species of plants rely on water for pollination: they release pollen into the water so it can float to other plants. Below, I will explain more about each of the three different pollination methods: animal pollinators, wind, and water.

Download my printable learning materials to learn all about animal pollinators!

Pollination Method 1: Animals

Animal pollination is when a plant relies on an animal pollinator to carry its pollen between flowers. Examples of animal pollinators include bees, butterflies, and beetles. However, many other types of insects and animals can be pollinators in some cases including mammals, reptiles, and birds!

Flowers pollenated by animals have an incredibly wide variety of colors, shapes, scents, and sizes depending on the pollinator that they need to attract. Animal pollination is the most common pollination method. It is estimated that around 80% of plants are pollinated by animal pollinators, rather than by abiotic forces like wind and water.

Pollination Method 2: Wind

Wind pollination is when a plant creates large amounts of light-weight pollen which is carried between flowers by the wind. You have probably seen wind-borne pollen – perhaps in spring or summer you have gone outside to find the surfaces of patio furniture and cars covered in a fine yellow powder. Maybe you have even started sneezing or itching your eyes because your body reacts to the pollen in the air. Scientists estimate that somewhat less than 20% of plants are pollinated by the wind. For example, some trees, grasses, and corn use the wind pollination method.

Pollination Method 3: Water

Water pollination occurs when plant releases its pollen into water or onto the surface of water. Pollen floats or flows through or across the water between flowers. Some aquatic plants use this pollination method, but overall, very few plants are pollinated via water. Scientists estimate that less than 1% of all plants are pollinated via water.

Teach Pollination in Your Classroom:

1. Explore pollination & plants with Wild Earth Lab!

2. Further Reading:

3. Free Pollination Learning Resources:

Unusual pollinators game – directions and cards. Students ask yes/no questions to identify the pollinators taped to their backs.


Are you interested in reading more posts like this? Subscribe or follow Wild Earth Lab using the links below!


References and Further Reading

  1. Houston Zoo (2018). Unusual Pollinators and the Plants They Love. Available: https://www.houstonzoo.org/blog/unusual-pollinators-plants-love/
  2. Maryland Grows (2020). Gone with the wind: a look at wind pollination. University of Maryland Extension. Available: https://marylandgrows.umd.edu/2020/04/13/gone-with-the-wind-a-look-at-wind-pollination/
  3. Mize, A. (2018). Lizards, mice, bats, and other vertebrates are important pollinators too. The Ecological Society of America. Available: https://www.esa.org/blog/2018/04/04/vertebrate-polinator-metaanalysis/
  4. USDA Forest Service (n.d.). Pollination Strategies. Available: https://www.fs.usda.gov/wildflowers/pollinators/Plant_Strategies/index.shtml
  5. USDA Forest Service (n.d.). Wind and Water Pollination. Available: https://www.fs.usda.gov/wildflowers/pollinators/wind.shtml

Sharing options and discussion for this post:

Posted on 8 Comments

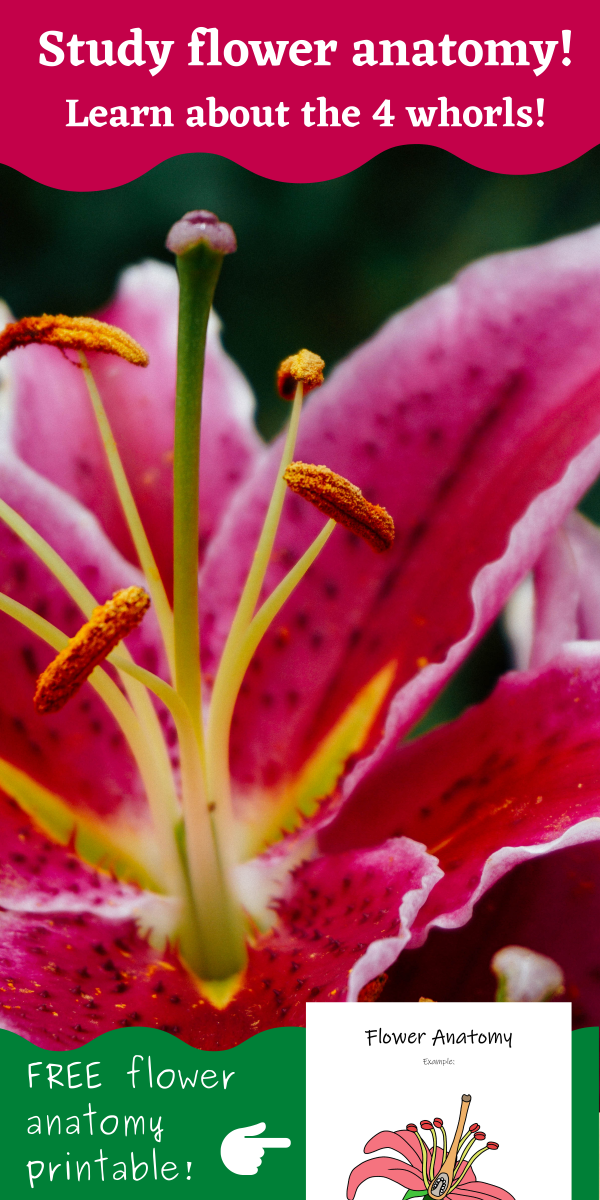
Flower Anatomy: the four whorls of flowers and their functions, plus diagram and activity!

Close up of a lily flower
text that says share this post

Flower anatomy is an important concept in botany! Whether you and your students are studying fruits, pollination, or plant life cycles, understanding the basics of flower anatomy is important background knowledge. Specifically, this post covers the basic parts of flower anatomy: the 4 “whorls” of complete flowers (sepals, petals, carpel, and stamen) as well as other basic parts supporting the flower’s structure.

A note for teachers: Are you teaching flower anatomy and life cycles? I think you will love my complete Flowers Unit. It includes all the hands-on activities, worksheets, and handouts that you’ll need to teach flowers. The Flowers Unit is also found within my Botany Bundle. Every unit I create is designed to bring the real experience of being a scientist to the classroom and features my original watercolor artwork in diagrams and other visuals–plus you’ll support this blog with your purchase! 💚

Recommended products

An overview of flower anatomy…

Before we dive into the four whorls of flower anatomy, take a look at this flower anatomy diagram, which shows the main parts of a flower.

A flower anatomy diagram of a complete flower (lily) with all four floral whorls: sepals, petals, stamens, and carpel.

Sepals

The sepals are small modified leaves located around the base of a flower. Sepals support the flower and protect the other flower parts while the flower is closed before and after pollination. You can find sepals still attached to some fruits.

stem of a pink flower in macro photography
The green sepals of a sunflower. Photo by Hilary Halliwell on Pexels.com

Petals

The petals are modified leaves that help attract pollinators to the flower. Petals are often large and brightly colored and may have patterns of colors in the ultraviolet spectrum which can be seen by insects even though it is invisible to the human eye. Interestingly, petals’ bright colors and patterns have evolved to send a signal to pollinators: “This way to the food!”

close photography of red and pink rose
The brightly colored petals of a rose. Photo by Pixabay on Pexels.com

Stamen

The stamens are the male part of a flower that produces pollen. The job of the stamen is to ensure the pollen is gently attached to pollinators‘ bodies as they visit the flower to drink nectar. Each stamen has two main parts:

  • Anther – the top portion of the stamen, which contains the pollen.
  • Filament – a short stalk supporting the anther.
purple pollen flowers
A flower with six purple and pink stamens. Photo by Anthony on Pexels.com

Carpel

The carpel is the female part of a flower that receives the pollen (also known as the pistil). Primarily, the carpel awaits pollen to be tracked onto it by a pollinator as it travels from flower to flower. The carpel has three main parts:

  • Stigma – the tip of the carpel that receives the pollen.
  • Style – a tube connecting the stigma to the ovary. Genetic material travels from the stigma, down the style, and to the ovary.
  • Ovary – the part of the carpel that develops into a fruit after pollination. The ovary contains ovules that develop into seeds.
blooming lilium with wavy petals and pleasant scent
A flower’s carpel. The orange stigma sits atop the long green style. Photo by Skyler Ewing on Pexels.com

Pedicel

A pedicel is a short stalk holding a single flower. A stalk holding more than one flower is called a peduncle. Both pedicels and peduncles serve the function of supporting flowers and transporting water and nutrients to the flowers.

Receptacle

The receptacle is the thickened top portion of the pedicel that connects to the flower’s base. This part supports the flower and holds the floral whorls. The receptacle becomes part of the fruit in certain fruits such as raspberries and strawberries.

Complete vs Incomplete Flowers and Perfect vs Imperfect Flowers

Flowers are classified as complete or incomplete and perfect or imperfect. Perfect flowers have both male and female parts (stamen and carpel). Imperfect flowers have either male or female parts but not both.

Any flower that has all four whorls (sepals, petals, stamens, and carpel) is called a complete flower. Complete flowers will also always be perfect flowers. However, perfect flowers are not always complete. A flower that has three or fewer whorls is called an incomplete flower. A flower can be incomplete and still be perfect (for example, a flower with petals, stamens, carpel, but no sepals).

Flower Anatomy Activities

1. Flower anatomy coloring activity:

The Free Resources page of my website includes this flower anatomy coloring activity. My email subscribers can access and download my full collection of free resources!

2. Flower Dissection Activity

Read my blog post with directions for a flower dissection classroom activity!

3. Flowers Unit

If you’re an educator planning to teach plant or flower anatomy, great activities and visuals are key to deepening understanding! I think you and your students will love my Flower Anatomy Diagrams, which you can also find within my complete Flowers Unit or the even more comprehensive Botany Collection (Plus you’ll support my blog with your purchase! ❤️)

Recommended products

Find your next topic with Wild Earth Lab…

Are you interested in reading more posts with educational activity ideas? Subscribe or follow Wild Earth Lab using the links below!


Sharing options and discussion for this post:

Posted on 3 Comments

Trigonometry in Action: Tree Height Measurement Step-by-Step Guide

tall tree

I don’t know about you, but I think math is more interesting when we can apply it to real-world situations! If you’re teaching trigonometry, right triangles, or angles in your classroom or homeschool, you and your students will love this tree-height applied math activity! In this simple learning activity, students will learn how to make a homemade inclinometer – a device for measuring the angle of inclination. Then, they will take measurements and calculate the height of a tree.

A note for educators: This tree height activity comes from my Math in the Forest Unit. If you’re an educator planning to try this activity, I recommend checking out the unit. It includes the necessary printable directions, diagrams, and worksheets for this activity—perfect for teachers and homeschoolers looking to bring applied math fun to the classroom! 💚

The challenges of measuring tree height

Unless you are measuring a short seedling, you probably won’t be able to measure tree height directly because you can’t reach the top. So how do you measure something so tall? Answer: Use an inclinometer and trigonometry!

View looking up at the rough bark of a tall deciduous tree
How do you measure the height of something taller than you? Answer: use trigonometry!

An inclinometer is a device for measuring an angle of inclination above the horizontal. We can use an inclinometer to help us find the height of tall objects, such as trees! When you’re looking up at the top of a tree, you can use the angle of inclination and your distance from the tree to calculate the tree height. This is possible thanks to trigonometry – a branch of mathematics dealing with angles and the sides of triangles.

So how do we do this? In this blog post, I’ll walk you through all the steps to calculate tree height with your students. The first step is to make your own inclinometer out of common household objects…

Part 1: Make an inclinometer

Follow these steps to make your own inclinometer from common household items. You’ll use the inclinometer to find an angle of inclination, which you’ll use to calculate tree height.

Materials

All the materials you need to make a homemade inclinometer to measure tree height!

Step-by-Step Directions

  1. Tape the straw across the center of the protractor at 90̊.
  2. Use the scissors to shorten the straw (as needed).
  3. Cut a short piece of thread or dental floss.
  4. Tie the small weight to the end of the floss.
  5. Tie the other end of the floss to the straw.
  6. Check that the thread hangs over the 0̊ mark when holding the inclinometer with the straw parallel to the ground. Adjust the position of the thread on the straw as needed.
1. Tape the straw across the center of the protractor at 90̊.
2. Use the scissors to shorten the straw (as needed).
3. Cut a short piece of thread or dental floss.
4. Tie the small weight to the end of the floss.
5. Tie the other end of the floss to the straw.
6. Check that the thread hangs over the 0̊ mark when holding the inclinometer with the straw parallel to the ground. Adjust the position of the thread on the straw as needed.

Part 2: Using your homemade inclinometer

Use your homemade inclinometer to measure the angle of inclination when looking up at the top of the tree. The homemade inclinometer requires two people to operate – one person to look through the inclinometer and one person to read the angle off of the side.

Materials

  • Homemade inclinometer
  • Tape measure
  • A friend

Directions

  1. Stand a short distance away from the tree, far enough away that you can see the top of the tree. This works best if you are on flat ground – not uphill or downhill from the tree. Measure your distance from the tree.
  2. Look through the straw with the curved edge of the protractor facing your eyeball. Do not touch the straw to your eyeball.
  3. As you look through the straw, tip the inclinometer upwards until you can see the top of the tree through the straw.
  4. Hold still and have a friend look at the side of the inclinometer. Have them read the angle where the thread crosses.
  5. Measure the height to your eye level.
Measure your distance from the tree
Look through the straw with the curved edge of the protractor facing your eyeball. Do not touch the straw to your eyeball.
As you look through the straw, tip the inclinometer upwards until you can see the top of the tree through the straw. Have a friend read the angle on the side of the inclinometer where the thread crosses.

Part 3: Calculate tree height

You can use trigonometry to calculate the tree height from the measurements you took with the tape measure and inclinometer. The imaginary horizontal line at eye level, the imaginary line from your eyes to the top of the tree, and the tree itself create a right triangle (see figure below).

There is a relationship between the angles in a right triangle and the lengths of its sides. If you know two angles and the length of one side, you can calculate the length of the other sides of the triangle. Look at the diagram and then check out the example calculation below.

Calculate tree height! (My email subscribers can download this printable diagram on the free resources page of my website!)

Example Calculation

Question: I want to know the height of a tree in my backyard. When I was standing 15 feet away from the tree and looking up at its top, I used my inclinometer to find an angle of 20̊. The height to my eye level is 5.2 feet.

distance x TAN(angle) = tree height above eye level

15 feet * TAN (20̊) = 5.5 feet

tree height above eye level + eye level = tree height

5.5 feet + 5.2 feet = 10.7 feet

Answer: The tree is about 10.7 feet tall!

Printable Directions & Worksheets

Trying this activity in your classroom? You can find worksheets and printable directions for measuring tree height in my Math in the Forest Unit:

worksheets and homemade inclinometer

Find your next unit…


Are you interested in more hands-on science activities? Subscribe or follow Wild Earth Lab using the links below!

References and Further Reading

  1. South Carolina Government Website (n.d.). Get Acquainted with Forestry Tools. Available: https://www.state.sc.us/forest/edutools.htm
  2. University of British Colombia (n.d.). Height Measurements. Available: https://bigtrees.forestry.ubc.ca/measuring-trees/height-measurements/
  3. Massachusetts Government Website (n.d.). How to measure trees. Available: https://www.mass.gov/how-to/how-to-measure-trees

Sharing options and discussion for this post: