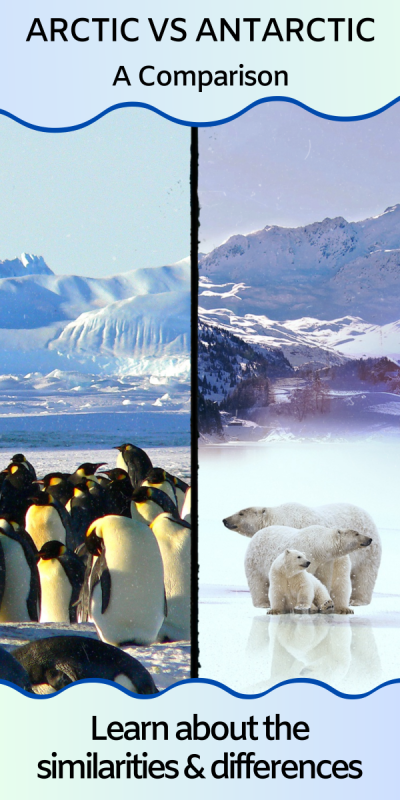
The Arctic and Antarctic sit at opposite ends of the Earth. While these icy extremes share surprising similarities, there are some big differences between them too. From their unique geographies to the wildlife and weather, these polar regions offer endless opportunities for comparison. In this post, we’ll explore the fascinating ways the Arctic and Antarctic are alike—and how they differ.
Before we dive in: If you’re an educator planning to teach about the Arctic or Antarctica in your classroom, great learning resources are key to deepening understanding! I think you and your students will love my Arctic and Antarctica Units (plus you’ll support my blog with your purchase! ❤️)
Arctic vs Antarctic: key differences & similarities
The Arctic and Antarctic are polar regions, located at opposite ends of our planet. At the center of the Antarctic, you will find the South Pole. The North Pole is in the center of the Arctic. Though they are far apart, the Arctic and Antarctic are similar in many ways. For example, both have a period of round-the-clock daylight in mid-summer and a period of total darkness in mid-winter. Furthermore, both the Arctic and Antarctic experience some of the coldest temperatures on our planet.
Geography
Geographically, there are some big differences between the Arctic and Antarctic. The Antarctic Circle is centered over one big continent: Antarctica. On the other hand, the Arctic Circle is filled by the Arctic Ocean, islands, and coastlines. Both the Arctic and Antarctic have lots of ice. Antarctica is covered in a gigantic glacial ice sheet and surrounded by seas covered in ice shelves and pack ice. The Arctic is filled with lots of floating sea ice.
Animals & Plants
The Arctic and Antarctic are home to some of the same animals. Both have whales, seals, and seabirds. But the similarities end there. For example, you won’t find penguins in the Arctic – they live in Antarctica only. This is good for the penguins because there are hungry polar bears in the Arctic. Polar bears are not the only animals found in the Arctic but not in the Antarctic. Walrus, puffins, reindeer, wolves, and foxes are all found in the far north, but not in Antarctica.
Compared to other places, both the Arctic and Antarctic have very few plants. So what do the animals eat? Tiny plants in the ocean called phytoplankton are an important food source in the Arctic and Antarctic. The phytoplankton are food for little ocean invertebrates called zooplankton (e.g., krill). The krill feed many larger animals – from fish and seabirds to baleen whales!
Weather and More
Both the Arctic and Antarctic are pretty chilly year-round. However, they get their coldest weather at different times of year. In July, when it is summer in the Arctic, it is winter in the Antarctic. Then in January, it is winter in the Arctic but summer in the Antarctic.
Another cool thing about the Arctic and Antarctic is that they both have dancing polar lights in the sky at night. These lights are called the Aurora Borealis in the north and Aurora Australis in the south. These incredible, natural light shows are caused when tiny particles from the sun bump into the Earth’s magnetic field.
Teaching Polar Regions in Your Classroom
There’s no need to scramble to put together the perfect lesson for the polar regions – I’ve already created it for you! This set includes all the printable materials you need for studying this subject.
If you enjoyed reading about the Arctic vs the Antarctic in this post, I know you will also love my printable science and nature units in your classroom!
Wild Earth Lab is supported by readers like you. This post includes links to my own products and affiliate products. If you purchase through links on my site, I may earn a small commission at no additional cost to you.
Although mushrooms grow out of the ground like plants, they belong to a completely different kingdom—the fungi kingdom. The life cycle of fungi, like mushrooms, is unique and distinct from the life cycles of plants and animals. Understanding the stages of a mushroom life cycle provides fascinating insights into how fungi grow, reproduce, and contribute to their ecosystems. In this post, we’ll explore the life cycle of a mushroom step-by-step. For homeschool parents and biology teachers looking for engaging ways to introduce the fungi kingdom, be sure to check out my printable mushroom life cycle materials featuring my artwork!
Before diving into the mushroom life cycle, be sure to review the parts of a mushroom. It helps to be familiar with mushroom anatomy terms including mycelium, hyphae, and spores.
1. Spores Germinate and Hyphae Form
The life cycle of a mushroom begins with spores. A spore is a single cell, but not just any cell – it’s a special cell for reproduction. When spores land on the soil or another surface, they germinate, which means start growing. The spores develop into hyphae: long branching filaments made of many cells.
2. Hyphae Meet
In animals, there are two mating types, known as male and female. Fungi also have different mating types (two or more depending on the species). When two hyphae of different but compatible mating types come into contact, they fuse together. This fusion allows new, unique hyphae to grow.
3. Mycelium Expands and Primordia Form
As the hyphae grow and expand, they form a mycelium – the underground part of a fungus. As the mycelium spreads, clusters of hyphae called hyphal knots start to develop. These hyphal knots are a sign that a mushroom may soon form. The knots grow into small structures called primordia, which are like baby mushrooms.
4. Button Forms
Many hyphal knots and primordia form in the mycelium, but only a few grow into mature mushrooms. A mushroom is the fruiting body of a fungus – its reproductive structure that makes spores. When a mushroom is young, it is called a button. Buttons have protective veils covering their gills.
Looking for a hands-on mushroom activity to try with your class? You can grow your own edible mushrooms using a kit, and watch buttons form from the mycelium! Try this grow-your-own oyster mushroom kit from ForestOriginsShop on Etsy.
5. Spores Release
Once the mushroom is fully developed, it opens, revealing its gills. The gills release spores. A single mushroom can produce billions of spores. Spores are very light, allowing them to travel easily through the air. If they land in a good spot, some will germinate and start the life cycle all over again.
Teach Mushroom Life Cycles with Wild Earth Lab!
Do you needclassroom materials for teaching fungi life cycles? I’ve created some for you! This set includes all the printable materials you need for studying how mushrooms form! Your purchase will support this blog.
Or, get these life cycle materials PLUS more mushroom activities in my complete Mushroom Unit:
Various Authors (n.d.). Introductory Biology: Evolutionary and Ecological Perspectives. Chapter XVI. Fungi. Available via University of Minnesota PressBooks: https://pressbooks.umn.edu/introbio/
Are you searching for a fun and unique ecology topic to teach in your science classroom? Look no further! In this post, I’ve compiled seven fascinating ecology topics that will spark curiosity about the natural world in your students. Additionally, this post compiles resources and science lessons related to bioindicators, symbiotic relationships, ecological succession, and more – to help you plan and find materials for teaching your next ecology lesson. Whether you’re a science teacher or a homeschool parent, these engaging subjects will inspire your students and make your lessons unforgettable.
A note for educators: The activities from this blog post come from my complete Ecology Units. These units are packed with all the materials you need for teaching ecology – including hands-on activities and visual aids designed to deepen understanding. These units make teaching ecology fun and easy – and every purchase helps support this blog!
A symbiotic relationship is a long-term interaction between two species. Symbiotic relationships typically benefit at least one and sometimes both of the two species involved. Symbiosis is a great topic to cover when teaching students about ecology. There are so many examples: pollination, lichens, seed dispersal, parasites, and more!
Pollination is a classic example of a symbiotic relationship between a plant and an animal – try out some pollination activity ideas and science lessons from my blog, or purchase my complete Pollination Unit
This is a fun, interdisciplinary topic that relates to both ecology and engineering! Biomimicry, also called biomimetics, is when people draw inspiration from nature to design items and solve problems. Plant, fungi, and animal species evolved features and behaviors over vast periods of time to overcome challenges they face in their habitats. Engineers may mimic these features and behaviors from nature to improve their own designs.
My origami frog mini study touches on the topic of biomimicry
3. Camouflage
Camouflage is an adaptation that helps an animal disguise its appearance. Studying camouflage goes hand-in-hand with learning about animal adaptations. There are many types of camouflage. Camouflage may help an animal blend into its background or look like something inedible or toxic.
Read my blog post about the cool adaptations of desert animals and plants
This bird beaks lab activity is a great way to learn about adaptations and natural selection – find the directions for this activity in my blog.
5. Bioindicators & Aquatic Macroinvertebrates
Macroinvertebrates make an awesome ecology lesson because you can find them in almost any stream or pond near you! Just flip over a few rocks in shallow water, and you’re sure to start finding aquatic macroinvertebrates! This can make a great field trip activity!
Furthermore, macroinvertebrates are a type of bioindicator used by scientists. A bioindicator is a type of organism whose wellbeing relates closely to ecological conditions and is studied by scientists. Certain macroinvertebrates are very sensitive to poor water quality and other human impacts. They are a great way to teach your students about healthy aquatic ecosystems.
Resources for teaching bioindicators & aquatic macroinvertebrates:
Looking through a lake sample for aquatic insects.
6. Disturbance and Succession
Disturbance and succession are good ecology topics to tie in with studies of wildfires, volcanic eruptions, and other natural disasters. These are natural events in ecosystems. A disturbance is some sort of event that causes a large and rapid change in an ecosystem – like a wildfire or a volcanic eruption. Succession is what follows – the natural and gradual change in an ecosystem over time.
Resources for teaching disturbance and succession:
Studying food webs is a fantastic way to learn about the flow of energy between organisms. A food web is a complex network of feeding relationships between organisms in an ecosystem. Energy flows from the organism being eaten to the organism doing the eating.
When you study food webs, you can also teach related topics such as predator-prey relationships, trophic cascades, and the important role of decomposers in ecosystems. Best of all, kids can be creative and learn about wildlife by mapping their own example food webs.
Try this fun food-webs activity, detailed in my blog post
Study Ecology with Wild Earth Lab
I’ve saved you the trouble of putting together materials for an awesome ecology unit. Choose from my large collection of science lessons, which all include activities, worksheets, handouts, posters, and more:
Catching aquatic macroinvertebrates is an exciting, hands-on activity that makes for an unforgettable ecology field trip. This is an outdoor activity and is a great way to examine the diverse organisms of freshwater ecosystems with your homeschool or science class. This activity will enhance your classroom studies of biodiversity, bioindicators, entomology, or aquatic food webs. In this post, I’ll guide you through three different techniques to successfully catch and observe aquatic macroinvertebrates. Let’s begin!
Before we dive in: If you’re an educator planning to teach macroinvertebrates, great visuals and activities are key to deepening understanding! I think you and your students will love my complete Macroinvertebrates Unit (plus you’ll support my blog with your purchase! ❤️)
Aquatic macroinvertebrates from left to right: mayfly nymph, stonefly nymph, and larval caddisfly.
An aquatic macroinvertebrate is an animal with no backbone that lives in or on water and is big enough that you can see it with your naked eye. This includes animals like aquatic insects, other aquatic arthropods, aquatic mollusks, aquatic worms, and more.
Macroinvertebrates play an important role in aquatic ecosystems. Many macroinvertebrates help recycle nutrients back into the food web by consuming detritus (decaying matter) that settles to the bottom of the water. They may also eat algae or even other macroinvertebrates. These tiny creatures are an important food source for fish, birds, and other animals that live in and around ponds, streams, and wetlands.
Furthermore, aquatic macroinvertebrates are used by scientists as bioindicators – basically, they help tell us if a stream, pond, or wetland is healthy. You can read more about macroinvertebrates and their use as bioindicators in this blog post.
Catching Aquatic Macroinvertebrates Activity
Materials
Each group will need the following materials.
Fine-mesh net such as a pool net for collecting aquatic macroinvertebrates
Tweezers
Large, deep-sided pans (e.g., foil roast pans, pie tins)
You can save time and support my blog when you purchase my aquatic macroinvertebrates unit – complete with all the worksheets and handouts for this activity!
Set-Up & Directions
Safety Note: Only attempt activities in extremely shallow, easily wadable streams and water bodies. Do not enter deep or swiftly moving water. Adult supervision is required at all times while in and around water.
Assign groups of 2-4 students.
Introduce and demonstrate the three methods for collecting aquatic macroinvertebrates (details below).
Pass out the materials.
Allow students to try out the three methods for collecting aquatic macroinvertebrates (details below).
Aquatic macroinvertebrates like to be in water and cannot survive for long out of water. While examining your aquatic macroinvertebrate catches, be sure to always keep them in a pan or jar of water.
At the end of the activity, instruct students to gently pour the aquatic macroinvertebrates back into the pond or stream.
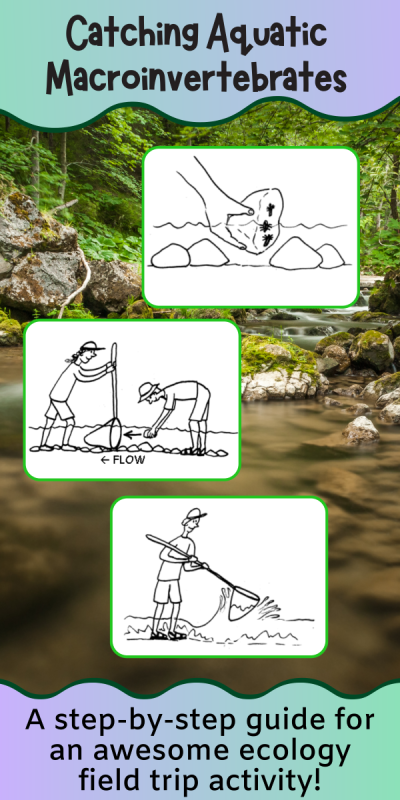
Method 1: Flipping over rocks
Works best in: shallow flowing or standing water
In shallow water such as near the edge of a pond or stream, flip over submerged rocks and logs. Benthic (bottom-dwelling) macroinvertebrates such as insect larvae are often clinging to the underside of rocks or logs. Use tweezers or fingers to gently remove the macroinvertebrates from the rock/log and place them in a pan filled with water.
Method 2: Net in flowing water
Works best in: shallow flowing water only
Have one person hold a net touching the bottom of a shallow stream, facing upstream. This should allow water to flow through the net. A second person will use their hands to gently move and scrub the rocks and sediments directly upstream of the net. As you scrub, macroinvertebrates will let go of the rocks and the flowing water will sweep them directly into the net. Empty the net’s contents into a pan filled with water.
Method 3: Net in standing water
Works best in: shallow standing water
You may be familiar with this technique as pond dipping. Use a net to scoop up sediments and plant matter from the bottom of a pond and empty it into a pan of water. Use tweezers to pick through the sample to find the aquatic macroinvertebrates that were hiding in the sediments and plant matter. You can place the macroinvertebrates you pick out into a separate small jar filled with water.
Identifying Aquatic Macroinvertebrates
There are many types of aquatic macroinvertebrates. Once you catch some macroinvertebrates, you will probably want to sort them into a few basic categories to begin with.
Aquatic macroinvertebrates include:
Aquatic insects:
Larvae/nymphs (e.g., EPT, dragonflies, dipterans)
Insects that are aquatic for their whole life cycle (e.g., water scorpions, water beetles)
Crayfish
Aquatic snails
Aquatic worms
Bivalves
Water mites
What do these ten animals have in common? They are all aquatic macroinvertebrates! 1. stonefly, 2. caddisfly, 3. mayfly, 4. aquatic beetle, 5. water strider, 6. freshwater snail, 7. freshwater mussel, 8. aquatic worm, 9. water mite, 10. crayfish.
Resources for Macroinvertebrate ID:
You have options when it comes to identifying macroinvertebrates. For beginners and younger learners, you may wish to sort macroinvertebrates into just a few basic categories (e.g., insects, worms, bivalves, etc.). Middle and high school classes often identify aquatic insects by order (e.g., mayflies, stoneflies, caddisflies, dipterans, etc.).
University-level classes and researchers sort macroinvertebrates down to the family, genus, or even species level. This level of ID typically requires a dissection microscope and a dichotomous key.
There are many resources for identifying aquatic macroinvertebrates and aquatic insects. Here are a few:
Troutnut is a fly fishing website with some wonderful photos of aquatic insects. It’s a great resource if you’re already pretty familiar with aquatic insects and ID at the genus/species level
This webpage from the University of New Hampshire has many aquatic insect photos and a stream key for advanced ID (genus/species level)
My Macroinvertebrates Unit has beginner-friendly materials for studying aquatic macroinvertebrates and identifying aquatic insects at the order level
My macroinvertebrates flashcards (these are found in the unit, but you can also purchase them separately here)
My three-part cards feature my drawings and are perfect for beginner-level aquatic macroinvertebrate ID!
Expanding on this Activity
Once you’ve learned how to catch aquatic macroinvertebrates, there are many ways that you can expand on this activity. Here are just a few ideas:
Compare two locations: compare the macroinvertebrates captured in flowing and standing water. Are they the same or different?
Life stages: bring a butterfly net and also capture flying insects in the area. Many aquatic insects like mayflies, stoneflies, caddisflies, dragonflies, and more are only aquatic until they reach maturity. Can you capture the flying adult forms of any aquatic macroinvertebrates around your pond or stream?
Sorting & counting: in ecology, “richness” refers to the number of different taxa (e.g., species, orders) found in a community. This is an important measure of biodiversity and one of many metrics that ecologists use to assess the health of an ecosystem. Introduce this concept to your students by having them create a list of the different types aquatic macroinvertebrates that they find during the field trip activity.
Teach Macroinvertebrates with Wild Earth Lab
Planning to teach this activity? Save time and support my blog when you purchase my Macroinvertebrates Unit, referenced throughout this post.
The unit includes everything you need to complete this activity: student handouts, worksheets, and readings, plus tons of other materials for learning all about macroinvertebrates!
Are you searching for an engaging and educational ecology activity to try with your students? Building your own food webs is a fantastic way to study the flow of energy between organisms – all while allowing kids to be creative! Best of all, this is an activity that you can complete outside, making it perfect for homeschool parents and teachers who enjoy having class outdoors! Get ready to inspire your students with this unique and interactive ecology project!
A special note for educators: are you planning to teach this food webs activity? If so, I’ve already created all the worksheets, printable materials, handouts, and directions that you will need. Find these materials in my complete Food Webs Unit – and you’ll support this blog with your purchase! 💚
A food web is a complex network of feeding relationships between organisms in an ecosystem. Energy flows from the organism being eaten to the organism doing the eating. We represent food webs using diagrams with arrows between the organisms. Food web diagrams map the many paths for the movement of energy between organisms.
I wrote a separate blog post in which you and your students can read more about food webs and food chains. It includes lots of diagrams and examples!
What types of organisms make a food web?
All the different lifeforms coexisting in an ecosystem form a community. The community is made of many individual, diverse lifeforms – like plants, animals, and fungi – called organisms.
When you build your food web model, it will include many different types of organisms. These organisms fall into three main categories, based on the roles they play in the food web. Knowing the difference between these roles will help you and your students build food webs.
In an ecosystem, you will find the following types of organisms:
1. Producer:
An organism that produces its own food through photosynthesis. Producers use sunlight, water, and carbon dioxide to make their own food. They also need soil nutrients.
Examples: trees and other plants, some plankton, moss, some microorganisms
2. Consumer:
An organism that eats other organisms as food. Consumers cannot make their own food. Consumers can be herbivores, omnivores, carnivores, and scavengers.
Examples: insects, birds, frogs, deer, other animals
3. Decomposer:
An organism that recycles nutrients back into the soil by eating and digesting decayed plant and animal matter and waste.
Examples: mushrooms, some worms, soil bacteria
Make your own food webs activity:
Gather your materials and follow these steps to create your own food webs with your students. You can all work on one big food web together, or each student can make their own mini-food web! There are many possibilities!
Materials
Flashcards or pictures of the organisms in an ecosystem (plants, animals, fungi, etc…)
Or, get a set for an ecosystem of interest (e.g., desert, arctic, forest, etc…)
You can also make your own set!
Sidewalk chalk
A large, paved area outdoors that is free of cars and heavy foot traffic
Step-by-Step Directions
Set-Up:
Sort the organism cards into 3 piles:
producers
consumers
decomposers
Look through your producers pile.
This pile represents the food sources for herbivores and omnivores (primary consumers) in your ecosystem.
Look through the consumers pile.
Sort these cards further or make a mental note of which organisms are likely to eat plants (herbivores and omnivores) and which organisms are likely to eat animals (carnivores and omnivores).
Research the diets of unfamiliar animals.
If students are unfamiliar with some of the animals and their diets, it may help to research the animals online. You can take notes on the backs of the cards if needed.
Note: if you’re using my food webs unit, a handout is provided with info on the diets of the included animals!
Build Your Food Web:
Choose your producers.
It is easiest to start with one to three producers.
Which consumers eat your producers? These are your primary consumers.
Place the primary consumers above your producers and draw arrows to represent the flow of energy from food to eater.
Which consumers eat your primary consumers? These are your secondary consumers.
Place the secondary consumers above your primary consumers and draw arrows to represent the flow of energy from food to eater.
Which consumers eat your secondary consumers? These are your tertiary consumers.
Place the tertiary consumers above your secondary consumers and draw arrows to represent the flow of energy from food to eater.
Repeat this process as needed, until your reach a consumer that is not eaten by anyone else – this is your top predator!
You can make your food web as big or small as you’d like! It could include dozens of organisms or just a few.
Add additional arrows as needed.
Food webs can be messy! Many any animals have multiple food sources and are preyed on by multiple predators.
Optional: place any decomposer cards underneath the food web. Decomposers recycle nutrients back into the soil to help producers like plants grow!
Example Food Webs:
An example of building your own food web!
Study Food Webs with Wild Earth Lab:
Of course, you can put together your own food web materials to complete this activity. Or, save time and support my blog when you purchase my food webs unit! The unit includes everything you need to complete this activity plus additional handouts, worksheets, and readings!
Birds are a diverse group of animals. Despite their vast differences, hummingbirds, penguins, and eagles all share a common ancestry! Through the process of natural selection, birds adapted to thrive in unique ecological niches. One of their most fascinating adaptations is their wings. But wings are not one size fits all – bird wings come in many specialized forms that serve different functions and fit different lifestyles. Let’s take a look at a few different types of bird wings and what they do!
Active soaring wings have an extremely long, slender shape. They are ideal for catching horizontal air currents like sea breezes. They help minimize flapping to conserve energy, making them great for staying in the air for long periods while hunting or migrating. You will find many examples of active soaring wings among seabirds.
Examples: albatross, gannet
Passive Soaring Bird Wings
Passive soaring wings appear broad and slotted. They are best for catching updrafts and flying for long periods. They help minimize flapping to conserve energy while circling to look for food on the ground or in the water below. You will find raptors and seabirds with this wing type.
Example: pelican, eagle
High-Speed Bird Wings
High-speed bird wings are not as long as active or passive soaring wings. They may appear pointed at the ends. As the name implies, high-speed wings are great for rapid movement. However, the bird must spend lots of energy flapping to reach high speeds. This makes these wings ideal for short bursts of speed, such as chasing down a flying prey animal or insect.
Examples: falcon, tern
Elliptical Bird Wings
Elliptical bird wings have a more rounded appearance. They are great for quick maneuvers and turns, which is why they are often seen on birds that live in dense forests. They are also good for quick take-offs, which can help a bird escape from a predator. Elliptical wings require lots of flapping to stay in flight.
Examples: dove, turkey
Swimming Bird Wings
Some wings have a fin-like shape. These wings are great for swimming, which can be very useful for a penguin that hunts by pursuit diving for fish underwater. Swimming wings allow a bird to “fly” underwater! These fin-like wings lack true flight feathers and are not suitable for flight (in the air, at least).
Example: penguin
Hovering Bird Wings
Hovering wings are great for – you guessed it – hovering. This type of wing allows a bird to stay in one place, suspended in the air. Hovering wings are small and move very, very quickly. Furthermore, when a bird flaps its hovering wings, the motion comes mostly from the shoulder joint rather than joints further down the wing. Hovering lets a hummingbird drink nectar from flowers while in flight. However, a huge amount of energy is used to keep the wings flapping so quickly.
Example: hummingbird
Study Bird Adaptations with Wild Earth Lab:
I’ve created these learning material sets to help you study bird adaptations:
Heisman, R. (2022). Extraordinary Appendages: An Introduction to Bird Wings. American Bird Conservancy. Available: https://abcbirds.org/blog/bird-wings/
Are you studying animal adaptations with your class? If so, there is nothing quite like a camouflage lab to learn first-hand how concealing coloration can help animals avoid being eaten by predators! This lab activity is very simple and effective for showing students how natural selection favors animals that can hide from predators.
This lab is entertaining because students get to be the “predators” by hunting for different “prey” (black and white beans) in a “habitat” made of white rice. Which prey will they capture most easily? Which prey will survive? Try this lab activity to find out!
In this post, you will learn how to set up a camouflage lab in your classroom. You can also get printable versions of these directions, worksheets, handouts, and classroom posters to use during this lab in my Camouflage Lab Mini Study!
If you are looking for even more ways to study animal adaptations, I think you will also like my bird beaks lab – read the separate post about the bird beaks lab.
Would the results of the lab activity be different if you used black rice as the background? How so?
Would the results of the lab activity be different if you used gray rice as the background? How so?
Which would get eaten more in a forest with lots of leaves and moss: a green lizard or a yellow lizard?
Which would get eaten more in a desert with lots of sand, rocks, and dry plants: a greenish blue snake or a tan and gray snake?
Expand on this Activity
Try these ways to expand on your camouflage lab:
1. Natural selection over several generations:
Expand on this activity to learn about natural and adaptations. Repeat the activity a few times to represent successive generations. Use the proportion of beans of each color after predation to determine the proportion of beans of each color in the next generation.
For example, if you started with 50 total beans (25 black beans and 25 white beans), and 5 black beans and 20 white beans remained after predation, then you should start the next generation with 10 black beans and 40 white beans.
Have students perform these calculations to add math to this lab. Afterwards, discuss which coloration thrived in the long run. Did either coloration disappear from the population after several generations?
2. Mimicry:
Did you know that some harmless animals mimic dangerous animals? A good example of this is the harmless viceroy butterfly, which looks very similar to the poisonous monarch butterfly. Another example is a non-venomous milk snake, which has nearly the same red and black stripes (called “warning coloration“) as a venomous coral snake! This type of disguise is called “mimicry“, and it is a type of camouflage.
Expand on your camouflage lab by adding in a mimicry lab activity. The purpose of a mimicry activity is to show how pretending to be dangerous benefits prey animals. There are many versions of a mimicry lab, such as the activity shown in this candy camouflage YouTube Video from Science Buddies.
This lab comes from my Reptiles Unit!
Your students will love the illustrated learning materials, plus you’ll support Wild Earth Lab with your curriculum purchase!
A keystone species is an organism that plays an exceptionally large role in its ecosystem. It provides materials or services that enrich the lives of other organisms in the ecosystem. Without the keystone species, the ecosystem would look very different and other organisms that rely on the keystone species would suffer. Now, let’s look at a few examples of keystone species!
Beavers in Wetlands
A common example of a keystone species is a beaver in a wetland. Beavers build dams on streams, causing water to back up and form ponds and wetlands. The result is a much more complex ecosystem with a greater variety of habitats.
A beaver wetland can support a very diverse plant and animal community. Beaver ponds provide a place for other animals to live and forage. A beaver wetland is a great habitat for wetland plants that like to grow in standing water. Without the beaver, the wetland ecosystem slowly degrades.
Saguaro Cactus in the Sonoran Desert
Like the beaver, the saguaro cactus is a keystone species. In the Sonoran Desert ecosystem, the saguaro plays a central role providing shelter and food for many other species.
Birds like elf owls, hawks, and woodpeckers live in cavities within the saguaro’s trunk. The saguaro’s flesh helps keep these homes temperature regulated so their occupants stay cool during hot desert days.
The saguaro flower provides nectar that feeds desert pollinators, like bats, doves, and bees. Once pollinated, the saguaro makes large fruits that are also a vital food source for desert animals. Coyotes, tortoises, birds, and others eat the fruit and disperse the saguaro’s seeds in their scat.
Many desert animals have a type of symbiotic relationship with saguaros known as mutualism. This means both the animal and the saguaro benefit from the relationship.
Prairie dogs are keystone species in grasslands and prairies because of their tunnels. They are exceptional excavators that build large networks of underground tunnels. These tunnels actually help keep the soil healthy. Digging tills and aerates the soil, and prairie dog scat provides a fertilizer for prairie plants.
Additionally, when prairie dogs abandon burrows, other prairie animal species can move in and use these homes. Not all animals are as good at digging as prairie dogs, so they rely on abandoned prairie dog homes for shelter. Finally, prairie dogs are a food source for grassland predators like coyotes and hawks.
Wolves in Forests
Although scarce today, wolves are a natural keystone species in many types of forests. Wolves help keep the populations of deer, elk, and other undulates under control through hunting them. Amazingly, this impacts the plant community of the forest! Let me explain: deer and elk are voracious plant eaters. When deer and elk numbers grow unnaturally high, plants struggle to grow fast enough to keep up with the hungry undulates. But when wolves are around, the deer and elk populations stay in check, and the plants benefit.
Even a few wolves can really make an impact. These is because the presence of wolves changes the behaviors of deer and elk, scaring them into more protected parts of a habitat. When there are no wolves around, deer and elk will more freely browse in any part of the habitat, including open areas like meadows and riparian zones.
Explore curriculum from Wild Earth Lab:
If you enjoyed this post, I know you will love using my environmental science materials in your classroom!
Fortin, D., Beyer, H. L., Boyce, M. S., Smith, D. W., Duchesne, T., & Mao, J. S. (2005). Wolves influence elk movements: behavior shapes a trophic cascade in Yellowstone National Park. Ecology, 86(5), 1320-1330.
Kotliar, N. B., Baker, B. W., Whicker, A. D., & Plumb, G. (1999). A critical review of assumptions about the prairie dog as a keystone species. Environmental management, 24, 177-192.
Some saguaro cacti live for 200 years or longer! Saguaro cacti grow very slowly. The speed of growth depends on many factors such as precipitation, temperature, and soil quality. Let’s explore the saguaro cactus life cycle in five steps! Notice that desert animals play a key role in two of these steps.
For Teachers and Parents: If you’re an educator planning to teach kids about cactiin your classroom or at home, great activities and visuals are key to deepening understanding! I think you and your students will love my complete Cactus Unit(plus you’ll support my blog with your purchase! ❤️)
A seed germinates. The two cotyledons open to form a tiny plant. Seeds that germinate in shady areas such as beneath palo verde trees are most likely to survive through the fragile young stages and reach maturity.
The seedling cactus grows through its first summer and develops more areoles and spines. At just a few millimeters in height, the seedling is so small that it can be difficult to spot.
2. Maturity
It may take ~35 years for a saguaro cactus to reach maturity and produce its first flowers.
The rate of growth depends on environmental conditions such as precipitation, temperature, soil quality, and the type of cactus. For saguaro cacti, growth happens very slowly over many years.
When a cactus reaches reproductive maturity, it can produce its own flowers. Time to reach maturity depends on the cactus species. For example, the saguaro cactus takes several decades to reach maturity.
The lesser long-nosed bat is a nighttime pollinator of the saguaro cactus
The cactus flowers bloom. Cactus flowers make tasty nectar to attract pollinators like bats, bees, and doves. Pollen is transferred between plants by the pollinators. This is a type of symbiotic relationship called mutualism because both the pollinator and the plant benefit. The pollinator gets a tasty meal of nectar, and the plant gets pollinated.
4. Fruiting
Saguaro fruits are a food source for many animals in the Sonoran desert. People sometimes eat the fruit too.
Once pollinated, the cactus fruit begins forming from the ovary of the flower. Cacti can produce huge amounts of fruit. For example, a single saguaro cactus may produce upwards of 100 fruits each year. That’s a lot of fruit! The ripened fruit splits open, revealing sweet flesh and seeds. This sends the signal to animals that the fruit is ready to eat!
5. Seed Dispersal
When an animal eats the saguaro fruit, it ingests some seeds. The seeds are then dispersed in the animal’s scat.
Desert animals like birds, coyotes, and tortoises eat cactus fruit and disperse seeds in their scat. This is another example of a mutualistic relationship between an animal and a cactus. The animal gets a meal of fruit, and the cactus gets its seeds dispersed. If the cactus is lucky, some of its seeds will be deposited in locations with good growing conditions. Over its lifespan, a single saguaro may produce millions of seeds. However, only a few of those seeds will germinate, grow, and reach maturity.
Helmy, Olga. 2021. Carnegiea gigantea, saguaro. In: Fire Effects Information System, (Online). U.S. Department of Agriculture, Forest Service, Rocky Mountain Research Station, Missoula Fire Sciences Laboratory (Producer). Available: www.fs.usda.gov/database/feis/plants/cactus/cargig/all.html
Maybe you have already heard of a bird beaks lab. But if not, the basic idea is this: students use different “beaks” (e.g., chopsticks, tweezers), to pick up different “food sources” (pasta, seeds, peas). Throughout this process, students figure out which beak is the best for “catching” each food.
This is a hilarious and hands-on way to experience competition between species and learn about natural selection and animal adaptations. Students will experience first-hand how specialized beaks can help birds quickly gather the most food and outcompete other types of birds.
In this post, you will learn how to set up your bird beaks lab in your classroom!
Get the most out of this activity: If you’re an educator planning to teach this activity, you’ll find all the worksheets, printable directions, and visual aids you need in my Bird Beaks Lab Mini Study and also within my complete Waterbirds and Waterfowl Unit (plus you’ll support my blog with your purchase! ❤️)
Place 20 gummy candies on a plate. Label the plate “insects”.
Place 20 grains of rice or seeds on a plate. Label the plate “seeds”.
Place 20 marshmallows on a plate. Label the plate “rodents”.
Place ~20 tsp (~100 mL)of food-colored water in a skinny container. Label the container “flower nectar”. Place a liquid measuring cup next to the container for students to deposit the water into.
Place 20 peas in a large bowl of water. Label the bowl “aquatic plants”.
Place 20 pieces of pasta in another large bowl of water. Label the bowl “fish”.
Write “stomach” on each paper cup.
Give each student a “stomach” and one of the 6 “beaks”. You can have each student use just one beak, then share answers with students who used other beaks afterward. Or, if you have a small group (and lots of time), you may wish to have each student try out each beak.
Lab Activity
Have students rotate through the food source stations with their beaks.
Instruct students to use their beaks to pick up as much food as they can in 20-60 seconds, placing food into the “stomach” containers. Start the timer and say “go!” (Longer periods may be necessary for very young groups).
After 20-60 seconds, say “stop!”. Students should use the lab datasheets to record the number of pieces of food they picked up (or the volume of liquid at the flower nectar station).
Instruct students to empty their “stomach” cups and put the station back the way it was before moving to the next station.
Once finished with all stations, ask each student to share their beak’s results with the class. Determine which beak(s) worked best for each food source.
Ask students to complete the graphing activity. Students will make a graph for each food source comparing the amount caught by each of the 6 beaks.
Have students work through the reflection questions in groups or individually.
Other Suggestions
For groups larger than 6 students, create multiple copies of each station. Or, have groups of 6 take turns rotating through the stations for this lab while the rest of the class completes other work.
After or during this lab, discuss adaptations and natural selection. Explain how in nature, animals compete for the same food sources. Birds that can quickly and easily gather lots of food have the best chances of surviving and raising offspring. Ask students to consider what happens when two birds with different beaks compete for the same food source. Discuss how the availability of different food sources may affect the shape of birds’ beaks over time.
Reflection Questions
Which beak(s) worked best for each food source?
Imagine a habitat where two groups of waterbirds compete for aquatic plants to eat. One group of birds has a filtering beak (like the slotted spoon), and one group of birds has a short, grasping beak (like the clip). What do you think would happen to each group of birds over time?
Imagine a bird species with a large, pointy beak (like the chopsticks) that eats seeds. Imagine that one year a few birds are born with shorter, more precise beaks (like the tweezers). Do you think the birds with the new beak type will thrive? What could happen to this bird species over time?



 Polar Bundle: set of 2 units – Arctic & AntarcticaOriginal price was: $27.00.$21.60Current price is: $21.60.
 Antarctica: a complete unit with ecology and climate science activities$15.00
 The Arctic: an ecology unit for kids$12.00