Posted on — 2 Comments

How does pollination work? A step-by-step guide to pollination and the plant life cycle

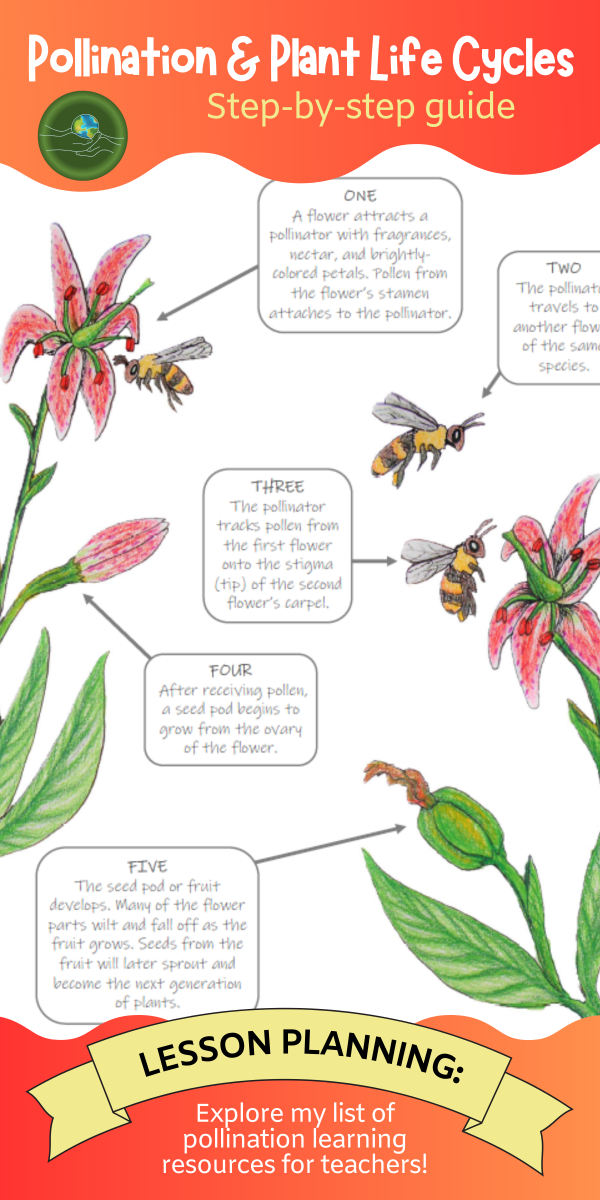
banner advertising a blog post about pollination and plant life cycles with a diagram of bees pollinating flowers
text that says share this post

In this post, we will take a closer look at the steps of animal pollination and the plant life cycle. You might already know that pollination is the transfer of pollen from the stamen to the carpel of a flowering plant (psst – brush up on your plant anatomy by reading my flower anatomy post or checking out my Flowers Unit!). Once pollinated, the plant forms a fruit. Fruits contain seeds, which will grow into the next generation of plants.

A variety of animals can be pollinators, such as bees, butterflies, and many others that may surprise you. The relationship between a pollinator and a plant is key to the survival of both species. This relationship is so important to both the plant and the pollinator that it influences how they evolve. In other words, plants and pollinators coevolved. Plant species developed traits to help them attract pollinators, such as brightly colored petals, sweet nectars, and strong scents. As pollinator species grew reliant on nectar as a food source, they developed body parts and habits for collecting flower nectar more efficiently.

Before we dive in: If youโ€™re an educator planning to teach pollination in your classroom, great activities are key to deepening understanding! I think you and your students will love my Pollination Unit, which is also found within my Botany Collection (plus youโ€™ll support my blog with your purchase! โค๏ธ)

Recommended products

Now, let’s take a look at the steps of pollination and the plant life cycle!

Step 1: Attracting pollinators

A flower attracts a pollinator with fragrances, nectar, and brightly-colored petals. Pollen from the flowerโ€™s stamen attaches to the pollinator.

A pollinator visiting a flower.

Step 2: Pollen transfer

The pollinator travels to another flower of the same species.

A pollinator traveling between flowers of the same species.

Step 3: Pollination

The pollinator tracks pollen from the first flower onto the stigma (tip) of the second flowerโ€™s carpel. Pollen travels via the style to the flower’s ovary.

The pollinator transfers the pollen to a second flower.

Step 4: Fruit growth

 After receiving pollen, a fruit or seed pod begins to grow from the ovary of the flower. Many of the flower parts wilt and fall off as the fruit/seed pod grows.

A fruit starts to form from the flower’s ovary.

Step 5: Seed dispersal

The seed pod or fruit develops. Once the fruit is ripe, the plant must disperse its seeds. At this point, some plants rely on another animal (separate from the pollinator) to help with seed dispersal. After the animal eats the fruit, it travels away from the parent plant and deposits the seeds in its scat. However, many plants do not rely on animals for seed dispersal. Alternative methods for seed dispersal utilize forces such as wind, water, and gravity.

Almost ready for seed dispersal.

Step 6: Germination and growth

After seed dispersal, seeds will germinate (or sprout) into tiny plants. The luckiest of the tiny plants will grow and reach maturity. Once mature, the plants make flowers of their own to attract pollinators, and the cycle begins again!

Germination process.

Teaching Pollination and Plant Life Cycles

Are you teaching pollination in your classroom? Here are some additional activity ideas and resources!

1. Try my free pollinator guessing game in your classroom:

Directions and cards for a pollinator guessing game are available on the free resources page of my website. My email subscribers gain access to the free resources page (plus receive my newsletters with new activity ideas, project guides, and science teaching inspiration!).

2. Read my post about weird and wild pollinators!

3. Check out my list of pollinator activity ideas for classrooms!

4. Try the flower anatomy activity in this blog post:

5. Study pollination with Wild Earth Lab!

Your students will love my Pollination Unit and other science units! I created this set of printable pollination learning materials and it is packed with activities and information, as well as my pollination artwork!

Recommended products

Here are some more units that I think you’ll love:


Are you interested in reading more posts about environmental science topics? Subscribe or follow Wild Earth Lab using the links below!


Sharing options and discussion for this post:

Posted on — Leave a comment

How do gaining and losing streams differ? Groundwater-stream interactions explained

banner with groundwater diagrams and the text "groundwater and streams interactions explained"

Surface water means any water that pools or flows on parts of the landโ€™s surface, like streams and ponds. But a lot of water does not stay at the surface โ€“ it infiltrates, or seeps into the ground. Groundwater fills the tiny gaps in the soils and rocks below our feet (called pore spaces).

Groundwater & The Water Table

Before we can learn about groundwater-surface water interactions, we must understand the water table. The water table is the level at which the pore spaces are filled entirely with water. The water table is not a flat surface, but rather a three-dimensional surface. Similar to the surface of the land, the water table has higher and lower areas. Parts of the water table are relatively steep while other parts are flatter. Like surface water, groundwater moves and flows, but much more slowly than surface water.

After a rainstorm or during snowmelt, water slowly seeps downward through the unsaturated parts of the soil to reach the water table. Water can also seep into and out of the ground through the bottoms of lakes and ponds and through streambeds!

Think About It…

yellow shovel half buried on sand near the ocean

Have you ever dug a hole in the sand next to an ocean or lake? Maybe if you dug deep enough, you noticed that your hole started filling in with water. This means you reached the water table! Water moves through the pore spaces between grains of sand to fill in the hole with water.

Gaining Streams

Streams are gaining when water is moving from the ground into the stream. If a stream is gaining, the amount of water flowing through the stream (the discharge) will increase as you move downstream.

Examine the stream diagram below. Arrows represent groundwater flow. What does the water table look like around the gaining stream?

A cross section of a gaining stream. Water is moving from the ground into the stream.

Losing Streams

Streams are losing when water is moving from the stream into the ground. If a stream is losing, the amount of water flowing through the stream will decrease as you move downstream. In some cases, losing streams lose all their water into the ground and dry up at a certain point downstream.

Examine the stream diagram below. Arrows represent groundwater flow. What does the water table look like around the losing stream?

A cross section of a losing stream. Water is moving from the stream into the ground.

Other Possibilities

Additionally, some streams are gaining on one side and losing on the other. This is called throughflow. You can remember this because groundwater is basically flowing roughly perpendicular to the direction of streamflow, “through” the stream.

Examine the stream diagram below. Arrows represent groundwater flow. What does the water table look like around the stream with throughflow?

A cross section of a stream with throughflow. The stream is gaining on one side and losing on the other.

Furthermore, some streams may have gaining portions and losing portions. Streams or portions of streams may also be gaining at certain times of the year but losing at other times of the year, depending on different seasonal conditions. This is common in areas with seasonal monsoons or places with winter snowpack that melts in spring. Extended periods of drought can also alter the stream conditions.

Teaching rivers? Then I think you’ll love my Science on the River Unit!

It’s packed with hands-on, applied STEM activities that will get your students outside investigating rivers like a real environmental scientist. Plus, you’ll support Wild Earth Lab with your science unit purchase!

More units from Wild Earth Lab…


Are you interested in reading more posts like this? Subscribe or follow Wild Earth Lab using the links below!


Sharing options and discussion for this post:

Posted on — 2 Comments

Stream Measurements Field Trip Activity: How to measure water flow with your students

picture of a stream with the text "how to measure streamflow a step-by-step guide"

Are you teaching your students about rivers and streams? Taking your own stream measurements is a great way to turn your lesson into a hands-on science adventure. These are real-world techniques used by watershed scientists and hydrologists to study streams and rivers. Furthermore, it’s an interdisciplinary activity that combines math, measurement, and science to answer questions about rivers and streams.

For Educators:ย Want printable directions, worksheets, and diagrams for this activity? You will find them in my complete Rivers Unit.

Why Measure Rivers?

Why should we study rivers and streams? Rivers and streams are important pathways in the water cycle, transporting water between different places. People use river water for drinking, household uses, agriculture, energy production, and more. However, people must be careful when using water from rivers because taking too much too quickly can impact other communities and ecosystems downstream. Hydrologists can collect stream measurements to help ensure that we are not using our water resources too quickly or in unsustainable ways.

Rivers are also facing big issues, including the impacts of climate change. Rivers fed by snowmelt and seasonal monsoons are particularly susceptible to the impacts of climate change. Climate change affects the amount of snow that builds up in the winter and the timing of melt and seasonal monsoons. Pollution is another key issue for rivers. As runoff makes its way over the land, it crosses many surfaces such as roadways, lawns, and farm fields. Chemicals and waste from these surfaces are swept up by the running water and become concentrated in streams and rivers, impacting the river ecosystem and creatures that live there. Scientists and water managers work hard to understand and find solutions to the issues that rivers face today and promote healthy streams and rivers.

horseshoe bend photo

Measuring river width and depth

Water depth and width are common stream measurements. The depth and width may vary dramatically as you move upstream or downstream along any stream or river. Width expands as a river moves across flat plains and decreases as the river enters narrow valleys and canyons. Additionally, stream depth typically varies as you move from one side of a stream to the other. The deepest part of a stream cross-section, also known as the thalweg, is not always in the middle โ€“ it is sometimes off to the side.

My watercolor painting of students measuring stream width and depth.

Cross-sectional area

Depth and width measurements can be used to estimate cross-sectional area in a location of interest on a river. The cross-sectional area is the area of an imaginary flat surface perpendicular to the direction of flow, bounded by the streambed and waterโ€™s surface.

Cross-sectional area of a stream

Calculating River Velocity

Velocity is the speed at which the water is flowing. There are many great tools that hydrologists can use to estimate velocity with high precision and accuracy. However, you can estimate a stream’s velocity in a more low-tech way with just a stopwatch and a stick. Simply time a small item as it floats down a measured length of stream. Then divide the float distance by the time it took the stick to float that far to get velocity!

Velocity is important to know for river safety and boating. Velocity is also used to calculate discharge.

yellow duckies in line on a concrete floor
How fast are these ducks moving? That’s the stream velocity!

Measuring River Discharge

Discharge tells us about the amount of water flowing through a river. More specifically, discharge is defined as the volume of water that flows through some cross-section of a river, per unit of time. Think of it this way โ€“ velocity is a distance per unit time, and discharge is a volume per unit time. A small creek and a huge river that have the same velocity would not have the same discharge. Discharge is a measurement that allows us to see the difference between that small creek and a huge river because it is a volumetric flow rate.

Measuring discharge helps us keep track of water resources for uses like drinking and growing food. Monitoring river discharge over many years allows water managers to predict and prepare for floods and droughts.

How much water flows out of the dam? It’s important to know the discharge!

Field Trip Activity: Calculate stream discharge!

Materials

  • Tape measure
  • Meterstick or yardstick
  • Stopwatch
  • Small floating item (e.g., a stick)
  • A net to catch the floating item (optional)
  • A small, easily-wadable stream
  • A buddy or two
  • Worksheets, diagrams, and printable directions for this activity (available in my complete Science on the River Unit)
photo of classroom handouts for calculating stream velocity and discharge

Part 1: Estimate Velocity

You can estimate a stream’s velocity in a low-tech way with just a stopwatch and a floating object (e.g., a stick). Simply time a small item as it floats down a measured length of stream.

a person holding paper boats
Time a small item as it floats down a length of the river to estimate the water’s velocity. Photo by Mariana Mileeva on Pexels.com
  1. In a small, easily wadable stream, use the tape measure a short float length (5-10 meters, or 15-30 feet) along the bank, parallel to the stream. Use a shorter distance if the stream is flowing very slowly.
  2. At the upstream end of your measured float length, drop a stick or other small floating object into the water. Drop the stick into a part of the stream that is flowing, not into a pool or eddy.
  3. As you drop the stick, start the stopwatch.
  4. Wait for the stick to float the measured float length. You may need to start over at step 3 if the stick becomes stuck.
  5. When the stick reaches the downstream end of your float length, stop the stopwatch. Record the time in seconds. (If the item you are floating is human-made like a paper boat or rubber duck, be sure to retrieve it so that it doesn’t become litter!)
  6. Repeat steps 2 through 5 two more times. Calculate the average time by adding the three times together and dividing that number by 3.
  7. Divide the float length by the average time to find the velocity.

Part 2: Find Discharge

Discharge is the flow of water in a stream. You can calculate discharge by multiplying the velocity of the stream by the approximate cross-sectional area of the stream.

  1. Return to the same place where you measured the velocity in part 1. In this same place, measure the width of your stream. Hold one end of the tape measure and toss the other end across the stream to a partner on the other side of the stream. Record the width from the waterโ€™s edge to the waterโ€™s edge.
  2. Use a meterstick or yardstick to measure the depth of the stream in three different places along the tape measure spanning the stream. For example, measure the depth near the left side, near the right side, and close to the center of the stream. Take the average of the three depth measurements.
  3. Multiply the average depth by the width to find the approximate cross-sectional area of the stream.
  4. Multiply the cross-sectional area by the velocity (from part 1) to find the discharge.
  5. Note: use the same units for all the numbers when doing calculations. E.g., if your velocity is in feet per second, then be sure to measure width and depth in feet.

Trying the activity with your class?

You’ll find a complete set of printable worksheets, activity guides, and visual aids for this activity and more cool hands-on science activities in my Science on the River Unit! (Plus you’ll support this blog with your purchase – which is pretty cool too๐Ÿ˜‰).

Find your next unit…

If you enjoyed this post, I know you’ll also love my environmental science units with hands-on lab activities:


Are you interested in reading more posts like this? Subscribe or follow Wild Earth Lab using the links below!


Sharing options and discussion for this post:

Posted on — 2 Comments

River channel types: identify straight, meandering, braided, and anastomosing channels

blog post banner advertising a blog post about rivers. With the text "let's learn about rivers" and "explore how different channel types and how they form!"

A stream or river is a natural, flowing waterway on the land’s surface. Stream channels are long, narrow depressions in the land where water flows. There are several common river channel types, also known as the major plan forms.

Before we dive in: If youโ€™re an educator planning to teach about rivers, having great visuals to deepen understanding is key! You can find materials for teaching channel types/plan forms within my comprehensive Science on the River Unit. It also includes activities for measuring stream discharge, lessons on drainage patterns, and stream diagrams (plus you’ll support my blog with your purchase! โค๏ธ)

Recommended products

As a river flows from its headwaters out to the sea, it usually transitions between several different plan forms. The river channel is shaped by the surrounding landscape, underlying rock type(s), sediment availability, and flow regime (i.e., variation in the amount of water flowing through a river, including the magnitude and frequency of different-sized floods).

Different rivers naturally have different plan forms – and that’s a good thing! You will find healthy streams and rivers with various natural planforms – no one planform is necessarily better than the others. It is best for a river to be as close to its natural state as reasonably possible.

The major planforms are straight, meandering, braided, and anastomosing. Next, let’s take a look at the different types of river channels you may see:

Straight River Channels

Straight channels are seen in areas where the landscape is steep, such as on the side of mountains or in straight, narrow valleys. The stream or riverโ€™s channel appears mostly straight with few curves or bends.

Straight river channel

Meandering River Channels

A meander is a curve in a stream. Subsequently, a meandering river is curving with many noticeable bends or turns. Meandering channels are seen in areas where the topography is gentle or nearly flat, such as plains and wide valley bottoms. Even subtle changes in the land’s surface can shape the river’s path since water always flows downhill in the path of least resistance. Flow is fastest on the outside of a curve, causing erosion. In contrast, flow is the slowest on the inside of a curve. Sediments settle out of the water and accumulate on the insides of curves, where water flows slowest, forming point bars.

Meandering river channel

Notably, some meanders are curvy and nearly double back on themselves, forming a loop. These extra curvy meanders are called goosenecks. Over time, the fast waters on the outside curves of a gooseneck wear down the banks. Eventually, the curves erode all the way through so that the flowing river water bypasses the gooseneck, cutting off the loop. Then, the former gooseneck becomes a water feature known as an oxbow lake.

Classroom posters and flashcards for studying river channel types are available in my complete River Unit.

Braided River Channels

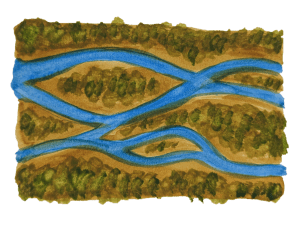
Braided channels are seen in many locations, including deserts, plains, glacial outwash, and coastal areas. The river channel contains sediment bars, giving it a braided appearance. For a braided channel to form, there must be plenty of sediment available in the channel to build up bars. Bars can be made of a variety of sediments: silts and sands, gravels, or larger stones.

The locations and shapes of sediment bars change over time. Although the bars in a braided channel may look permanent, the sediment is slowly making its way downstream toward the ocean. The powerful, flowing water carries each grain of sediment a short distance at a time. In fact, a single piece of sediment may travel a short distance rapidly, then settle onto a bar or the riverbed for days, months, or even years before it moves again. Even so, large floods can cause rapid changes in the locations and appearances of the bars in a braided river.

Braided river channel

Anastomosing River Channels

In an anastomosing channel, multiple river channels are separated by large, vegetated bars or islands. This gives the appearance of a few separate stream channels rather than one main channel. Braided rivers and anastomosing rivers are similar because they both have multiple channels that intertwine. The main difference between anastomosing rivers and braided rivers is that the channels of an anastomosing river are separated by semi-permanent islands, while the sediment bars of a braided river are more ephemeral (short-lived).

Anastomosing river channel

Teaching Rivers in Your Classroom

Are you an educator planning to teach about rivers? You can save time preparing lessons by using my complete Science on the River Unit below. Plus, you’ll support Wild Earth Lab with your purchase!

Keep reading about rivers, streams, and freshwater…

Recommended Posts:

5 Reasons to Teach Rivers and Streams in Your Classroom

Rivers and streams provide endless opportunities for scientific exploration and discovery – and chances are you can find one right in your community! From their chemistry and physics to their role in ecosystems and human communities, rivers and streams offer excellent opportunities to teach critical concepts in science and math in an applied way. Acrossโ€ฆ

Freshwater Visualization: Learning Activity With Kitchen Measurements

Itโ€™s hard to imagine just how little freshwater exists on Earth compared to saltwater. If you’re teaching the water cycle, your students might be amazed to learn that less than 3% of the Earthโ€™s water is freshwaterโ€”the rest is saltwater. In this post, Iโ€™ll show you a hands-on freshwater learning activity that uses simple kitchenโ€ฆ

Explaining The Water Cycle in 10 Stages

The water cycle is the process that keeps our planet’s water in constant motion. From evaporation to groundwater flow, each step plays a vital role in shaping our environment and life on our planet. In this post, we’ll explore 10 key processes in the water cycle, breaking down how each one works. For teachers:ย If youโ€™reโ€ฆ

Measuring Soil Infiltration Rates: A Science Classroom Activity

Are you teaching the water cycle or studying soil in your classroom or homeschool? Measuring infiltration rates in different types of soils is a hands-on activity that helps students explore how water interacts with the ground. This soil infiltration activity also ties in perfectly with studies of porosity and permeability. This engaging experiment works asโ€ฆ

DIY Rain Gauge Activity for Teaching the Water Cycle

Teaching your students about the water cycle? Building a DIY rain gauge from a plastic bottle is a fun, hands-on activity to explore a key water cycle process: precipitation. This simple project is perfect for your classroom or homeschool and can be a stand-alone lesson or part of a larger study of water cycle processes.โ€ฆ

Find your next science topic from Wild Earth Lab…


Are you interested in reading more posts like this? Subscribe or follow Wild Earth Lab using the links below!


References and Further Reading

  1. National Park Service (n.d.). Fluvial Features: Meandering Streams. Available: https://www.nps.gov/articles/meandering-stream.htm
  2. National Park Service (n.d.). Fluvial Features: Braided Streams. Available: https://www.nps.gov/articles/braided-stream.htm
  3. Plummer, C. C., Carlson, D. H., & Hammersley L. (2019) Physical Geology. New York, NY: McGraw-Hill Education. (16th ed., ch. 10).

Sharing options and discussion for this post:

Posted on — 4 Comments

Which animals pollinate? Common pollinators plus a few that will surprise you!

banner with pictures of pollinators and the text "weird and wild: animal pollinators!" and "+ free classroom activity! Learn about the diversity of pollinators!"

Pollinators are animals that transfer pollen between flowers. Many pollinators are insects, such as bees. However, birds, mammals, and a variety of other animals can also be pollinators! Pollinators are key members of most terrestrial (on-land) ecosystems. Pollinated plants produce food that feeds other members of the ecosystem. Pollinators also help humans because they pollinate many of our food crops. For example, a tomato could not form from a tomato plantโ€™s flower without being pollinated by a bee.

Plants and pollinators have symbiotic relationships โ€“ long-lasting, close relationships between two living beings. A pollinator and a plant have a specific type of symbiotic relationship called mutualism, in which the relationship benefits everyone involved. The pollinator gets a tasty meal of nectar. The plant gets pollinated so it can make seeds. Itโ€™s a win-win!

In this post, we’ll take a look at the different types of animals that pollinate plants. But first…

A note for teachers: are you teaching pollination? I think you and your students will love the hands-on activities and thoughtfully crafted visuals in my comprehensive Pollination Unit! It includes all the activities, handouts, worksheets, and diagrams you’ll need for teaching pollination. I hope you love it!

Bees & Wasps

The European honey bee or

Although there are many different animal pollinators, bees (especially honeybees) are usually considered the most important pollinator due to their key role in many ecosystems and their ability to pollinate a wide variety of different plants, including many food crops. Bees rely on flowers as their food source – they fly from flower to flower collecting nectar and pollen.

There are many types of bees that pollinate, including honeybees, bumblebees, and solitary bees. Surprisingly, wasps are also sometimes pollinators. That’s right – while wasps are often thought of as being unfriendly pests, they actually play very important roles in their ecosystems!

Butterflies & Moths

Photo by Erik Karits on Pexels.com

Butterflies drink nectar through a long proboscis – a straw-like mouth part that can reach deeply into flowers. Consequently, butterflies often pollinate deeply tube-shaped flowers. They are attracted to colorful, clustered flowers that are open in the daytime.

On the other hand, nocturnal moths pollinate night-time opening flowers. Moths also have long proboscises and can reach into deeply tubular flowers like their butterfly relatives. In fact, certain moths can have astoundingly long proboscises, such as Darwin’s hawkmoth.

As the tale goes, Charles Darwin came across a species of orchid flower in Madagascar that holds nectar at the end of a foot-long tube. Darwin hypothesized that a species of butterfly or moth with a foot-long proboscis must exist in order to drink nectar and pollinate this flower. Some laughed at this idea, but many years later, scientists identified a species of hawkmoth in Madagascar with a foot-long proboscis, just as Darwin predicted!

More insect pollinators: beetles, ants, & beyond!

Bees, wasps, butterflies, and moths are just four of the many insects that pollinate plants. Some flies are also pollinators, as are some beetles and ants! Many of these insects inadvertently pollinate flowers as they crawl across them, picking up pollen on their bodies.

Birds

brown hummingbird selective focus photography
Photo by Philippe Donn on Pexels.com

Hummingbirds are by far the most common and well-known bird that pollinates. They drink nectar through their long beaks and can pollinate tube-shaped flowers, just like butterflies. It is well known that hummingbirds especially love red flowers. You may see people hanging red plastic hummingbird feeders in their yards, designed to attract these adorable pollinators. Hummingbirds are even known to fly directly into people wearing red, mistaking their clothing for a cluster of tasty red flowers.

In certain ecosystems, other types of birds such as parrots may also sometimes pollinate.

Bats

Photo by HitchHike on Pexels.com

Did you know that bats can be pollinators? While bats are best known for their ability to catch and eat insects using echolocation, some bats prefer eating fruit and flower nectar. Bats are nocturnal and pollinate at night, like moths. But as some of the largest pollinators, bats usually prefer bigger flowers that produce larger volumes of nectar. Agave, bananas, and some cacti are all popular among bats!

Even more unusual pollinators

black brown and white animal on tree
Photo by Alexander Dummer on Pexels.com

The list does not stop here! There are many more unique pollinators out there. Some reptiles pollinate. As do some slugs. Even a variety of mammals, such as some lemurs and sugar gliders, are known to pollinate plants in their ecosystems. There is certainly no shortage in the diversity of pollinators found around the world!

Try this free pollinator game for your classroom…

Are you looking to teach your students about the diversity of pollinators? Here’s a game you can try in your classroom! Print out pictures of a variety of pollinators and tape them to studentsโ€™ backs. Tell students that all the animals on their backs can pollinate plants. Then, instruct the students to ask each other yes/no questions about the animals on their backs until they can guess them correctly.

Freebie: for this game, I’ve put together 18 printable pollinator cards, plus directions. Click here to download the free cards and game!

Support Wild Earth Lab with a curriculum purchase?

Teaching pollination? Your students will love my Pollination Unit! I created this set of printable pollination learning materials, and it is packed with activities and information, as well as my pollination artwork!

Find your next science topic from Wild Earth Lab…

Looking for your next lesson? Try one of these…


Are you interested in reading more posts like this? Subscribe or follow Wild Earth Lab using the links below!


References and Further Reading

  1. California Academy of Sciences (n.d.). Darwin’s Hawk Moth. Available: https://www.calacademy.org/explore-science/darwin%E2%80%99s-hawkmoth
  2. Houston Zoo (2018). Unusual Pollinators and the Plants They Love. Available: https://www.houstonzoo.org/blog/unusual-pollinators-plants-love/
  3. Mize, A. (2018). Lizards, mice, bats, and other vertebrates are important pollinators too. The Ecological Society of America. Available: https://www.esa.org/blog/2018/04/04/vertebrate-polinator-metaanalysis/
  4. USDA Forest Service (n.d.). Unusual Animal Pollinators. Available: https://www.fs.usda.gov/wildflowers/pollinators/animals/unusual.shtml
  5. USDA Forest Service (n.d.). Who are the pollinators? Available: https://www.fs.usda.gov/wildflowers/pollinators/animals/index.shtml

Sharing options and discussion for this post:

Posted on — 1 Comment

What are the different types of pollination? How animal, water, and wind pollination methods work

Poster that says "study pollination methods" and "wind, water, and animal pollinators" and "with tons of pollination activity ideas to try in your classroom!"

You might already know that pollination is the transfer of pollen from the stamen (male flower part) to the carpel (female flower part) of a flowering plant. Once pollinated (via any of the pollination methods), the plant forms a fruit. Fruits contain seeds, which will grow into the next generation of plants. Read more about flower anatomy and download a free flower anatomy diagram here.

Pollination Methods Diagram featuring my colored pencil art!

Different plants are pollinated in different ways. Some plants self-pollinate, meaning a flower is pollenated with pollen from the same plant or even the same flower. Alternatively, many plants cross-pollinate, meaning they receive pollen from a different plant of the same species. Since plants cannot move, they usually need some help to transfer their pollen to other flowers or plants. For instance, many plants need the help of animals called pollinators. However, some plants are pollinated by the wind carrying their pollen to other flowers. Additionally, some aquatic (water-living) species of plants rely on water for pollination: they release pollen into the water so it can float to other plants. Below, I will explain more about each of the three different pollination methods: animal pollinators, wind, and water.

Download my printable learning materials to learn all about animal pollinators!

Pollination Method 1: Animals

Animal pollination is when a plant relies on an animal pollinator to carry its pollen between flowers. Examples of animal pollinators include bees, butterflies, and beetles. However, many other types of insects and animals can be pollinators in some cases including mammals, reptiles, and birds!

Flowers pollenated by animals have an incredibly wide variety of colors, shapes, scents, and sizes depending on the pollinator that they need to attract. Animal pollination is the most common pollination method. It is estimated that around 80% of plants are pollinated by animal pollinators, rather than by abiotic forces like wind and water.

Pollination Method 2: Wind

Wind pollination is when a plant creates large amounts of light-weight pollen which is carried between flowers by the wind. You have probably seen wind-borne pollen โ€“ perhaps in spring or summer you have gone outside to find the surfaces of patio furniture and cars covered in a fine yellow powder. Maybe you have even started sneezing or itching your eyes because your body reacts to the pollen in the air. Scientists estimate that somewhat less than 20% of plants are pollinated by the wind. For example, some trees, grasses, and corn use the wind pollination method.

Pollination Method 3: Water

Water pollination occurs when plant releases its pollen into water or onto the surface of water. Pollen floats or flows through or across the water between flowers. Some aquatic plants use this pollination method, but overall, very few plants are pollinated via water. Scientists estimate that less than 1% of all plants are pollinated via water.

Teach Pollination in Your Classroom:

1. Explore pollination & plants with Wild Earth Lab!

2. Further Reading:

3. Free Pollination Learning Resources:

Unusual pollinators game – directions and cards. Students ask yes/no questions to identify the pollinators taped to their backs.


Are you interested in reading more posts like this? Subscribe or follow Wild Earth Lab using the links below!


References and Further Reading

  1. Houston Zoo (2018). Unusual Pollinators and the Plants They Love. Available: https://www.houstonzoo.org/blog/unusual-pollinators-plants-love/
  2. Maryland Grows (2020). Gone with the wind: a look at wind pollination. University of Maryland Extension. Available: https://marylandgrows.umd.edu/2020/04/13/gone-with-the-wind-a-look-at-wind-pollination/
  3. Mize, A. (2018). Lizards, mice, bats, and other vertebrates are important pollinators too. The Ecological Society of America. Available: https://www.esa.org/blog/2018/04/04/vertebrate-polinator-metaanalysis/
  4. USDA Forest Service (n.d.). Pollination Strategies. Available: https://www.fs.usda.gov/wildflowers/pollinators/Plant_Strategies/index.shtml
  5. USDA Forest Service (n.d.). Wind and Water Pollination. Available: https://www.fs.usda.gov/wildflowers/pollinators/wind.shtml

Sharing options and discussion for this post:

Posted on — 3 Comments

Glaciers: how they form, types of glaciers, and why glaciers are important

banner advertising a blog post about glaciers: how do the form? why do they matter?

A glacier is a large, dense ice mass made from compacted snow that slowly moves under its own weight over a long period of time. Unlike seasonal snowpack, glacial ice does not fully melt in summer. Although glaciers move slowly, often just centimeters per day, they may cover great distances over many years. There are two types of glaciated landscapes on Earth. Alpine glaciation is found in tall mountains where the high elevation creates cold enough conditions for glaciers to form. Continental glaciation is when glacial ice fully covers a very large area of land โ€“ sometimes an entire continent!

A note for teachers: if you’re teaching glaciology, glacial landscapes, ice ages, or climate change, I think you’ll love the hands-on materials and engaging lessons in my Glaciers Unit. It covers all these topics and more, with activities, research projects, models, and high-quality visuals. Plus, you’ll support this blog with your purchase! ๐Ÿ’™

How does glacial ice form?

Glacial ice begins forming when snowflakes fall and accumulate. Compared to ice, freshly fallen snow has a very low overall water content and is mostly made of air. As snowfall continues, snow compacts under its own weight. The delicate snowflake forms start breaking under the weight of overlying snow. Snowflakes may also recrystallize into more grain-like shapes if they partially thaw and refreeze. These forces reshape the snowflakes into granular snow.

Next, over several winters, additional snowfall buries and compacts the granular snow. Grains become weakly cemented together into firn. There is still air between the individual grains, but less than in granular snow. Over many years, the firn is buried deeper and deeper in snow. The mass of the overlying snow applies great pressure on the firn. This pressure forces more air out and causes the firn to recrystallize into glacial ice.

Glaciers form when the amount of snow that accumulates on the ground in an area is more than the amount of snow that ablates โ€“ or is lost. Glacial ice ablates by melting and calving (breaking off into a body of water and floating away). Year after year, as snow builds up, it compacts and recrystallizes into dense glacial ice. An advancing (growing) glacier accumulates more ice than it ablates. A receding (shrinking) glacier accumulates less ice than it ablates. Glaciers also move downhill due to gravity via basal sliding over bedrock and sediments.

Part of an ice sheet in Antarctica

What are the different types of glaciers?

Valley Glaciers

A valley glacier is a large area of ice confined to a mountain valley. As valley glaciers move down valleys, they carve out many unique landforms. As the ice bends to go around corners or over surfaces with changing slopes crevasses, or cracks, form in the surface of the glacier. Today, you will find valley glaciers in many tall mountain ranges worldwide and even in some high-elevation areas close to the equator! However, many valley glaciers are receding due to our warming climate.

Ice Sheets

Ice sheets are huge areas of ice that cover 50,000 square kilometers or more! Unlike valley glaciers, which move in just one direction, ice sheets spread outward in all directions. Ice sheets cover large parts of continents, or sometimes, entire continents. Today, ice sheets are only found in Antarctica and Greenland. However, during the last glacial maximum, ice sheets also covered large parts of North America and Eurasia. Unlike valley glaciers, ice sheets are not contained within valleys. They may span across and cover entire mountain ranges in a thick layer of ice.

Ice Caps

Ice caps are like miniature ice sheets. They are areas of ice that cover less than 50,000 square kilometers but are not confined to mountain valleys. Ice caps are more common than ice sheets today, and are found in many places, including Iceland, the Andes, and the Himalayas.

Other masses of ice

Ice shelves are parts of glaciers that extend outward over the open ocean or sea. They are still attached to land-based glaciers along an edge. Ice shelves and pieces of ice shelves break off (or โ€œcalveโ€), forming icebergs. Icebergs as well as frozen ocean water form sea ice. Some sea ice melts and reforms each year while some lasts year-round. However, anthropogenic climate change reduces the amount of sea ice that makes it through summers.

Why are glaciers important?

Glacial ice stores almost 70% of the worldโ€™s freshwater! Additionally, rapid anthropogenic (human-caused) climate change causes glaciers to recede at unusually fast rates. This results in sea level rise and harms coastal communities and ecosystems.  Glaciers are also important because they shape the landscape. Furthermore, wildlife live on and around glaciers and sea ice (e.g., glacier finches, penguins) and in landscapes shaped by glaciation (e.g., pikas, Dall sheep).

Scientists who study glaciers are called glaciologists. They measure glacial movement and monitor the recession of many glaciers. Glaciologists study and predict the ways our changing climate affects glaciers. Scientists also learn about past climates by drilling deep into glacial ice and studying ice that formed long ago. The ice deep within some very old glaciers comes from snow that fell hundreds of thousands of years ago! Glacial ice acts as a time capsule, preserving frozen water, gas bubbles, and dust/ash from the time it formed. When scientists study ancient ice, they can learn about past temperatures, atmospheric conditions, volcanic eruptions, and more.

Where can I find glaciers?

Today, you can find alpine glaciation on most continents. However, most glacial ice is found near the poles. In the past, glaciers covered larger areas of land. During the last glacial maximum (the time when the glaciers were largest during the last ice age), ice sheets covered large parts of northern Eurasia and North America.

Teaching a glaciology or glacial landscapes unit?

Check out the Glaciers Unit that I’ve put together! It features tons of my watercolor illustrations of glaciers and the post-glacial landscape! Click below to learn more!


Are you interested in reading more posts like this? Subscribe or follow Wild Earth Lab using the links below!


References and Further Reading

  1. Davies, B. (2022). Ice shelves, icebergs and sea ice. AntarcticGlaciers.org. Available:
  2. NASA (2017). Core questions: An introduction to ice cores. Available: https://www.antarcticglaciers.org/glacier-processes/glacier-types/ice-shelves-sea-ice-icebergs/https://climate.nasa.gov/news/2616/core-questions-an-introduction-to-ice-cores/
  3. National Park Service (2018).Glaciers and Climate Change. Available: https://www.nps.gov/articles/glaciersandclimatechange.htm
  4. National Snow and Ice Data Center (n.d.) Glaciers. University of Colorado Boulder. Available: https://nsidc.org/learn/parts-cryosphere/glaciers
  5. Plummer, C. C., Carlson, D. H., & Hammersley L. (2019). Physical Geology. New York, NY: McGraw-Hill Education. Pg 163-170, 283 – 287

Sharing options and discussion for this post:

Posted on — 3 Comments

12 Pollination Activities for Kids: pollinator lesson ideas to try in your classroom!

photo of a flower anatomy diagram overlaid with the text "10 pollination activities for kids!" and "+ a free flower anatomy worksheet!"

Wild Earth Lab is supported by readers like you. This post includes links to my own products and affiliate products. If you purchase through links on my site, I may earn a small commission at no additional cost to you.

If you’re learning about pollination with your students or kids this school year, try out some of these fun pollination activity ideas in your classroom!

Special note for educators: if you’re planning to teach pollination, you can find all the activity directions, handouts, and printable materials you’ll need in my complete Pollination Unit โ€“ and you will support this blog with your purchase.

1. Insect Vision

A flower that looks fairly plain to the human eye may look completely different through the eyes of an insect! Flower petals sometimes reflect UV and infrared light, which are colors that the human eye cannot see but are visible to some insect pollinators.

Grab a UV marker plus black light set, paper, and regular markers. Start by using a regular marker to draw the outline of a flower and cut it out. Then, create โ€œinvisibleโ€ patterns on the petals with the black light marker. Then shine the black light on your flower to reveal the hidden designs!

A flower that looks fairly plain to the human eye may look completely different through the eyes of an insect!

2. Pollinator Garden

Plant a pollinator garden with native wildflower species to attract pollinators to your yard. Start by researching native wildflower species in your local area. A plant nursery or garden center can be a great place to start, and you can also find seeds online. To further promote pollinator habitat in your yard, you can even build a pollinator hotel!

3. Flower Dissection

Dissect a flower to learn about flower anatomy. Can you find the stamen, carpel, petals, and sepals? Talk about how brightly colored petals can attract pollinators, how stamens spread pollen onto the pollinator’s body or legs, and how carpels have pollen tracked onto them by the pollinators.

Diagram showing the parts of a flower, including the carpel, stamen, pedicel, sepal, petal, and receptacle.
Anatomy of a flower!

4. DIY Flower Anatomy Diagram

Here’s a fun pollination activity idea that’s completely free! I created this free printable flower anatomy coloring activity. You can download and print it from my free resources page. To access the free resources page, simply join my newsletter (you can unsubscribe at any time, but stay subscribed if you’d like my fun science and nature-related activities and more sent to your inbox!)

Freebie found on my free resources page

5. Pollination in Action

Visit a butterfly pavilion or butterfly house to observe pollination up close!

Better yet, raise your own butterflies from caterpillars, then release them into your garden where they can feed on your flowers! You do this using a butterfly grower’s kit or by finding caterpillars in your yard to raise.

close up of a child holding a butterfly on hand
Photo by Vladimir Srajber on Pexels.com

6. Metamorphosis and Migration

Raise and release monarch or painted lady butterflies. You can even find kits to band monarch butterflies and discover if they migrated successfully! For more information on monarch banding and tracking, visit Monarch Watch.

7. Healthy Habitats

Participate in an invasive species removal workday at a local natural area. This will help create room for the native wildflowers to grow and feed pollinators!

8. Honey Fun

Learn about how bees make honey (for example, here’s an article about bees making honey from Southern Cross University). Then cook or bake something with honey!

honeycomb close up detail honey bee
Bees making honey. Photo by Pixabay on Pexels.com

9. Waggle Dance

Read about or watch a video of the โ€œwaggle danceโ€ that bees use to tell hive members the distance and direction to flowers (e.g., here’s a waggle dance video on YouTube from Bienentanz GmbH). Then, try doing your own waggle dance in the same pattern as the bee!

10. Pollination at Night

If you have night-time opening flowers in your area (e.g., evening primrose, moonflower, night phlox), go for a nighttime walk with a flashlight to observe the open flowers. Go back during the day to see them when they are closed.

11. Unusual Pollinators

Learn about some unusual pollinators with this fun ice-breaker game! I’ve created a printable handout with the game directions and free cards. You can download and print it from my free resources page. To access the free resources page, simply join my newsletter.

12. Symbiotic Relationships

Did you know that pollination is a type of symbiotic relationship between a plant and a pollinator? Learn more about symbiotic relationships with my mini study pack:

More Pollination Materials From Wild Earth Lab:

Are you interested in reading posts with ecology and science learning activity ideas? Subscribe or follow Wild Earth Lab using the links below!

Sharing options and discussion for this post:

Posted on — 6 Comments

Snow Hydrology: why and how do scientists study snow?

painting of a frozen river in the snow

What is snow hydrology?

Snow hydrology is the study of snowโ€™s role in the water cycle. Snow hydrologists study snowfall, melting, and everything that happens to snow in between! Many snow hydrologists are interested in the ways snow impacts our water resources. They may use data to make predictions about the water supply.

A note for teachers: if you’re looking for a winter-themed way to teach applied science and math, I’ve created something you will love. My Science in the Snow winter STEM unit includes hands-on activities for learning about the scientific study of snow. It covers the properties of water molecules, phase changes, weather stations, and snow-water equivalent calculations. Plus, every purchase helps support this blog!

Why is snow hydrology important?

Snow plays an important role in the water cycle in many parts of the world. For example, in mountainous regions, snow accumulates (builds up) in the mountains all winter, then rapidly melts in the spring. As a result, the amount of water flowing through streams dramatically increases in the spring and early summer. Water from snow melt is used for drinking, household activities, and growing food crops. Many animals also rely on a yearly cycle of snow accumulation and melt. For example, some fish rely on cold water from snowmelt to keep their habitats cool enough during the hot summer.

One of the most important things snow hydrologists study is the impacts of climate change on snow. They seek to understand and predict the ways the amount of snowfall and the timing of snowmelt are changing in different places. This is an important topic to study because snow helps provide water that humans and many ecosystems rely on.

This diagram, from my Science in the Snow Unit, shows snow’s role and movements within the water cycle, via accumulation, redistribution, and melting.

What do snow hydrologists measure?

Snow hydrologists take lots of measurements. They measure the total amount of snowfall, as well as the density, composition, layering, and temperature of the snowpack. To collect this information, snow hydrologists may perform field research, monitor weather stations, or use remote sensing (e.g., monitoring an area from an aircraft or drone). Many snow hydrologists are interested in how much water snow will provide once it melts. Because of this, they measure or estimate snow water equivalent (SWE). You can think of SWE as the depth of standing water that would be left on the ground if all the snow melted instantaneously. This number can vary a lot. The density of snow has a big impact on the SWE. Estimating SWE accurately is important because it helps us make predictions about our water supply.

A basic method for measuring snow depth

Methods for Snow research:

1.) Field Research

To collect data, snow hydrologists sometimes need to put on skis or snowshoes and go take measurements by hand. Often, snow hydrologists must carry all the equipment they need on their backs or in sleds. They head out to a study area to measure snow depth, dig snow pits to observe layers in the snowpack, collect samples, and more.

2.) Weather Stations

Weather stations are great for taking lots of measurements all winter long. These stations can monitor the total amount of snowfall as well as the density of snow, temperature, wind speed, and more. Weather stations in remote areas are often powered by solar panels. They can repeatedly take measurements throughout the winter without anyone there in-person.

3.) Remote Sensing

Many of the newest methods in snow hydrology fall into the category of remote sensing. Remote sensing is a way of learning about something without making direct contact with it. Remote sensing includes using drones, aircrafts, and satellites to monitor the groundโ€™s surface. Today, snow hydrologists can learn about the location and characteristics of snow with remote sensing. Some scientists are even developing tools for estimating snow water equivalent with remote sensing.

black drone
Drones can be used for remote sensing. Photo by David Bartus on Pexels.com

Are you studying the water cycle or snow?

Check out my collection of Environmental Science educational materials:


Are you interested in reading more posts like this? Subscribe or follow Wild Earth Lab using the links below!


References and Further Reading

  1. The US Geological Survey has a great webpage all about some snow hydrologists and what they do! Get to know the scientists behind snowmelt research!
  2. The European Space Agency released this animated map that shows the locations of water stored as snow across the globe!
  3. Read this article from the University of Washington about how students study to become snow hydrologists.
  4. National Weather Serviceโ€™s webpage with info on snow water equivalent (SWE).
  5. This review article by Anne W. Nolin explains recent advances in remote sensing of snow. The article has sections explaining different parameters related to snow that remote sensing may help measure.
  6. This article from MissoulaAvalanche.org explains SWE and SLR.
  7. This short article from the University of Wyoming gives details about different areas of research within the field of snow hydrology.

Sharing options and discussion for this post:

Posted on — 1 Comment

What is Biomimicry? Definition and examples of designs inspired by nature!

Picture of a whale and a wind turbine with the text "biomimicry: designs inspired by nature: activity ideas!" and "plus tones of real-world examples of biomimicry"

Biomimicry, also called biomimetics, is when people draw inspiration from nature to design items and solve problems. Plant, fungi, and animal species evolved features and behaviors over vast periods of time to overcome challenges they face in their habitats. Engineers may mimic these features and behaviors from nature to improve their own designs.

A note to teachers: Are you teaching your students about biomimicry, design inspired by nature? I think you’ll love my Tree Frogs STEM unit – it discusses biomimicry and helps build STEM skills through hands-on activities. It’s so much more than “just a frog unit,” and every purchase helps support this blog!

Recommended products

Tree frog toes and grippy tire tread

Did you know that tree frog toes are helping to inspire designs for car tires? Tree frog toes have grippy pads. If you could look closely at these pads, you would see a pattern of deep, hexagon-shaped grooves. The grooved pattern helps tree frogs stick to the damp surface of trees. By studying the toes of tree frogs, scientists and engineers are learning to design better tread patterns for car tires to improve traction on damp roads!

Tree frogs and biomimicry: The tiny, grippy patterns on tree frogs’ toes help them stick to vertical surfaces and climb. Similar grippy patterns are seen in tire tread!

Owls/Hummingbird wings and quiet flight

Owls have specialized noise-dampening feathers on the fronts of their wings so they can fly silently and sneak up on prey. Hummingbirds also have similar noise-dampening feathers to keep the sound to a minimum as they beat their wings dozens of times per second! Studying the wings of these birds helped engineers design wings for quieter airplanes.

brown hummingbird selective focus photography
A hummingbird in flight. Photo by Philippe Donn on Pexels.com

Burs and Velcro

Velcroโ€™s hooks mimic the way that burs stick to the fur of passing animals (or the leg of your hiking pants!). The soft side of the Velcro is like the animal fur, and the rigid side is like the hooks on the bur. Burs evolved as a way for plants to disperse their seeds. There is a seed inside of each bur. By attaching seeds to animals, the plants can reach new habitats, rather than all growing next to the parent plant.

Humpback whales and wind turbines

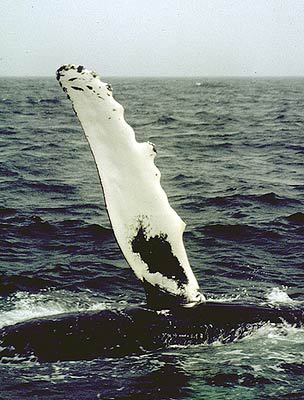
Humpback whale fins helped inspire the design of wind turbine blades. A whaleโ€™s unique fin shape is great for increasing lift and decreasing drag. This shape helps the whale glide through the water, and it helps wind turbines spin to generate renewable energy!

Spider webs and bird safety glass

Spiders build their webs so that small insects will accidentally fly into the webs and become trapped in the sticky threads. But spiders don’t want larger flying animals like birds to run into and destroy the webs they painstakingly build. To avoid this, some spiders make silk with an ultraviolet coating. The ultraviolet colors are highly visible to birds, but not to many other species. This allows birds to see the web before they inadvertently fly into it and destroy it. A window glass company was inspired by these spiders to create glass windows with a UV-reflective pattern throughout. While not visible to humans, the reflective pattern lets birds know there’s something in their path before they collide with the window and injure themselves.

Flying squirrels, sugar gliders, and wingsuits

Wingsuits sometimes used by daredevils in extreme sports like skydiving and base jumping mimic the skin flaps that allow flying squirrels and sugar gliders to sail through the air from tree to tree!

Glaucomys volans (southern flying squirrel)
Flying squirrel.

Biomimicry Activity Ideas For Kids

Here are a few activity ideas for teaching students about biomimicry!

  1. Case Study: Have each student research in-depth one particular case of biomimicry. What animal(s) are being mimicked? What traits are being mimicked? How are humans using these traits? What products or systems did it help create?
  2. DIY Biomimicry: provide each student with blank paper and have them brainstorm their own idea for an item or system they could create using biomimicry. Encourage them to start by listing a few favorite animals, and jotting down some of the characteristics/behaviors of each animal. How could those characteristics/behaviors benefit humans? Once they have their ideas, students can draw or write about their design.
  3. Tree Frogs and Biomimicry: Consider downloading my Tree Frogs STEM Unit for kids! It’s a complete unit designed to build math, engineering, and science skills, with activities themed around tree frogs! It includes some fun origami engineering activities as well as information on tree frog biomimicry!

Recommended products

Are you interested in reading more posts like this? Subscribe or follow Wild Earth Lab using the links below!


References and Further Reading

  1. Vanderbilt, T. (2012). How Biomimicry is Inspiring Human Innovation. Smithsonian Magazine. Available: https://www.smithsonianmag.com/science-nature/how-biomimicry-is-inspiring-human-innovation-17924040/
  2. Phillips, E. (n.d.). BIOMIMICRY IS REAL WORLD INSPIRATION. Carnegie Museum of Natural History. Available: https://carnegiemnh.org/biomimicry-is-real-world-inspiration/
  3. Schwartz, D. (2012). Wing-Suits: Humans Surpassing Animals in Flight. Boston University. Available: https://blogs.bu.edu/bioaerial2012/2012/09/26/wing-suits-humans-surpassing-animals-in-flight/
  4. Green Team Blog (2014). A Better Building: Biomimicry Glass Working with Nature to Reduce Bird-Window Collisions. University of Utah. S.J. Quinney College of Law. Available: https://law.utah.edu/a-better-building-biomimicry-glass-working-with-nature-to-reduce-bird-window-collisions/
  5. University of Akron News (2018). With the help of frogs, graduate student wins award for tire tread research. University of Communications and Marketing. Available: https://www.uakron.edu/im/news/with-the-help-of-frogs-graduate-student-wins-award-for-tire-tread-research

Sharing options and discussion for this post: