Posted on — Leave a comment

Flower Dissection: try this simple hands-on science activity in your classroom!

pink flower, tweezers, and scissors with worksheets.

Are you teaching your students about the parts of a flower or plant anatomy? Sometimes the best way to understand how something works is by taking it apart. A flower dissection is a simple and engaging hands-on activity that brings plant anatomy to life in your classroom. In this activity, students will carefully examine and identify key flower structures like petals, sepals, carpels, and stamens. Plus, theyโ€™ll explore the fascinating connection between flowers and Fibonacci numbers in nature!

If you’re looking for more background information about flower anatomy, be sure to check out my blog post where I cover the four main whorls of a flower. You can also learn more about the functions of flowers and their various parts in the plant life cycle in this post about pollination and the plant life cycle!

Please Note: I’ve made the directions for this flower dissection activity available for free here in this post. If you would like printable directions and worksheets for this activity, you can find them in my complete Flowers Unit in my shop.

Materials

Each student will need the following materials:

  • Flowers
  • Tweezers
  • Glue
  • Pencils or pens
  • Printed student directions and lab worksheet (available in my Flower Unit)

Tips for Success

  • Have flower and plant anatomy diagrams on hand so your students can reference them as they dissect their flowers. Need diagrams? Try one of these options:
    • You can find my hand-drawn flower & plant anatomy diagrams in my flowers unit (linked above)
    • You can also find a free flower diagram on my free resources page (pictured below)!
  • Use a large flower so that students can easily see all the parts.
  • Use a complete flower with all four main flower parts: sepals, petals, carpels, and stamens. For example, lilies, hibiscuses, or tulips are all good choices.
diagram showing the parts of a flower

Directions

Part 1: Flower Dissection

Pass out the materials to your students. Give a brief overview of the main parts of a flower. Then, assist your students as they work through the following steps to dissect their flowers:

  1. Use the tweezers or your fingers to carefully remove the sepals and then the petals from your flower.
  2. Break apart the carpel(s) and stamens.
  3. Count the number of sepals, petals, carpels, and stamens and record the number of each.
  4. Glue one of each part to the lab worksheet.
  5. Use a pencil or pen to draw arrows and label the stigma, style, and ovary on the carpel glued to the lab worksheet.
  6. Use a pencil or pen to draw arrows and label the anther and filament on the stamen glued to the lab worksheet.

Part 2:ย  Fibonacci Numbers in Nature

Fibonacci numbers form a sequence so that each number is the sum of the previous two numbers (e.g., 1+1 = 2; 2+1 = 3, 3+2 = 5; 5+3=8; and so on). Fibonacci numbers are often found in nature. Students should answer the following questions:

  1. Calculate and write down the next 5 numbers in the Fibonacci sequence: 1,1,2,3,5,8,… ___, ___, ___, ___, ___
  2. Look back at your lab worksheet. How many petals did your flower have? Is this a Fibonacci number? What about the sepals? Carpels? Stamens?

Study Flowers with Wild Earth Lab!

If you enjoyed this activity, I know you’ll love my Flowers Unit! It includes everything you need for this activity and other flower projects too!

OR – take your botany learning to the next level with my Botany Collection. It’s a bundle of three plant units: Flowers, Pollination, and Fruit!

Ready for another dissection?

Read my blog post on how to do a Mushroom Dissection Lab!

Explore more lessons from Wild Earth Lab:

If you enjoyed this post, I know you will love trying my other science and nature units in your classroom too!


Are you interested in reading more posts with directions for science activities? You can subscribe or follow Wild Earth Lab using the links below!

Subscribe, share, and comment:

Posted on — 2 Comments

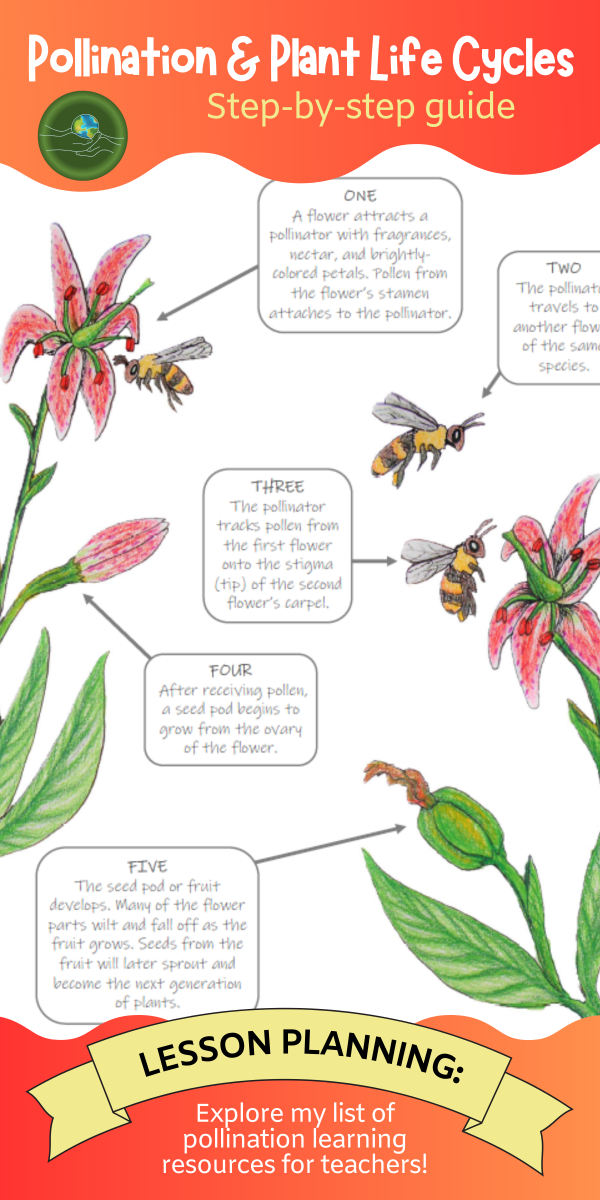
How does pollination work? A step-by-step guide to pollination and the plant life cycle

banner advertising a blog post about pollination and plant life cycles with a diagram of bees pollinating flowers
text that says share this post

In this post, we will take a closer look at the steps of animal pollination and the plant life cycle. You might already know that pollination is the transfer of pollen from the stamen to the carpel of a flowering plant (psst – brush up on your plant anatomy by reading my flower anatomy post or checking out my Flowers Unit!). Once pollinated, the plant forms a fruit. Fruits contain seeds, which will grow into the next generation of plants.

A variety of animals can be pollinators, such as bees, butterflies, and many others that may surprise you. The relationship between a pollinator and a plant is key to the survival of both species. This relationship is so important to both the plant and the pollinator that it influences how they evolve. In other words, plants and pollinators coevolved. Plant species developed traits to help them attract pollinators, such as brightly colored petals, sweet nectars, and strong scents. As pollinator species grew reliant on nectar as a food source, they developed body parts and habits for collecting flower nectar more efficiently.

Before we dive in: If youโ€™re an educator planning to teach pollination in your classroom, great activities are key to deepening understanding! I think you and your students will love my Pollination Unit, which is also found within my Botany Collection (plus youโ€™ll support my blog with your purchase! โค๏ธ)

Now, let’s take a look at the steps of pollination and the plant life cycle!

Step 1: Attracting pollinators

A flower attracts a pollinator with fragrances, nectar, and brightly-colored petals. Pollen from the flowerโ€™s stamen attaches to the pollinator.

A pollinator visiting a flower.

Step 2: Pollen transfer

The pollinator travels to another flower of the same species.

A pollinator traveling between flowers of the same species.

Step 3: Pollination

The pollinator tracks pollen from the first flower onto the stigma (tip) of the second flowerโ€™s carpel. Pollen travels via the style to the flower’s ovary.

The pollinator transfers the pollen to a second flower.

Step 4: Fruit growth

 After receiving pollen, a fruit or seed pod begins to grow from the ovary of the flower. Many of the flower parts wilt and fall off as the fruit/seed pod grows.

A fruit starts to form from the flower’s ovary.

Step 5: Seed dispersal

The seed pod or fruit develops. Once the fruit is ripe, the plant must disperse its seeds. At this point, some plants rely on another animal (separate from the pollinator) to help with seed dispersal. After the animal eats the fruit, it travels away from the parent plant and deposits the seeds in its scat. However, many plants do not rely on animals for seed dispersal. Alternative methods for seed dispersal utilize forces such as wind, water, and gravity.

Almost ready for seed dispersal.

Step 6: Germination and growth

After seed dispersal, seeds will germinate (or sprout) into tiny plants. The luckiest of the tiny plants will grow and reach maturity. Once mature, the plants make flowers of their own to attract pollinators, and the cycle begins again!

Germination process.

Teaching Pollination and Plant Life Cycles

Are you teaching pollination in your classroom? Here are some additional activity ideas and resources!

1. Try my free pollinator guessing game in your classroom:

Directions and cards for a pollinator guessing game are available on the free resources page of my website. My email subscribers gain access to the free resources page (plus receive my newsletters with new activity ideas, project guides, and science teaching inspiration!).

2. Read my post about weird and wild pollinators!

3. Check out my list of pollinator activity ideas for classrooms!

4. Try the flower anatomy activity in this blog post:

5. Study pollination with Wild Earth Lab!

Your students will love my Pollination Unit and other science units! I created this set of printable pollination learning materials and it is packed with activities and information, as well as my pollination artwork!

Here are some more units that I think you’ll love:


Are you interested in reading more posts about environmental science topics? Subscribe or follow Wild Earth Lab using the links below!


Sharing options and discussion for this post: