Are you teaching your students about the parts of a flower or plant anatomy? Sometimes the best way to understand how something works is by taking it apart. A flower dissection is a simple and engaging hands-on activity that brings plant anatomy to life in your classroom. In this activity, students will carefully examine and identify key flower structures like petals, sepals, carpels, and stamens. Plus, they’ll explore the fascinating connection between flowers and Fibonacci numbers in nature!
If you’re looking for more background information about flower anatomy, be sure to check out my blog post where I cover the four main whorls of a flower. You can also learn more about the functions of flowers and their various parts in the plant life cycle in this post about pollination and the plant life cycle!
Please Note: I’ve made the directions for this flower dissection activity available for free here in this post. If you would like printable directions and worksheets for this activity, you can find them in my complete Flowers Unit in my shop.
Printed student directions and lab worksheet (available in my Flower Unit)
Tips for Success
Have flower and plant anatomy diagrams on hand so your students can reference them as they dissect their flowers. Need diagrams? Try one of these options:
You can find my hand-drawn flower & plant anatomy diagrams in my flowers unit (linked above)
You can also find a free flower diagram on my free resources page (pictured below)!
Use a large flower so that students can easily see all the parts.
Use a complete flower with all four main flower parts: sepals, petals, carpels, and stamens. For example, lilies, hibiscuses, or tulips are all good choices.
Directions
Part 1: Flower Dissection
Pass out the materials to your students. Give a brief overview of the main parts of a flower. Then, assist your students as they work through the following steps to dissect their flowers:
Use the tweezers or your fingers to carefully remove the sepals and then the petals from your flower.
Break apart the carpel(s) and stamens.
Count the number of sepals, petals, carpels, and stamens and record the number of each.
Glue one of each part to the lab worksheet.
Use a pencil or pen to draw arrows and label the stigma, style, and ovary on the carpel glued to the lab worksheet.
Use a pencil or pen to draw arrows and label the anther and filament on the stamen glued to the lab worksheet.
Part 2: Fibonacci Numbers in Nature
Fibonacci numbers form a sequence so that each number is the sum of the previous two numbers (e.g., 1+1 = 2; 2+1 = 3, 3+2 = 5; 5+3=8; and so on). Fibonacci numbers are often found in nature. Students should answer the following questions:
Calculate and write down the next 5 numbers in the Fibonacci sequence: 1,1,2,3,5,8,… ___, ___, ___, ___, ___
Look back at your lab worksheet. How many petals did your flower have? Is this a Fibonacci number? What about the sepals? Carpels? Stamens?
Study Flowers with Wild Earth Lab!
If you enjoyed this activity, I know you’ll love my Flowers Unit! It includes everything you need for this activity and other flower projects too!
OR – take your botany learning to the next level with my Botany Collection. It’s a bundle of three plant units: Flowers, Pollination, and Fruit!
Ready for another dissection?
Read my blog post on how to do a Mushroom Dissection Lab!
Studying the parts of a mushroom is a fun biology activity for students at many levels. One of the best, hands-on ways to learn mushroom anatomy is by dissecting one. In this mushroom dissection activity, students will observe the…
In this post, we will examine overall tree anatomy and the key parts of a tree. Then, we will peek inside the tree to examine the layers of a tree’s trunk and their functions.
A special note for educators: Are you planning to teach your students about trees? I offer a complete Trees Unit as well as aForest Ecology Unit. And they are both found within my discounted Forest Bundle. I know your students will love the beautiful diagrams and hands-on activities – and you’ll support this blog with your purchase! ❤️
We can think of trees as having three main parts. Let’s take a look at each.
Roots are the underground parts of a tree that take up water and dissolved minerals. They also help anchor the tree to the soil.
The trunk is the main woody stalk of a tree which supports all other branches.
The crown is the top portion of a tree. It includes the branches and leaves or needles extending from the main trunk. The crown of a tree will look quite different in different types of trees. Picture the crown of a deciduous tree, conifer tree, or palm tree. Let’s take a closer look at the parts of the crown:
A branch is any woody stalk extending from the main trunk.
The leaves are parts of a tree that produce the tree’s food through photosynthesis. In deciduous trees, leaves are broad and flat, and fall off the tree at the end of each growing season.
The needles are the leaves of a coniferous tree, which produce the tree’s food through photosynthesis. Needles do the same job as broad, flat leaves but stay attached to the tree throughout the entire year.
Tree Trunk Anatomy
Inside a human body, you will find different organs: a heart, intestines, lungs, kidneys, etc. Just like humans, trees have different organs inside their trunks too. The trunk of a tree is made up of several layers, each performing a different function. Let’s take a look.
Bark is the rough, protective outer coating. Bark helps protect the tree from insect and fungi invaders.
The phloem underlies the bark. The phloem’s function is to transport sugars. Sugars form in the leaves during photosynthesis, and the phloem moves the sugars to other parts of the plant where they are needed for growth.
The cambium is a thin layer of dividing cells between the xylem and phloem. This is where secondary (outward) growth occurs. In temperate climates, the most growth happens during the summer. This is why tree rings form.
The sapwood underlies the cambium. The sapwood is the living part of the xylem, which actively moves water upwards through the tree. Water is drawn up through the ground via the tree’s roots. Water leaves the tree through tiny pores called stomata in the leaves, in a process called transpiration. The xylem grows from the cambium – we can see tree rings in the xylem.
The heartwood is old, inactive xylem tissue. Heartwood no longer has living cells and does not move water. Heartwood provides structural support. Both living and dead xylem parts (sapwood and heartwood) contain tree rings that formed each year as the tree grew inwards from the cambium.
The pith is at the very center of the tree trunk and plays a role in the movement of nutrients. In older trees the pith is often very tiny or diminished, relative to the size of the heartwood.
Free Tree Anatomy Materials:
My email newsletter subscribers can access my full collection of free learning resources. Sign up today to access all the freebies, including these:
Trees are perennial plants with long, woody trunks. Trees of temperate latitudes are often grouped into two main categories: deciduous trees that lose and regrow their leaves each year, and coniferous trees that stay green year-round! Let’s take a closer look at deciduous vs coniferous trees…
Before we dive in: If you’re an educator planning to teach about trees in your classroom, great activities and visuals are key to deepening understanding! I think you and your students will love my complete Trees Unit (plus you’ll support this blog with your purchase! ❤️)
Deciduous Trees
Here are a few properties of deciduous trees. A tree is a deciduous tree if it:
Has broad, flat leaves
Does photosynthesis during the warm growing season only
Leaves change color at the end of the growing season
Loses its leaves and regrows its leaves once a year
Examples of Deciduous Trees
Ash
Birch
Maple
Oak
Willow
Coniferous Trees
Here are a few characteristics of coniferous trees. A tree is coniferous if it:
Has needles
Does photosynthesis year-round, but may slow down in winter
Needles stay green year-round (“evergreen”)
Needles stay on branches year-round
Has cones
Examples of Conifers
Cedar
Fir
Juniper
Pine
Spruce
Other Evergreens
It’s worth noting that conifers are not the only trees that stay green year-round. You will find many evergreen trees growing at tropical latitudes around the equator. This is because close to the equator, there is little to no temperature difference between summer and winter. Consequently, you will find many unique types of trees growing in the tropics that do not need to shed leaves in wintertime. One example is a palm tree.
Learning Activity Idea:
Play “Deciduous or Coniferous?” Collect samples of parts from several different deciduous and coniferous trees (leaves, needles, seedpods, flowers, fruits, cones, etc.). Grab two jars and label one “deciduous” and one “coniferous”. Ask your child to sort the parts into the jars.
Support Wild Earth Lab with your purchase?
If you enjoyed this post, I think you will love my Trees Unit! It’s a complete set of printable learning materials for teaching kids all about trees – featuring my illustrations! You’ll learn about deciduous vs coniferous, tree anatomy, life cycles, tree ring science, and more!
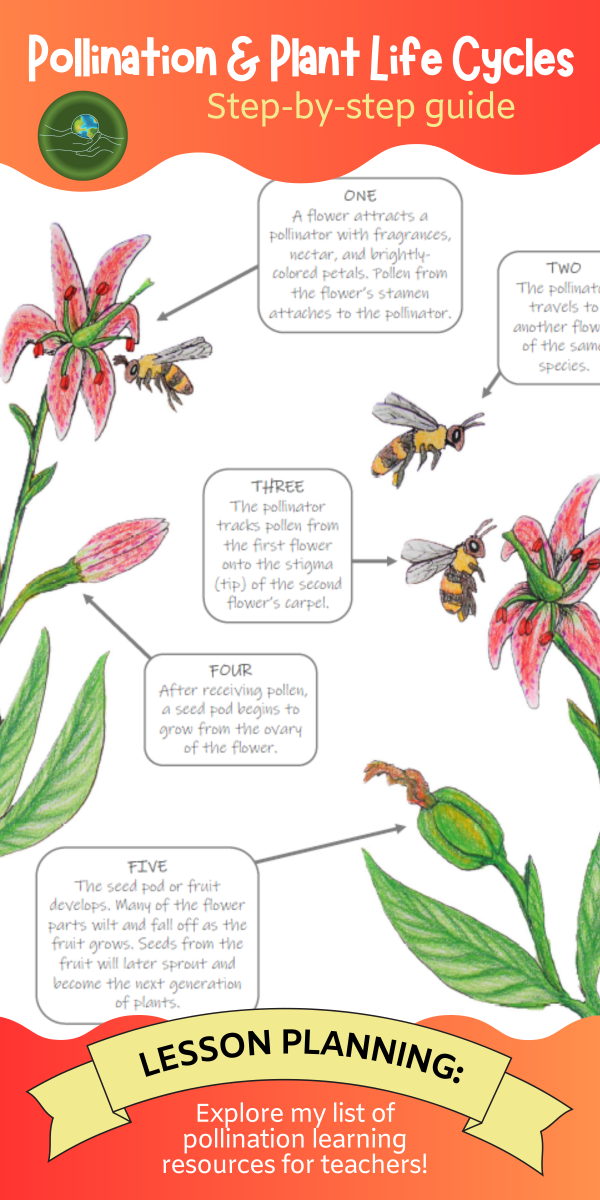
In this post, we will take a closer look at the steps of animal pollination and the plant life cycle. You might already know that pollination is the transfer of pollen from the stamen to the carpel of a flowering plant (psst – brush up on your plant anatomy by reading my flower anatomy post or checking out my Flowers Unit!). Once pollinated, the plant forms a fruit. Fruits contain seeds, which will grow into the next generation of plants.
A variety of animals can be pollinators, such as bees, butterflies, and many others that may surprise you. The relationship between a pollinator and a plant is key to the survival of both species. This relationship is so important to both the plant and the pollinator that it influences how they evolve. In other words, plants and pollinators coevolved. Plant species developed traits to help them attract pollinators, such as brightly colored petals, sweet nectars, and strong scents. As pollinator species grew reliant on nectar as a food source, they developed body parts and habits for collecting flower nectar more efficiently.
Before we dive in: If you’re an educator planning to teach pollination in your classroom, great activities are key to deepening understanding! I think you and your students will love my Pollination Unit, which is also found within my Botany Collection (plus you’ll support my blog with your purchase! ❤️)
Now, let’s take a look at the steps of pollination and the plant life cycle!
Step 1: Attracting pollinators
A flower attracts a pollinator with fragrances, nectar, and brightly-colored petals. Pollen from the flower’s stamen attaches to the pollinator.
A pollinator visiting a flower.
Step 2: Pollen transfer
The pollinator travels to another flower of the same species.
A pollinator traveling between flowers of the same species.
Step 3: Pollination
The pollinator tracks pollen from the first flower onto the stigma (tip) of the second flower’s carpel. Pollen travels via the style to the flower’s ovary.
The pollinator transfers the pollen to a second flower.
Step 4: Fruit growth
After receiving pollen, a fruit or seed pod begins to grow from the ovary of the flower. Many of the flower parts wilt and fall off as the fruit/seed pod grows.
A fruit starts to form from the flower’s ovary.
Step 5: Seed dispersal
The seed pod or fruit develops. Once the fruit is ripe, the plant must disperse its seeds. At this point, some plants rely on another animal (separate from the pollinator) to help with seed dispersal. After the animal eats the fruit, it travels away from the parent plant and deposits the seeds in its scat. However, many plants do not rely on animals for seed dispersal. Alternative methods for seed dispersal utilize forces such as wind, water, and gravity.
Almost ready for seed dispersal.
Step 6: Germination and growth
After seed dispersal, seeds will germinate (or sprout) into tiny plants. The luckiest of the tiny plants will grow and reach maturity. Once mature, the plants make flowers of their own to attract pollinators, and the cycle begins again!
Germination process.
Teaching Pollination and Plant Life Cycles
Are you teaching pollination in your classroom? Here are some additional activity ideas and resources!
1. Try my free pollinator guessing game in your classroom:
Directions and cards for a pollinator guessing game are available on the free resources page of my website. My email subscribers gain access to the free resources page (plus receive my newsletters with new activity ideas, project guides, and science teaching inspiration!).
Your students will love my Pollination Unit and other science units! I created this set of printable pollination learning materials and it is packed with activities and information, as well as my pollination artwork!
Wild Earth Lab is supported by readers like you. This post includes links to my own products and affiliate products. If you purchase through links on my site, I may earn a small commission at no additional cost to you.
You may have noticed the unique rings that appear on tree stumps – and you might even know that you can figure out a tree’s age by counting the rings! But did you know that scientists can use tree growth rings to learn about our past climate and even estimate the date of historic volcanic eruptions? In this post, we will explore the exciting fields of dendrochronology and dendroclimatology – that is, the study of tree-ring dating and the study of past climates using tree rings!
A note for teachers: if you’re planning to teach trees, you’ll find all the printable handouts, worksheets, and activity directions that you’ll need in my complete Trees Unit. Plus, you’ll support my blog with your purchase!
Growth rings form as trees grow within temperate zones: trees grow most rapidly during the warm season when their leaves are on their branches, performing photosynthesis. But in the colder season, leaves fall from branches, causing photosynthesis and growth to stall. This recurring fluctuation in growth rate each year creates the annual ring pattern.
Because of this, thicker tree rings form in years with the longest and warmest or wettest growing seasons. Cool or dry years lead to less favorable growing conditions and consequently, a thinner tree growth ring. Scientists can use tree rings in very old trees to learn about our past climate and even estimate the dates of significant geologic events like volcanic eruptions!
Beneath its rough bark, a tree holds more history than you might realize!
Tree Rings and Climate Change
Tree rings can also provide scientists with a valuable glimpse into our planet’s past climate. The patterns of thicker and thinner rings let scientists know when regions were experiencing events like droughts or cold spells: these less favorable conditions cause thinner growth rings during those years. For example, scientists in Scotland are using tree rings to learn about the variations and past behaviors of the jet stream – narrow, fast air currents in our Earth’s atmosphere, important to global weather patterns. Increased variations in tree rings in recent times lead scientists to suspect that human-caused climate change has started making the jet stream less predictable.
Additionally, historic forest fire regimes (the timing and frequency of forest fires) can be tracked through tree rings. If a tree survives a forest fire, its ring from that year will often be marked with distinct scarring from the flames. Scientists use the scars and rings to figure out the natural timing of the fire regime for a region before humans interfered.
The inside of a tree trunk contains many working parts – as well as a wealth of information about the historic climate and conditions!
You may wonder – why do we need trees to learn about past climates? Surely humans have written records of weather events. However, some trees can live to be several hundred to 1,000 years old, or more! Scientists have even found bristlecone pines, a tree species with remarkable longevity, that have been around for multiple millennia – well before humans were able to accurately measure temperature.
The tree rings can also be counted in petrified wood! When available, preserved and petrified wood give scientists an opportunity to see even further back into the past than the oldest trees in an area – just so long as they can figure out when the ancient tree fell or was chopped down.
Some petrified wood I spotted while out hiking in Colorado!
Tree Rings and Dating Volcanic Eruptions
Severe volcanic eruptions lead to less than favorable growing conditions due to volcanic debris in the atmosphere. Less sunlight reaching the Earth and poor air quality may cause thin or irregular tree rings following an eruption. Looking at the tree rings of very old trees can be a great way for scientists to narrow down the year of a historic volcanic eruption.
One recent example of using tree rings in this way involves a volcano on the Greek island of Santorini. Based on records, scientists knew a significant eruption occurred sometime around 1,600 or 1,500 B.C.E. When looking at an event this ancient, scientists are somewhat limited by the age of trees in the surrounding area – few trees alive today are known to have been alive in 1,600 B.C.E.
However, for this study, the ancient wood used to construct a tomb was used. So long as the life of the ancient tree partially overlaps with the life of a tree living today in that area, scientists can use overlaps in the ring patterns of the living and ancient tree to approximate the date it was cut down. Then, using tree rings from the ancient wood, scientists were able to narrow down the time frame and now estimate the eruption occurred close to the year 1,560 B.C.E. This was possible because scientists could detect a chemical anomaly (or sudden change from the normal chemical make-up) in the ancient tree’s growth rings around this time, caused by a sudden change in growing conditions following the eruption.
Scientists can also look at trees growing on top of volcanic debris deposits – the eruption that formed the deposits must be at least as old as the oldest tree growing on the deposit. Scientists must be careful using this method, however. Take, for example, one well-known volcano – Mount Rainier in Washington state, USA. For a while, scientists believed that Mount Rainier had erupted sometime between 1820 and 1854, based on a study involving counting the number of rings of trees growing upon moraines (mounds of debris deposits) that were assumed to have formed from an eruption (Crandell, 1969). However, more recently, scientists have discredited the tree ring study by showing that these moraines formed from older volcanic deposits being moved around by non-volcanic avalanches (Sisson & Vallance, 2009).
Volcanic eruptions have a huge impact on both the landscape and the plants and animals of an area! Pictured here is the crater of Haleakala, on the island of Maui in Hawaii.
How Scientists Observe Tree Rings
Scientists can learn a lot from looking at tree rings – but they do not necessarily need to chop down a tree to do this! The trees that give the scientists the opportunity to see the furthest back into history are the oldest trees – it certainly would not be worth chopping down these incredible, ancient living beings, just to get a look at their insides.
To look inside of a tree, scientists can use a thin, hand-operated drill to extract a thin “core” of wood. Imagine pushing a hollow straw through a layered Jello, to pull out a thin section – in that thin section you can see all the different stripes, representing each layer – or in the case of a tree, each ring! Then the stripes in the core can be counted to determine the number of rings, and the age of the tree. Trees can heal from these small puncture wounds – just like we heal after scraping a knee or getting a paper cut.
Drilling into a tree (left) then removing the core (right).
Classroom Activity: Observing Tree Rings and Tree Anatomy
As a plant anatomy learning activity, next time you see a cut log on the side of a trail, a stump, or some chopped firewood, try counting the number of rings to determine the tree’s age when it died. For additional learning fun, you can also try identifying the different parts of a tree cross-section: the bark, phloem, cambium, xylem (sapwood and heartwood), and pith:
Bark is the rough, protective outer coating. Bark helps protect the tree from insect and fungi invaders.
The phloem underlies the bark. The phloem’s function is to transport sugars. Sugars form in the leaves during photosynthesis, and the phloem moves the sugars to other parts of the plant where they are needed for growth.
The cambium is a thin layer of dividing cells between the xylem and phloem. This is where secondary (outward) growth occurs.
The sapwood underlies the cambium. The sapwood is the living part of the xylem, which actively moves water upwards through the tree. Water is drawn up through the ground via the tree’s roots. Water leaves the tree through tiny pores called stomata in the leaves, in a process called transpiration.
The heartwood is old, inactive xylem tissue. Heartwood no longer has living cells and does not move water. Heartwood provides structural support. Both living and dead xylem parts (sapwood and heartwood) contain tree rings that formed each year as the tree grew inwards from the cambium.
The pith is at the very center of the tree trunk and plays a role in the movement of nutrients. In older trees, the pith is often very tiny or diminished, relative to the size of the heartwood.
If you’re teaching this activity in an indoor classroom setting, it may help to have small wood slices to use as tree cross sections for each student to observe. (These are also really fun for kids to decorate and turn into necklaces!)
Free Worksheets: My email newsletter subscribers can download and print these free tree anatomy worksheets from my free resources page. To access the freebies, join the newsletter below:
If you enjoyed this post, I know you will love my complete Trees Unit! It has a ton of tree activities and everything you need to study trees in your classroom.
Driedger C. L. & Scott. W. E. U.S. Geological Survey. (August 28, 2008). Mount Rainier – Living safely with a volcano in your backyard. Retrieved from https://geology.com/usgs/rainier/
Pearson, C., Salzer, M., Wacker, L., Brewer, P., Sookdeo, A., & Kuniholm, P. (2020). Securing timelines in the ancient Mediterranean using multiproxy annual tree-ring data. Proceedings of the National Academy of Sciences, 117(15), 8410-8415.