Posted on Leave a comment

5 Winter-Themed STEM Activities: snowflakes, glaciers, and more!

Winter classroom STEM activities

Looking for fun and educational ways to bring STEM learning into your homeschool or classroom this winter? These winter-themed activities are perfect for exploring science, technology, engineering, and math through hands-on projects that celebrate the season. From measuring snow and studying glaciers to investigating the science behind snowflakes and symmetry, these activities will keep students engaged all winter long. Grab your winter coat and get ready to dive into these exciting winter STEM activities!

Wild Earth Lab is supported by readers like you. This post includes links to my own products and affiliate products. If you purchase through links on my site, I may earn a small commission at no additional cost to you.

1. Measure snow like a scientist

If you live somewhere that gets snow in winter, youโ€™ve likely measured the depth of snow before! But with a few extra steps, you can turn this simple task into an awesome, hands-on snow science activity.

Start by learning about snow water equivilent and how to calculate it. This can be a great way to start a conversation about snow in the water cycle, and the ways snow supplies our rivers and aquifers with an important input of water.

You can find the full activity directions for a snow measurements activity in my blog! Or better yet, you can save time and support my blog when you purchase the printable worksheets and directions for this activity in my complete Science in the Snow Unit.

โ˜ž Upgrade your outdoor learning:

Measuring snow with your students? You can track the snow all winter long by placing a metal snow gauge in your yard or outdoor learning area. Whether you’re teaching in the classroom or at home, you can create an inspiring outdoor learning area for studying snow, weather, and more.

Cardinal Snow Gauge: product and image from Soldarmetals on Etsy.
Snow Gauge: product and image from Swenproducts on Etsy.

2. Explore glaciers and climate science

Why study glaciers this winter? Glaciers tie in to many important science topics – not just geology and landforms, but also climate science, sea level rise, and water resources! Glaciers are an important reservoir of frozen freshwater on Earth. However, glaciers all over the world are receding and disappearing due to climate change, putting communities at risk of flooding and altering ecosystems.

Furthermore, glaciers teach scientists about our Earth’s past! Glacial ice is like a time capsule, holding important clues about the history of our Earth and its climate. By studying glaciers, students can learn about and discuss the past, present, AND future of our climate!

Ready to study glaciers? You can read more about the types of glaciers and how they form in my blog post! Or better yet, you can save time and support my blog when you purchase my Glaciers Unit – complete with classroom activities, worksheets, handouts and more.

valley glacier diagram

3. Read about how snowflakes form

If you’ve ever looked at a snowflake under a microscope or magnifying glass, you know that each snowflake is a unique, beautiful formation. But how do these amazing water crystal structures form? It all starts high in earth’s atmosphere, with a dust particle and water vapor. Since every snowflake takes a slightly different path to the ground, each snowflake runs into unique conditions along the way. These different experiences impact the way each snowflake forms.

Learning about the formation of snow ties in to studies of meterology and the three phases of water. Because of this, snowflake formation is an engaging winter science topic at many different levels.

Need materials for studying snowflakes? Read a step-by-step description of how snowflakes form in my blog post! Or, find printable snowflake formation materials in my Snowflake Mini Study or in my complete Geometry in the Snow Unit.

formation of a snowflake diagram

4. Learn about symmetry with paper snowflakes

When it comes to geometry, snowflakes provide a great tool for learning about symmetry with a winter-y twist! Cutting paper snowflakes from coffee filters or paper is a great hands-on way to study rotational symmetry, planes of symmetry, and more!

Paper snowflakes are an easy activity to DIY! But if you’re looking for a little guidance, I’ve got you covered. Activity directions and worksheets for a paper snowflakes & lines of symmetry lesson are also found in my Geometry in the Snow Unit.

lines of symmetry classroom handouts

5. Study the animals of the poles!

Winter is the perfect time to study the survival strategies of animals that live in the coldest places on earth! Topics could include survival strategies like migration, hibernation, and insulation or the food webs and ecosystems of the Arctic or Antarctic.

Studying and modeling arctic food webs is a fun, hands-on ecology activity that students love. You can learn how to build your own food webs in my blog post. Furthermore, you can learn all about arctic ecology and find materials for an arctic food webs lesson in my Arctic Unit.

handouts and classroom printables

Winter studies with Wild Earth Lab!

Thereโ€™s no need to scramble to put together the perfect winter science lesson  โ€“ Iโ€™ve already created some for you! The winter stem activities from this post come from my winter STEM units:

Explore more lessons from Wild Earth Lab:

If you enjoyed these winter stem activities, I know you will love trying my other science and nature units in your classroom too!


Are you interested in reading more posts with STEM activity ideas? Subscribe or follow Wild Earth Lab using the links below!

Subscribe, share, and comment:

Posted on 1 Comment

Build Your Own Solar Eclipse Viewer Box: a step by step guide!

a banner that says "how to build your own solar eclipse viewer box" with a picture of an eclipse and a diagram of a viewer box

If a solar eclipse is happening where you live, make this simple solar eclipse viewer from household materials. You cannot look directly at the Sun because it will damage your eyes. However, you can view a solar eclipse using a homemade eclipse viewer box. You can use this viewer box to watch a partial or annular solar eclipse, or track the progress of a total solar eclipse before and after totality.

Photo by Drew Rae on Pexels.com

Before we begin, you may ask: what is happening during an eclipse?

As you know, the Earth is orbiting the Sun, and the Moon is orbiting the Earth. Every once and a while, the Sun, Moon, and Earth all line up and something very special happens. A solar eclipse happens when the Moon passes between the Earth and the Sun. During a solar eclipse, the Moon totally or partially blocks out the Sun during the daytime.

Try my Solar Eclipse Mini Study – with worksheets, activity guides and more.

Materials

  • Cardboard box (tip: longer box = larger projected image!)
  • Sheet of white printer paper
  • Box cutter
  • Tape
  • Aluminum foil
  • Scissors
  • Pin
Download a print out version of these directions to build your own solar eclipse viewer box.

Set Up

Download my printable version of these directions to build a solar eclipse viewer box.

  1. Have an adult cut a head-sized hole into the bottom of the cardboard box.
  2. Use tape to attach a white sheet of paper to one side of the box.
  3. In the opposite side, towards the top of the box, have an adult cut a small rectangular opening.
  4. Cut a piece of aluminum foil that is slightly larger than the rectangular opening you cut.
  5. Keeping the foil completely flat, tape the foil over the rectangular opening.
  6. Use the pin to make a tiny hole in the center of the aluminum foil.
  7. Close the top of the box and tape it shut.

Using Your Eclipse Viewer Box

  1. Stand with your back to the Sun. Never look directly at the Sun and never face the Sun while using the viewer. Do not look at the Sun through the pinhole.
  2. Hold the box with the head hole facing towards the ground. The aluminum foil should face the Sun.
  3. Facing the piece of paper, place the top of your head up into the head hole. Do not put your whole head all the way up into the box, as this will block the incoming light.
  4. Look up at the white sheet of paper.
  5. With the help of a friend, adjust your position until you see the projection of the solar eclipse on the paper.

Study Solar Eclipses with Wild Earth Lab!

You’ll find the printable directions for this activity, solar eclipse diagrams, and worksheets in my Solar Eclipse Mini Study:

Try my Solar Eclipse Mini Study – with worksheets, activity guides and more.

Explore curriculum from Wild Earth Lab:

If you enjoyed this post, I know you will love using my environmental science materials in your classroom!


Are you interested in reading more posts like this? Subscribe or follow Wild Earth Lab using the links below!


Sharing options and discussion for this post:

Posted on 1 Comment

What is Biomimicry? Definition and examples of designs inspired by nature!

Picture of a whale and a wind turbine with the text "biomimicry: designs inspired by nature: activity ideas!" and "plus tones of real-world examples of biomimicry"

Biomimicry, also called biomimetics, is when people draw inspiration from nature to design items and solve problems. Plant, fungi, and animal species evolved features and behaviors over vast periods of time to overcome challenges they face in their habitats. Engineers may mimic these features and behaviors from nature to improve their own designs.

A note to teachers: Are you teaching your students about biomimicry, design inspired by nature? I think you’ll love my Tree Frogs STEM unit – it discusses biomimicry and helps build STEM skills through hands-on activities. It’s so much more than “just a frog unit,” and every purchase helps support this blog!

Recommended products

Tree frog toes and grippy tire tread

Did you know that tree frog toes are helping to inspire designs for car tires? Tree frog toes have grippy pads. If you could look closely at these pads, you would see a pattern of deep, hexagon-shaped grooves. The grooved pattern helps tree frogs stick to the damp surface of trees. By studying the toes of tree frogs, scientists and engineers are learning to design better tread patterns for car tires to improve traction on damp roads!

Tree frogs and biomimicry: The tiny, grippy patterns on tree frogs’ toes help them stick to vertical surfaces and climb. Similar grippy patterns are seen in tire tread!

Owls/Hummingbird wings and quiet flight

Owls have specialized noise-dampening feathers on the fronts of their wings so they can fly silently and sneak up on prey. Hummingbirds also have similar noise-dampening feathers to keep the sound to a minimum as they beat their wings dozens of times per second! Studying the wings of these birds helped engineers design wings for quieter airplanes.

brown hummingbird selective focus photography
A hummingbird in flight. Photo by Philippe Donn on Pexels.com

Burs and Velcro

Velcroโ€™s hooks mimic the way that burs stick to the fur of passing animals (or the leg of your hiking pants!). The soft side of the Velcro is like the animal fur, and the rigid side is like the hooks on the bur. Burs evolved as a way for plants to disperse their seeds. There is a seed inside of each bur. By attaching seeds to animals, the plants can reach new habitats, rather than all growing next to the parent plant.

Humpback whales and wind turbines

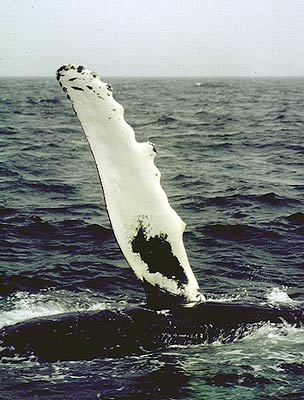
Humpback whale fins helped inspire the design of wind turbine blades. A whaleโ€™s unique fin shape is great for increasing lift and decreasing drag. This shape helps the whale glide through the water, and it helps wind turbines spin to generate renewable energy!

Spider webs and bird safety glass

Spiders build their webs so that small insects will accidentally fly into the webs and become trapped in the sticky threads. But spiders don’t want larger flying animals like birds to run into and destroy the webs they painstakingly build. To avoid this, some spiders make silk with an ultraviolet coating. The ultraviolet colors are highly visible to birds, but not to many other species. This allows birds to see the web before they inadvertently fly into it and destroy it. A window glass company was inspired by these spiders to create glass windows with a UV-reflective pattern throughout. While not visible to humans, the reflective pattern lets birds know there’s something in their path before they collide with the window and injure themselves.

Flying squirrels, sugar gliders, and wingsuits

Wingsuits sometimes used by daredevils in extreme sports like skydiving and base jumping mimic the skin flaps that allow flying squirrels and sugar gliders to sail through the air from tree to tree!

Glaucomys volans (southern flying squirrel)
Flying squirrel.

Biomimicry Activity Ideas For Kids

Here are a few activity ideas for teaching students about biomimicry!

  1. Case Study: Have each student research in-depth one particular case of biomimicry. What animal(s) are being mimicked? What traits are being mimicked? How are humans using these traits? What products or systems did it help create?
  2. DIY Biomimicry: provide each student with blank paper and have them brainstorm their own idea for an item or system they could create using biomimicry. Encourage them to start by listing a few favorite animals, and jotting down some of the characteristics/behaviors of each animal. How could those characteristics/behaviors benefit humans? Once they have their ideas, students can draw or write about their design.
  3. Tree Frogs and Biomimicry: Consider downloading my Tree Frogs STEM Unit for kids! It’s a complete unit designed to build math, engineering, and science skills, with activities themed around tree frogs! It includes some fun origami engineering activities as well as information on tree frog biomimicry!

Recommended products

Are you interested in reading more posts like this? Subscribe or follow Wild Earth Lab using the links below!


References and Further Reading

  1. Vanderbilt, T. (2012). How Biomimicry is Inspiring Human Innovation. Smithsonian Magazine. Available: https://www.smithsonianmag.com/science-nature/how-biomimicry-is-inspiring-human-innovation-17924040/
  2. Phillips, E. (n.d.). BIOMIMICRY IS REAL WORLD INSPIRATION. Carnegie Museum of Natural History. Available: https://carnegiemnh.org/biomimicry-is-real-world-inspiration/
  3. Schwartz, D. (2012). Wing-Suits: Humans Surpassing Animals in Flight. Boston University. Available: https://blogs.bu.edu/bioaerial2012/2012/09/26/wing-suits-humans-surpassing-animals-in-flight/
  4. Green Team Blog (2014). A Better Building: Biomimicry Glass Working with Nature to Reduce Bird-Window Collisions. University of Utah. S.J. Quinney College of Law. Available: https://law.utah.edu/a-better-building-biomimicry-glass-working-with-nature-to-reduce-bird-window-collisions/
  5. University of Akron News (2018). With the help of frogs, graduate student wins award for tire tread research. University of Communications and Marketing. Available: https://www.uakron.edu/im/news/with-the-help-of-frogs-graduate-student-wins-award-for-tire-tread-research

Sharing options and discussion for this post:

Posted on 1 Comment

Fold a Jumping Frog: Step-by-Step Video Tutorial

part-way folded origami frog and origami frog

In this video activity, students will learn to fold an origami jumping frog! Origami is the art of folding paper. Through origami, a simple piece of paper takes on different shapes, and can even be transformed into complex figures such as boxes, flowers, animals, and much more. In this activity, you will fold your own jumping tree frog out of paper!

Folding a jumping frog is a great activity to do with students of any age. It’s a great add-on activity to a frog life cycle unit! Folding a frog helps students practice the art form of origami and follow a step-by-step procedure. Students can practice measuring how far the frog can jump. Furthermore, students can modify their frogs to try to make them jump further – a great way of practicing adaptability, problem-solving, and innovation skills central to STEM fields.

Fold an Origami Jumping Frog: Video Tutorial

Origami Frog Materials

To fold your jumping frog, all you need is a piece of paper. You may also use markers, pencils, or any other art supplies of your choice to decorate your finished jumping frog.

Fold a Jumping Frog: Written Step-by-Step Directions

  1. Start with a rectangular piece of paper. If it has a colorful side, place it facing down. 
  2. Fold diagonally so that the top corner meets the opposite edge. Crease then unfold.
  3. Repeat the previous step with the other top corner. Unfold.
  4. Flip the paper over. The creases will form an X.
  5. Fold the top edge down to create another crease through the center of the X.
  6. Unfold, then press in on the new crease to start popping up the paper like a tent.
  7. Flatten the paper by pinching together the top and bottom of the X.
  8. Flip over.
  9. Fold the two triangular flaps toward the top and crease. This will be the frogโ€™s front arms.
  10. Fold both sides into the center line.
  11. Flip over. This will be the frogโ€™s back.
  12. Now begin folding the frogโ€™s springy back legs. Fold approximately the bottom fourth of the paper up over the back.
  13. Flip over. Now fold the bottom the same amount over the front to create a spring.
  14. Flip over your completed frog. Add eyes or decorate your frog.
  15. To get the frog to jump, place the frog on a hard, flat surface. Press down on the back end of the frog, compressing the springy back legs, then quickly release.
Sitting green tree frog watercolor painting
Did you know tree frogs can jump about 50 times their body length?

Visit the Wild Earth Lab shop for nature-based STEM curricula!


Are you interested in reading more posts like this? Subscribe or follow Wild Earth Lab using the links below!


Sharing options and discussion for this post: