Posted on Leave a comment

Measuring Snow: hands-on classroom activity to learn about snow hydrology and the water cycle!

banner with a picture of classroom handouts and the text "study snow hydrology and the water cycle - snow measurements lab"

If you live somewhere that gets snow in winter, you’ve likely measured the depth of snow before! But with a few extra steps, you can turn this simple task into an awesome, hands-on snow measurements lab activity for your classroom.

Find these worksheets and handouts in my snow hydrology lab mini study!

By measuring snow and performing calculations, we can determine snow water equivalent, stored water, and snow-to-liquid ratios! These are all important measurements for snow hydrologists and tell us a lot about water resources and the water cycle.

In this post, you will learn how to set up your own snow measurements lab to try out in your classroom! You can also get printable versions of these directions plus worksheets, handouts, and classroom posters to go along with this lab in my Bird Beak Adaptations Lab Mini Study!

Find these worksheets and handouts in my snow hydrology lab mini study!

Gather Your Materials

Gather the following materials for the snow measurements lab:

Part 1: Water in Snow

  • Printed copies of the โ€œWater in Snowโ€ worksheets (1 set per student)
  • 3 identical jars with lids
  • Water
  • Freshly fallen snow (not โ€œslushโ€ or partially melted snow)
  • Ice cubes

Part 2: Snow Water Equivalent

Set Up and Directions

Part 1: Water in Snow

  1. Fill one jar with liquid water, one jar with snow, and one jar with ice cubes. Fill all jars to the same level.
  2. Place a lid on each jar to prevent evaporative water loss.
  3. Put the jars somewhere indoors to melt.
  4. Ask students to make predictions about the water levels in each jar. Which jar will hold the most water at the end of the experiment? Which will hold the least?
  5. Encourage students to discuss their reasoning. They may notice that the jar with the ice cubes visibly contains a lot of air. For this reason, some students may expect that the ice cube jar will have the lowest water level at the end of the experiment.
  6. You may also ask students to draw a line on each jar to show where they think the water level will be.
  7. Once everything melts, ask students to check if their predictions were correct. Which jar holds the most water now? Which jar holds the least water now?
  8. Discuss how different types of snow (e.g., a fluffy, dry snow and a heavier, wet snow) will have different proportions of water and air in them. Share with students that snow hydrologists are often interested in the โ€œSnow Water Equivalentโ€, or in other words, the amount of water in snow.

Part 2: Snow Water Equivalent

  1. Start by sharing with students that precipitation (e.g., snow, rain) is measured as a depth.
  2. We can measure this depth by setting an open container outside to collect precipitation as it falls.
  3. Help students use the rulers to draw and label measurement markings up the side of the container, starting at the bottom.
  4. Ask students to set these containers outside before it snows. If it is windy, students may need to place rocks or other heavy items around the containers to hold them in place. When the snow stops, students should record the depth, bring the container indoors, then wait for the snow to melt in the container.
  5. Once students determine the Snow Water Equivalent (i.e., the depth of meltwater in the container), help them calculate a snow-to-liquid ratio (SLR). You may wish to work through the example on the student handout as a class.

Other Suggestions

  • The snow and ice cubes may melt slowly. If you donโ€™t have a long class period, set up this activity at the end of class one day, then finish the activity at the start of class the next day.
  • Donโ€™t pack down the snow in the jar, since this may impact the snowโ€™s density.

Reflection Questions

  1. Water only makes up a small part of snowโ€™s volume. What could make up the rest of the snow? (What else is in the jar?).
  2. Imagine you have one jar with a fluffy, fresh snow, and one jar with a heavy, dense snow that was on the ground for a few days. After melting, which jar would have more liquid water? Why?
  3. Which would be more water: an inch of rain or an inch of snowfall? Why?
  4. If 21 inches of snow falls, and the snow-to-liquid ratio is 7 : 1, what is the snow water equivalent?
  5. Could snow water equivalent ever be a larger number than snow depth? Why or why not?

This activity comes from my Science in the Snow Unit!

Your students will love the illustrated learning materials, plus you’ll support Wild Earth Lab with your curriculum purchase!

Explore more curriculum from Wild Earth Lab:

If you enjoyed this post, I know you will love using my environmental science materials in your classroom!


Are you interested in reading more posts like this? Subscribe or follow Wild Earth Lab using the links below!


Sharing options and discussion for this post:

Posted on 2 Comments

River channel types: identify straight, meandering, braided, and anastomosing channels

blog post banner advertising a blog post about rivers. With the text "let's learn about rivers" and "explore how different channel types and how they form!"

A stream or river is a natural, flowing waterway on the land’s surface. Stream channels are long, narrow depressions in the land where water flows. There are several common river channel types, also known as the major plan forms.

Before we dive in: If youโ€™re an educator planning to teach about rivers, having great visuals to deepen understanding is key! You can find materials for teaching channel types/plan forms within my comprehensive Science on the River Unit. It also includes activities for measuring stream discharge, lessons on drainage patterns, and stream diagrams (plus you’ll support my blog with your purchase! โค๏ธ)

Recommended products

As a river flows from its headwaters out to the sea, it usually transitions between several different plan forms. The river channel is shaped by the surrounding landscape, underlying rock type(s), sediment availability, and flow regime (i.e., variation in the amount of water flowing through a river, including the magnitude and frequency of different-sized floods).

Different rivers naturally have different plan forms – and that’s a good thing! You will find healthy streams and rivers with various natural planforms – no one planform is necessarily better than the others. It is best for a river to be as close to its natural state as reasonably possible.

The major planforms are straight, meandering, braided, and anastomosing. Next, let’s take a look at the different types of river channels you may see:

Straight River Channels

Straight channels are seen in areas where the landscape is steep, such as on the side of mountains or in straight, narrow valleys. The stream or riverโ€™s channel appears mostly straight with few curves or bends.

Straight river channel

Meandering River Channels

A meander is a curve in a stream. Subsequently, a meandering river is curving with many noticeable bends or turns. Meandering channels are seen in areas where the topography is gentle or nearly flat, such as plains and wide valley bottoms. Even subtle changes in the land’s surface can shape the river’s path since water always flows downhill in the path of least resistance. Flow is fastest on the outside of a curve, causing erosion. In contrast, flow is the slowest on the inside of a curve. Sediments settle out of the water and accumulate on the insides of curves, where water flows slowest, forming point bars.

Meandering river channel

Notably, some meanders are curvy and nearly double back on themselves, forming a loop. These extra curvy meanders are called goosenecks. Over time, the fast waters on the outside curves of a gooseneck wear down the banks. Eventually, the curves erode all the way through so that the flowing river water bypasses the gooseneck, cutting off the loop. Then, the former gooseneck becomes a water feature known as an oxbow lake.

Classroom posters and flashcards for studying river channel types are available in my complete River Unit.

Braided River Channels

Braided channels are seen in many locations, including deserts, plains, glacial outwash, and coastal areas. The river channel contains sediment bars, giving it a braided appearance. For a braided channel to form, there must be plenty of sediment available in the channel to build up bars. Bars can be made of a variety of sediments: silts and sands, gravels, or larger stones.

The locations and shapes of sediment bars change over time. Although the bars in a braided channel may look permanent, the sediment is slowly making its way downstream toward the ocean. The powerful, flowing water carries each grain of sediment a short distance at a time. In fact, a single piece of sediment may travel a short distance rapidly, then settle onto a bar or the riverbed for days, months, or even years before it moves again. Even so, large floods can cause rapid changes in the locations and appearances of the bars in a braided river.

Braided river channel

Anastomosing River Channels

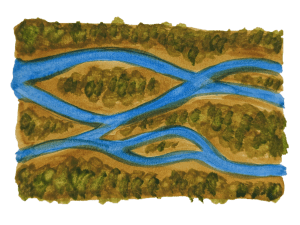
In an anastomosing channel, multiple river channels are separated by large, vegetated bars or islands. This gives the appearance of a few separate stream channels rather than one main channel. Braided rivers and anastomosing rivers are similar because they both have multiple channels that intertwine. The main difference between anastomosing rivers and braided rivers is that the channels of an anastomosing river are separated by semi-permanent islands, while the sediment bars of a braided river are more ephemeral (short-lived).

Anastomosing river channel

Teaching Rivers in Your Classroom

Are you an educator planning to teach about rivers? You can save time preparing lessons by using my complete Science on the River Unit below. Plus, you’ll support Wild Earth Lab with your purchase!

Keep reading about rivers, streams, and freshwater…

Recommended Posts:

5 Reasons to Teach Rivers and Streams in Your Classroom

Rivers and streams provide endless opportunities for scientific exploration and discovery – and chances are you can find one right in your community! From their chemistry and physics to their role in ecosystems and human communities, rivers and streams offer excellent opportunities to teach critical concepts in science and math in an applied way. Acrossโ€ฆ

Freshwater Visualization: Learning Activity With Kitchen Measurements

Itโ€™s hard to imagine just how little freshwater exists on Earth compared to saltwater. If you’re teaching the water cycle, your students might be amazed to learn that less than 3% of the Earthโ€™s water is freshwaterโ€”the rest is saltwater. In this post, Iโ€™ll show you a hands-on freshwater learning activity that uses simple kitchenโ€ฆ

Explaining The Water Cycle in 10 Stages

The water cycle is the process that keeps our planet’s water in constant motion. From evaporation to groundwater flow, each step plays a vital role in shaping our environment and life on our planet. In this post, we’ll explore 10 key processes in the water cycle, breaking down how each one works. For teachers:ย If youโ€™reโ€ฆ

Measuring Soil Infiltration Rates: A Science Classroom Activity

Are you teaching the water cycle or studying soil in your classroom or homeschool? Measuring infiltration rates in different types of soils is a hands-on activity that helps students explore how water interacts with the ground. This soil infiltration activity also ties in perfectly with studies of porosity and permeability. This engaging experiment works asโ€ฆ

DIY Rain Gauge Activity for Teaching the Water Cycle

Teaching your students about the water cycle? Building a DIY rain gauge from a plastic bottle is a fun, hands-on activity to explore a key water cycle process: precipitation. This simple project is perfect for your classroom or homeschool and can be a stand-alone lesson or part of a larger study of water cycle processes.โ€ฆ

Find your next science topic from Wild Earth Lab…


Are you interested in reading more posts like this? Subscribe or follow Wild Earth Lab using the links below!


References and Further Reading

  1. National Park Service (n.d.). Fluvial Features: Meandering Streams. Available: https://www.nps.gov/articles/meandering-stream.htm
  2. National Park Service (n.d.). Fluvial Features: Braided Streams. Available: https://www.nps.gov/articles/braided-stream.htm
  3. Plummer, C. C., Carlson, D. H., & Hammersley L. (2019) Physical Geology. New York, NY: McGraw-Hill Education. (16th ed., ch. 10).

Sharing options and discussion for this post: