Posted on Leave a comment

Teaching Landforms: sorting and compare & contrast activities

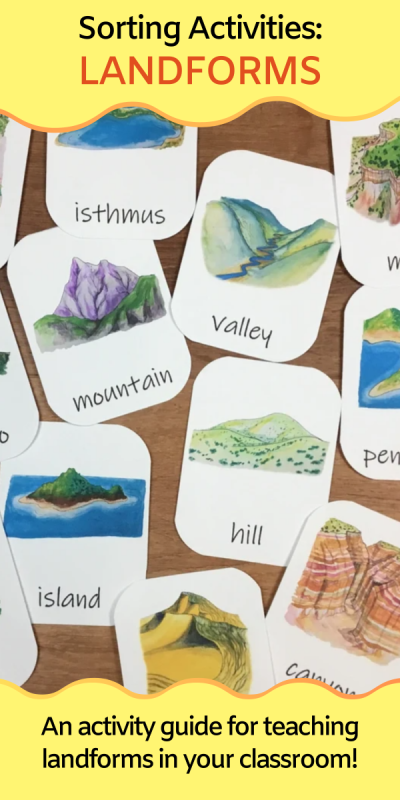
landform flashcards
text that says share this post

Teaching landforms in your classroom? If you’re searching for a quick and easy way to help students learn about landformsโ€”without needing lots of extra suppliesโ€”youโ€™ve come to the right place! This post shares simple sorting and compare/contrast activities perfect for introducing landforms. All youโ€™ll need are some landform flashcards or pictures, making this activity both fun and hassle-free!

Materials

All you need for this simple learning activity is some good landform flashcards or pictures. I recommend downloading and printing my landform three-part cards. Optionally, you can also purchase my water features three-part cards. You’ll receive high-quality illustrations of each landform on printable flashcards, plus you’ll support my blog with your purchase!

landforms flashcards

Or, if you’re looking for EVEN MORE landforms materials for your lessons, I recommend checking out my complete Landforms Unit. It includes the landforms flashcards, a printable version of the directions in this blog post, and additional activities and printable materials.

Step 1: Get to know the common landforms

Using your landform flashcards, work through the following steps with your students to introduce the common landforms.

  • Look through the whole-card flashcards together.
  • Read the definitions on the information cards and learn about how each common landform is formed.
  • Practice matching landform pictures to landform names with the picture-only and word-only flashcards.
  • Can you spot any of these landforms on the coastal and desert landscape posters?

Landform Sorting Activities

Arrange the flashcards into different groups:

  • Landforms that are surrounded by water and landforms that are not surrounded by water.
  • Landforms made of loose sand or soil and landforms made of solid rocks.
  • Landforms that stick up out of the earth and landforms that go down into the earth.

Which landforms…

Which landforms…

  • Are flat on top?
  • Are pointy?
  • Are steep?
  • Are gently sloping?
  • Are hollow inside?
  • Can be found in your local area?

Compare and Contrast

Look for some similarities and differences between each pair of landforms:

  • Island and peninsula
  • Peninsula and isthmus
  • Mountain and volcano
  • Mountain and hill
  • Hill and sand dune
  • Valley and canyon
  • Cave and volcano
  • Mesa and mountain
  • Cliff and canyon

How did it form? (advanced!)

  Find the cards for the landforms that are formed by:

  • Erosion
  • Deposition
  • Volcanic activity
  • Plate tectonics

(Hint: some landforms can form in more than one way and may fit into more than one category)

What’s Next?

Continue reading about the different types of landforms (complete with examples of each type!) You can also read my post about water features.

Study this topic with Wild Earth Lab!

Thereโ€™s no need to scramble to put together the perfect landforms lesson  โ€“ Iโ€™ve already created it for you! This set includes all the printable materials you need for studying landforms in your classroom or homeschool!

Explore more lessons from Wild Earth Lab:

If you enjoyed this post, I know you will love trying my other printable science and nature units in your classroom too!


Are you interested in reading more posts about educational activities? Subscribe or follow Wild Earth Lab using the links below!


Subscribe, share, and comment:

Posted on Leave a comment

5 Winter-Themed STEM Activities: snowflakes, glaciers, and more!

Winter classroom STEM activities

Looking for fun and educational ways to bring STEM learning into your homeschool or classroom this winter? These winter-themed activities are perfect for exploring science, technology, engineering, and math through hands-on projects that celebrate the season. From measuring snow and studying glaciers to investigating the science behind snowflakes and symmetry, these activities will keep students engaged all winter long. Grab your winter coat and get ready to dive into these exciting winter STEM activities!

Wild Earth Lab is supported by readers like you. This post includes links to my own products and affiliate products. If you purchase through links on my site, I may earn a small commission at no additional cost to you.

1. Measure snow like a scientist

If you live somewhere that gets snow in winter, youโ€™ve likely measured the depth of snow before! But with a few extra steps, you can turn this simple task into an awesome, hands-on snow science activity.

Start by learning about snow water equivilent and how to calculate it. This can be a great way to start a conversation about snow in the water cycle, and the ways snow supplies our rivers and aquifers with an important input of water.

You can find the full activity directions for a snow measurements activity in my blog! Or better yet, you can save time and support my blog when you purchase the printable worksheets and directions for this activity in my complete Science in the Snow Unit.

โ˜ž Upgrade your outdoor learning:

Measuring snow with your students? You can track the snow all winter long by placing a metal snow gauge in your yard or outdoor learning area. Whether you’re teaching in the classroom or at home, you can create an inspiring outdoor learning area for studying snow, weather, and more.

Cardinal Snow Gauge: product and image from Soldarmetals on Etsy.
Snow Gauge: product and image from Swenproducts on Etsy.

2. Explore glaciers and climate science

Why study glaciers this winter? Glaciers tie in to many important science topics – not just geology and landforms, but also climate science, sea level rise, and water resources! Glaciers are an important reservoir of frozen freshwater on Earth. However, glaciers all over the world are receding and disappearing due to climate change, putting communities at risk of flooding and altering ecosystems.

Furthermore, glaciers teach scientists about our Earth’s past! Glacial ice is like a time capsule, holding important clues about the history of our Earth and its climate. By studying glaciers, students can learn about and discuss the past, present, AND future of our climate!

Ready to study glaciers? You can read more about the types of glaciers and how they form in my blog post! Or better yet, you can save time and support my blog when you purchase my Glaciers Unit – complete with classroom activities, worksheets, handouts and more.

valley glacier diagram

3. Read about how snowflakes form

If you’ve ever looked at a snowflake under a microscope or magnifying glass, you know that each snowflake is a unique, beautiful formation. But how do these amazing water crystal structures form? It all starts high in earth’s atmosphere, with a dust particle and water vapor. Since every snowflake takes a slightly different path to the ground, each snowflake runs into unique conditions along the way. These different experiences impact the way each snowflake forms.

Learning about the formation of snow ties in to studies of meterology and the three phases of water. Because of this, snowflake formation is an engaging winter science topic at many different levels.

Need materials for studying snowflakes? Read a step-by-step description of how snowflakes form in my blog post! Or, find printable snowflake formation materials in my Snowflake Mini Study or in my complete Geometry in the Snow Unit.

formation of a snowflake diagram

4. Learn about symmetry with paper snowflakes

When it comes to geometry, snowflakes provide a great tool for learning about symmetry with a winter-y twist! Cutting paper snowflakes from coffee filters or paper is a great hands-on way to study rotational symmetry, planes of symmetry, and more!

Paper snowflakes are an easy activity to DIY! But if you’re looking for a little guidance, I’ve got you covered. Activity directions and worksheets for a paper snowflakes & lines of symmetry lesson are also found in my Geometry in the Snow Unit.

lines of symmetry classroom handouts

5. Study the animals of the poles!

Winter is the perfect time to study the survival strategies of animals that live in the coldest places on earth! Topics could include survival strategies like migration, hibernation, and insulation or the food webs and ecosystems of the Arctic or Antarctic.

Studying and modeling arctic food webs is a fun, hands-on ecology activity that students love. You can learn how to build your own food webs in my blog post. Furthermore, you can learn all about arctic ecology and find materials for an arctic food webs lesson in my Arctic Unit.

handouts and classroom printables

Winter studies with Wild Earth Lab!

Thereโ€™s no need to scramble to put together the perfect winter science lesson  โ€“ Iโ€™ve already created some for you! The winter stem activities from this post come from my winter STEM units:

Explore more lessons from Wild Earth Lab:

If you enjoyed these winter stem activities, I know you will love trying my other science and nature units in your classroom too!


Are you interested in reading more posts with STEM activity ideas? Subscribe or follow Wild Earth Lab using the links below!

Subscribe, share, and comment:

Posted on Leave a comment

Rock ID Lab: directions and materials list for a classroom geology activity

a box of rock samples

In this activity, students will become familiar with rocksโ€™ physical properties and the basics of rock identification. Students will sort rocks into groups based on their observations and learn about the physical properties of rocks. At the end of the rock ID lab, students can try identifying rocks by type, subtype, and name.

No prior rock ID experience is needed for students to complete this lab activity. Part A especially is a great way for beginners to explore the physical properties of rocks! However, before beginning parts B and C of this activity, students should already be familiar with the rock cycle and the three main types of rocks (igneous, sedimentary, and metamorphic!) and their sub-types.

Before starting the lab, students should also know the difference between rocks and minerals. Often, it makes sense to do a mineral lab before diving into a rocks ID lab. You can find my mineral lab online write up (free) or the printable directions (for purchase).

Please Note: I’ve made the directions for this rock ID lab activity available for free here in this post. However, if you want printable directions, worksheets, flashcards, readings, and teaching posters for a rock ID lab, you can purchase them in my shop. The printable rock ID flashcards are included but also sold individually. Or, you can find all these materials plus more in my complete Rocks and Minerals Unit.

Materials

This activity requires one of each item per lab group unless stated otherwise.

  • 10+ rock  samples labeled with numbers 1-10+
    • Recommended: granite, gabbro, rhyolite, basalt, limestone, conglomerate, mudstone, gneiss, slate, and marble
    • You can complete this lab with a different rock sample set, but it is ideal to have a mixture of common igneous, sedimentary, and metamorphic rocks.
  • Hand lens or microscope
  • Juice of a lemon
  • Eye dropper
  • Student worksheets (1 set per student)
  • Teaching posters
  • Rock cards
Save preparation time AND support my blog: purchase all the printable materials you need to complete a rock ID lab in my shop!

Modifications (optional)

  • To make this rock ID lab simpler, do parts B and C all together as a class.
  • As an alternative to parts B and C, you could tell students which rocks are igneous, sedimentary, and metamorphic and then ask students to find some similarities between the rocks within each group.
  • To simplify part C, tell your students which 10 rock samples they have, but do not tell them which is which. This allows students to use the process of elimination to identify the most difficult samples.

Safety Notes

  • Read and comply with any warnings on the packaging and safety information sheets of rock samples and test kit tools used to complete this lab.
  • Adult supervision is required at all times while completing this lab.

Directions

Part A: Examine the Rocks

  1. Allow the students to familiarize themselves with the rock samples by picking them up, looking at them, etc…
  2. Ask the students to take note of which rock samples…
    • Are light colored?
    • Are dark colored?
    • Have several different colors?
    • Are one solid color?
    • Are made of crystals? (use hand-lens or microscope)
    • Are made of sediment particles stuck together? (use hand-lens or microscope)
    • Are fine-grained?
    • Sparkle?
    • Are dull?
    • Are soft or break or crumble easily?
    • Are very solid and don’t break or crumble?
    • Have stripes or layers? (foliation)
    • React to an acid (lemon juice)?
      • Note for acid reactions: rocks with a very high calcium carbonate content (e.g., marble, limestone, and coquina) should react with a drop or two of acidic lemon juice. They will bubble and fizz. Rocks with a lower calcium carbonate content (e.g., some mudstones) may bubble and fizz slightly.
Need worksheets and handouts? Purchase my set of printable materials that complement this activity!

Part B: Rock Types & Sub-Types

  1. As a class, review or research the properties of igneous, sedimentary, and metamorphic rocks and their sub-types. Create a list of the properties (texture, composition, foliation, etc…) you might see in each of these rock types and subtypes:
    • Igneous:
      • Extrusive
      • Intrusive
    • Sedimentary:
      • Chemical
      • Clastic
      • Biochemical and organic
    • Metamorphic:
      • Foliated
      • Nonfoliated
  2. As you create your lists, introduce/review the following concepts: mafic vs felsic, igneous textures, grain sizes, and foliation. For this step, the teaching posters found in my product will be a helpful visual aid.
  3. Students should write detailed descriptions of each rock sample, noting the following physical properties:
    • Texture (use a microscope or hand lens)
    • Composition
    • Luster
    • Color
    • Foliation (use hand lens if needed)
    • Acid reaction (strong reaction, weak reaction, no reaction)
    • Other properties
  4. See if your students can correctly identify the type or subtype of any of the rock samples.
    • Start with rocks that can be most easily identified. For example, a rock with clear foliation can quickly be identified as a metamorphic foliated rock. A rock that is made of sediment particles cemented together can be quickly identified as a sedimentary clastic rock.
    • It is OK if there are some rocks that your students are unsure about. Discuss why they are unsure and if there are any types/sub-types they can rule out. It may not be possible to identify certain rocks in a classroom setting.
  5. After this part of the lab is complete, reveal which rocks were sedimentary, igneous, and metamorphic. You may also lead a discussion on how the physical properties of rocks relate to how they formed. E.g., large crystals form deep underground, foliation forms under directional pressure, etc…
Teaching posters for this Rock ID activity(available for purchase)

Part C: Rock ID

  1. Pass out the rock information flashcards or a different rock ID guide of your choosing.
    • For an added challenge: encourage students to only look at the front (info/text-only) side of the flashcards while making their IDs. The backs of the flashcards include pictures and names of the rocks.
  2. The students should read the properties listed on each flashcard.
  3. Students can compare the rock properties on the flashcards to their written descriptions of each sample.
  4. Students should do their best to match each rock sample to its correct identity.
  5. Rock ID is challenging: assist students if they become stuck.
  6. End the lab by revealing the correct identity of each sample.
My Rock ID cards make identifying common rocks a breeze!

Study Rocks and Minerals with Wild Earth Lab!

Save time by purchasing all the printable materials you need for a rock ID lab! This set includes all the worksheets, teaching posters, flashcards, and handouts you need for completing this rock ID activity:

OR: you can also find all the above materials plus more in my full Rocks and Minerals Unit:

Explore more lessons from Wild Earth Lab:

If you enjoyed this post, I know you will love trying my other science and nature units in your classroom too!


Are you interested in more earth science activity ideas? Subscribe or follow Wild Earth Lab using the links below!


Subscribe, share, and comment:

Posted on 1 Comment

Soil Science in Your Classroom: 5 educational activities to try

a graphic that has a picture of some soil and worksheets, with the text "5 soil science classroom activities"

Are you studying soil science with your homeschool or science class? Soil science is an exciting and interdisciplinary subject that integrates chemistry, physics, and environmental science. From testing soil organic matter to measuring porosity and permeability, hands-on lab activities will bring the real experience of being a soil scientist to your science classroom or homeschool. In this post, you’ll discover five educational soil science activities to try, including a soil texture jar test, modeling soil horizons, and more. These activities are perfect for helping your students explore the wonders of soil in a fun and interactive way!

1. Try the Jar Test for Soil Textures

Soil scientists need to evaluate the “textures” of soils: in other words, the proportion of sand, silt, and clay in the sediment part of the soil. But this can be a challenge. How do you separate and measure all those tiny grains?

This most basic method, the โ€œjar testโ€, is easy to do in a classroom setting. Shake up some soil and water in a jar. Then, watch the grains settle over time. Larger grains settle faster than smaller ones.

You can find the full activity directions for this science project in my blog! Or better yet, you can save time and support my blog when you purchase the printable worksheets and directions for this activity.

2. Build a Soil Horizons Parfait

Did you know soils have layers? Scientists call the layers โ€œsoil horizonsโ€. Each of the six soil horizons is given a letter: O, A, E, B, C, and R. The upper two horizons, O and A, are called topsoil. Each horizon has its own unique characteristics and function.

You can teach your students about layers in the soil by building a soil horizons parfait. Perhaps you have made a โ€œcup of dirtโ€ from pudding? With a few extra steps, you can turn this simple snack into a tasty science activity by creating a soil horizons parfait!

You can find the full activity directions for this “snack-tivity” in my blog! Or better yet, you can support my blog by purchasing my soil horizons mini study, which includes printable directions for this activity as well as soil horizon worksheets.

3. Measure Porosity and Permeability

If you’re studying soils, your students will need to know the difference between soil porosity and permeability. While these two properties are related, they are not the same! And what better way to understand the difference between porosity and permeability than a hands-on lab activity!?

Conveniently, soil porosity and permeability can be measured and observed using common household items. You can find the full activity write-up with directions for porosity and permeability in my blog! Or better yet, support my blog AND save time when you purchase the printable worksheets and directions for this lab activity.

worksheets for permeability studies
Worksheets for porosity

4. Test for Soil Organic Matter

If you’re studying soils with your students, you have probably learned that soil is a mixture of sediments and organic matter. But different soils have different amounts of these two ingredients. A soilโ€™s organic matter content is important, especially when considering a soilโ€™s ability to support plants.

To demonstrate this, you can do a cool classroom demo by mixing soil with hydrogen peroxide. The hydrogen peroxide reacts with organic matter in the soil to make gas (i.e., fizzing and bubbles!). More bubbles = more organic matter in the soil!

Find theย directions for a soil organic matter classroom demoย in my blog! Or better yet, you can support my blog by purchasing the worksheets and printable directions for this classroom activity.

dishes with soil on a lab bench next to liquid in a bottle and a clipboard

5. Learn About Decomposers

Decomposers are organisms with a very important job: they help recycle nutrients back into the soil. They help break down dead organic matter into the soil nutrients that help plants grow. There are many types of decomposers, including mushrooms and fungi, earthworms, and microbes.

You can print my free food web poster (including decomposers). To learn more about food webs and the important role of decomposers, check out my complete Food Webs Unit (for purchase).

If you are interested in studying mushrooms, I’ve also created some free mushroom anatomy printables. You can dive deeper into the world of fungi and mushrooms with my complete Mushroom Unit.

photo of mushroom anatomy diagrams
I made these mushroom anatomy diagrams for you! You can download them for FREE.

Study Soil Science with Wild Earth Lab

Many of the activities from this post come from my complete Soil Science Unit! Thereโ€™s no need to scramble to put together the perfect Soil Science Lesson โ€“ Iโ€™ve already created it for you! This set includes tons of activities and lab directions, teaching posters, handouts, and more!

Explore more units from Wild Earth Lab:

If you enjoyed this post, I know you will love using my other science units in your classroom!


Are you interested in more science activity ideas? Subscribe or follow Wild Earth Lab using the links below!


Subscribe, share, and comment:

Posted on 1 Comment

9 Interactive Earth Science Activities for Homeschool and Classroom Learning

A banner for a blog post about 9 Earth Science Activities for hands-on learning in your classroom and homeschool with a photo of some landforms made of clay and the text "+Free map coloring activity" at the bottom of the banner.
text that says share this post

Are you in search of engaging ways to teach earth science in your homeschool or classroom? Hands-on activities help make complex concepts more memorable and enjoyable for students. Whether you’re building models of Earth’s layers, measuring stream flow, or exploring plate boundaries, these interactive lessons will bring earth science to life in your classroom!

In this post, you’ll find nine earth science activities that are perfect for homeschool parents and classroom teachers looking to inspire curiosity about the earth. Let’s get started!

1. Make a map of the continents and oceans

Teach students the names and locations of the oceans and continents. I’ve created a FREE printable worksheet for this activity. Simply print it out and color in the different continents and oceans with your students. Download the free worksheet here.

2. Measure stream flow

Earth science isn’t just about soils and rocks – water is an important part of our earth too! Hydrologists collect stream measurements to ensure we are not using our water resources too quickly or in unsustainable ways. With a few household items, you can collect river measurements too!

I’ve already written up the full directions for this activity online in my blog. Find the complete guide for this activity with materials and calculations at the end of this blog post about stream measurements! Or better yet, you can support my blog by purchasing the printable directions and handouts for this activity from my shop!

painting showing three people taking measurements in a stream

3. Examine porosity and permeability

Porosity and permeability are important topics in both soil science and geology. Examining soil porosity and permeability is an easy lab experiment that you can complete with common household items. Compare the porosity and permeability of three sediments: gravel, sand, and clay/silt.

You can find the full written directions with materials and calculations for a porosity and permeability lab activity online in my porosity and permeability blog post! You can save time and support my blog with your purchase of the printable directions and handouts for this activity from my shop!

person digging on soil using garden shovel

4. Build a model of the Earth’s layers

There are many ways to build a model of the Earth’s layers. You can model Earth’s three basic (compositional) layers: core, mantle, and crust. Or to make this activity more advanced, make a model of earth’s mechanical layers instead – lithosphere, asthenosphere, etc…

You can make your model of the Earth’s layers out of many different types of materials. A few options include:

  • Play dough or clay
  • Food, such as packing together different colors of rice cereal-marshmallow treats, and candy
  • Construction paper circles
  • Stacked nesting bowls
  • Printable templates, like these ones I created (for purchase in my shop)!
paper model of the layers of the earth
You can find my templates for creating this paper model of the Earth’s layers in my shop!

5. Build a model of the soil horizons snack-tivity!

Perhaps you have made a โ€œcup of dirtโ€ from pudding. But you can turn this simple snack into a tasty science activity by creating a soil horizons parfait!

The basic idea is this: you will make a parfait with 6 layers to represent the 6 horizons. This is an entertaining and tasty way to teach your students about soil horizons during a gardening, soil science, or agriculture unit in your classroom.

Best of all, you can find the online directions for this activity for free on my blog! Alternatively, you can save time and support my website when you purchase the printable directions and handouts for this activity in my shop!

a strawberry yogurt parfait in a cup
Photo by Farhad Ibrahimzade on Pexels.com

6. Identify common minerals

Minerals are the building blocks of rocks and an important topic in any geology or earth science class. You can teach your students how to identify common minerals by following a few simple steps.

I’ve written a whole blog post on how to set up a minerals lab in your classroom or homeschool. You can follow these online directions, or purchase printable directions and handouts from my shop.

Worksheets and classroom handouts
These directions and handouts are available for purchase in my shop.

7. Build play dough landforms

Creating landforms out of play dough or clay is sure to be a memorable earth science lesson for students! All you need is enough play dough for each student. Students can build common landforms such as islands, hills, mesas, peninsulas, isthmuses, and more. Or try creating landforms specific to your area – do you live near volcanoes? Moraines? Caves? Canyons?

I recommend starting by sculpting the following 7 easy landforms:

  • Hill
  • Mountain
  • Island
  • Isthmus
  • Peninsula
  • Volcano
  • Mesa (flat-topped mountain)

This activity is pretty straightforward. But, if you’d like to elevate your landforms lesson with printable directions, landform flashcards, and more, you should check out my landforms unit, available in my shop.

A photo showing classroom handouts for building your own landforms out of play dough
If you need directions and printable materials for this play dough activity, find them within my complete landforms unit

8. Model tectonic plate boundaries with cookies!

Create a model of the three main tectonic plate boundary types using sandwich cookies. Remove the top layer of the sandwich cookie (lithosphere), break it in half, and place it back on top of the crรจme (asthenosphere), arranged as a boundary type.

Be sure to create the following three boundary types:

  • Convergent
  • Divergent
  • Transform
black round cookies on white surface

9. Study earth science with Wild Earth Lab

There’s no need to scramble to put together the perfect earth science unit – I’ve already created several for you! Choose from plate tectonics, rocks & minerals, landforms, water features, the water cycle, glaciers, and soil science! Each is packed with earth science activities, worksheets, readings, and more!

Explore even more units from Wild Earth Lab:

If you enjoyed these earth science activities, I know you will love using my other environmental science materials in your classroom!


Are you interested in more hands-on classroom activity ideas? Subscribe or follow Wild Earth Lab using the links below!

Subscribe, Share, and Comment:

Posted on Leave a comment

Science Snack Activity: make a soil horizons parfait!

A banner that says "science snack-tivity soil horizons parfait" with a drawing of a parfait cup

Perhaps you have made a “cup of dirt” from pudding. But you can turn this simple snack into a tasty science activity by creating a soil horizons parfait!

For this activity, you will make a parfait with 6 layers to represent the 6 horizons. This is an entertaining and tasty way to teach your students about soil horizons during a gardening, soil science, or agriculture unit in your classroom.

Background Information: Layers in Soils

Did you know soils have layers? If you viewed a vertical cross section of soil, you would see up to six main layers. Each layer looks different and is made of a unique mixture of sediments and organic matter.

We call the layers โ€œsoil horizonsโ€. Each of the six soil horizons is given a letter: O, A, E, B, C, and R. The upper two horizons, O and A, are called topsoil. Topsoil is rich in organic matter compared to the lower layers. Topsoil is where plants grow, so it is important in agriculture and ecology!  A healthy topsoil promotes healthy plant life.

What are the main soil horizons?

Here are the 6 main horizons, from top to bottom:

  • O Horizon: Decaying organic matter at the soilโ€™s surface
  • A Horizon: Soil rich in both organic matter and coarse sediments
  • E Horizon: Coarse soils, which lost their clay and soluble minerals to downward leaching
  • B Horizon: The โ€œsubsoilโ€; clay and dissolved minerals build up in this layer
  • C Horizon: โ€œParent materialโ€ of soil: pieces of partially weathered rock
  • R Horizon: Hard bedrock beneath the soil

Activity: create your own soil horizons parfait!

Materials
  • Tall, clear cups or glasses
  • Spoons
  • Graham crackers
  • Yogurt
  • Jam
  • Fresh Cut Fruit
  • Granola
  • Paper towels
Directions

Build your own model of soil horizons by making a parfait. Each layer represents a different horizon. Students should add these layers to a tall glass or clear plastic cup.

  1. R horizon:  pieces of whole graham cracker, to represent bedrock.
  2. C horizon:  crumbled gram crackers to represent the soilโ€™s parent material made from partially weathered rock in this horizon.
  3. B horizon:  yogurt, which is smooth and creamy like the fine-grained clay and soluble minerals found in this horizon.
  4. E horizon:  jam, because gritty seeds in jam represent the coarser sands and silts found in this horizon.
  5. A horizon:  fresh fruit, because this horizon is rich in organic matter.
  6. O horizon:  granola, to represent decomposing organic matter like crunchy leaves on the surface of the soil.

Soil Science with Wild Earth Lab

This soil horizons parfait activity comes from my complete Soil Science Unit. The unit is full of many activities like this one for teaching students all about soils.

Explore curriculum from Wild Earth Lab:

If you enjoyed this post, I know you will love using my environmental science materials in your classroom!


Are you interested in reading more posts like this? Subscribe or follow Wild Earth Lab using the links below!


Sharing options and discussion for this post: