Posted on — 1 Comment

What Happens in a Solar Eclipse? Total, annular and partial eclipses explained!

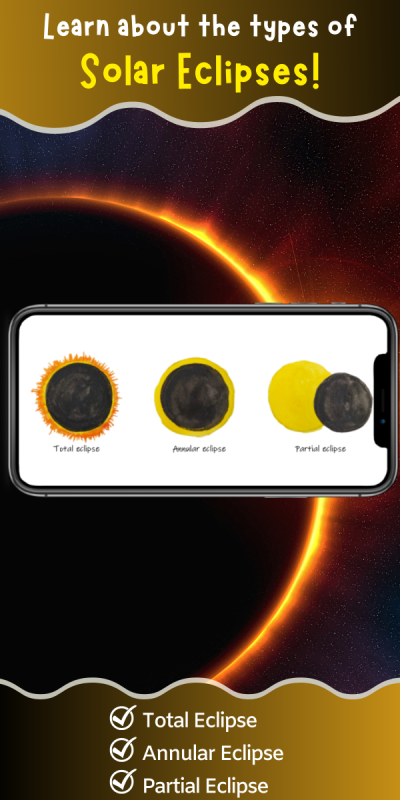
a banner that says "learn about the types of solar eclipses" with pictures of the sun

As you know, the Earth is orbiting the Sun, and the Moon is orbiting the Earth. Every once and a while, the Sun, Moon, and Earth all line up and something very special happens. A solar eclipse happens when the Moon passes between the Earth and the Sun. During a solar eclipse, the Moon totally or partially blocks out the Sun during the daytime. There are three main types of eclipses: total solar eclipse, annular solar eclipses, and partial solar eclipses.

If you are viewing a solar eclipse soon, make sure to try out building your own solar eclipse viewer box and learn how to identify the different stages of a solar eclipse!

Total Eclipse

Photo by Drew Rae on Pexels.com

There are a few different types of solar eclipses. The most dramatic type of eclipse is a total eclipse. A total eclipse happens when the Moon passes directly between the Earth and the Sun and blocks the Sun from our view on the ground. Totality is the phase of the eclipse when the Moon fully covers the Sun. When this happens, part of the Earth is totally in the moon’s shadow. If you are in the shadow, it becomes dark during the daytime. The Sun’s corona is seen behind the Moon during totality.

Annular Eclipse

The second type is an annular eclipse. During both annular and total solar eclipses, the Moon passes directly between the Earth and the Sun. However, in an annular eclipse, the moon cannot fully cover the sun because the moon is at its furthest distance from Earth on its elliptical orbit.

Partial Eclipse

The third type of solar eclipse is a partial eclipse. Partial eclipses are the most common. During a partial eclipse, the Moon passes between the Earth and the Sun, but is not perfectly lined up. Consequently, the Moon only blocks part of the Sun.

Learn about the solar eclipse with Wild Earth Lab

Are you viewing a solar eclipse soon with your students or family? Try out my solar eclipse learning materials!

Try my Solar Eclipse Mini Study – with worksheets, activity guides and more.

Explore curriculum from Wild Earth Lab:

If you enjoyed this post, I know you will love using my environmental science materials in your classroom!


Are you interested in reading more posts like this? Subscribe or follow Wild Earth Lab using the links below!


References and Further Reading

  1. Lea, R. (2023). The 5 main stages of October’s annular solar eclipse explained. Space.com. Available: https://www.space.com/annular-solar-eclipse-2023-main-stages-explained
  2. NASA (n.d.). Types of Solar Eclipses. Available: https://science.nasa.gov/eclipses/types/
  3. NCAR & UCAR Science Education (2017). 2017 Great North American Eclipse and the HAO Connection (video). Available: https://www.youtube.com/watch?v=rBxymVkpMl8

Sharing options and discussion for this post:

Posted on — 1 Comment

Build Your Own Solar Eclipse Viewer Box: a step by step guide!

a banner that says "how to build your own solar eclipse viewer box" with a picture of an eclipse and a diagram of a viewer box

If a solar eclipse is happening where you live, make this simple solar eclipse viewer from household materials. You cannot look directly at the Sun because it will damage your eyes. However, you can view a solar eclipse using a homemade eclipse viewer box. You can use this viewer box to watch a partial or annular solar eclipse, or track the progress of a total solar eclipse before and after totality.

Photo by Drew Rae on Pexels.com

Before we begin, you may ask: what is happening during an eclipse?

As you know, the Earth is orbiting the Sun, and the Moon is orbiting the Earth. Every once and a while, the Sun, Moon, and Earth all line up and something very special happens. A solar eclipse happens when the Moon passes between the Earth and the Sun. During a solar eclipse, the Moon totally or partially blocks out the Sun during the daytime.

Try my Solar Eclipse Mini Study – with worksheets, activity guides and more.

Materials

  • Cardboard box (tip: longer box = larger projected image!)
  • Sheet of white printer paper
  • Box cutter
  • Tape
  • Aluminum foil
  • Scissors
  • Pin
Download a print out version of these directions to build your own solar eclipse viewer box.

Set Up

Download my printable version of these directions to build a solar eclipse viewer box.

  1. Have an adult cut a head-sized hole into the bottom of the cardboard box.
  2. Use tape to attach a white sheet of paper to one side of the box.
  3. In the opposite side, towards the top of the box, have an adult cut a small rectangular opening.
  4. Cut a piece of aluminum foil that is slightly larger than the rectangular opening you cut.
  5. Keeping the foil completely flat, tape the foil over the rectangular opening.
  6. Use the pin to make a tiny hole in the center of the aluminum foil.
  7. Close the top of the box and tape it shut.

Using Your Eclipse Viewer Box

  1. Stand with your back to the Sun. Never look directly at the Sun and never face the Sun while using the viewer. Do not look at the Sun through the pinhole.
  2. Hold the box with the head hole facing towards the ground. The aluminum foil should face the Sun.
  3. Facing the piece of paper, place the top of your head up into the head hole. Do not put your whole head all the way up into the box, as this will block the incoming light.
  4. Look up at the white sheet of paper.
  5. With the help of a friend, adjust your position until you see the projection of the solar eclipse on the paper.

Study Solar Eclipses with Wild Earth Lab!

You’ll find the printable directions for this activity, solar eclipse diagrams, and worksheets in my Solar Eclipse Mini Study:

Try my Solar Eclipse Mini Study – with worksheets, activity guides and more.

Explore curriculum from Wild Earth Lab:

If you enjoyed this post, I know you will love using my environmental science materials in your classroom!


Are you interested in reading more posts like this? Subscribe or follow Wild Earth Lab using the links below!


Sharing options and discussion for this post:

Posted on — 1 Comment

Sun and Star Activity Ideas: 13 outer space classroom projects to try!

A banner that says "sun and star activity ideas to try in your classroom"
text that says share this post

Wild Earth Lab is supported by readers like you. This post includes links to my own products and affiliate products. If you purchase through links on my site, I may earn a small commission at no additional cost to you.

Exploring the wonders of the sun and stars can captivate young minds and spark curiosity about the universe! Whether you’re diving into a sun unit, teaching about stars, or weaving astronomy into your science lessons, hands-on activities make learning truly memorable. From crafting DIY sundials and phenology wheels to creating tasty constellation snacks and building solar ovens, these engaging sun and star activity ideas are perfect for your classroom or homeschool.

Before we dive in: If you’re an educator planning to teach about the sun or stars, great activities are key to deepening understanding! I think you and your students will love my complete Sun Unit (plus you’ll support my blog with your purchase! ❤️)

1. DIY Sundial

DIY Sundial – use the Sun to tell the time by creating your own sundial. All you need is a paper plate, a straight stick, and a compass.

close up of a sundial

2. Phenology Wheel

Phenology Wheel – record your journey around the Sun by creating a phenology wheel.

This phenology activity comes from my complete Sun Unit

3. Constellation Snacks

Constellation Snacks – this is for sure the tastiest star activity, and always a big hit with kids of all ages! Form different constellations out of pretzel sticks and marshmallows. Then eat them!

silhouette of trees and mountain under blue starry sky
Photo by Sindre Fs on Pexels.com

4. Suncatchers

Suncatchers – create brightly colored suncatchers with tissue paper. Display them in a sunny window for all to see!

  • A suncatcher craft guide from PBS Kids
  • Another suncatcher guide from WikiHow
  • Prefer a kit? Skip the hassle of gathering materials! Try a suncatcher kit like this one!

5. Solar Oven

Solar Oven – build a solar oven out of a box and aluminum foil. Try melting cheese on nachos or making s’mores in the solar oven!

6. Learn to use a Telescope!

Telescope – learn how to use a basic student telescope for an elevated star-gazing experience! Locating and observing celestial objects is a great hands-on way to learn about outer space!

silhouette of person standing near telescope

7. Ode to the Sun

Ode to the Sun – show some gratitude for the Sun by writing a poem about it. For example, create a cinquain poem about the Sun using the following format:

  • Line 1: one noun
  • Line 2: two adjectives
  • Line 3: three verbs ending in –ing
  • Line 4: four-word phrase or statement
  • Line 5: one noun

This activity comes from my Sun Unit where you can learn background information about the sun to help inspire ideas for your poems!

8. Solar Printing

Solar Printings – One of my favorite sun and star activities! Make sun prints with this special sun print paper! Arrange small objects on top of the special paper, then set them in a sunny outdoor area. The shadows of the objects become imprinted on the paper.

9. Model the Seasons

Model the Seasons – learn about the Earth’s tilted axis in a hands-on way. Rotate an orb on a stick with a tilted axis while shining a light on it. Mark the equator, Arctic Circle, and Antarctic Circle so you can track what happens in these unique places.

10. Distance Model

Distance model – calculate the relative distance each planet is from the Sun on a tape measure. Start with Neptune, then work your way backward from there.

Free solar system image

11. Mnemonic Devices

A mnemonic device is a type of memory aid. A memorable phrase, word, or pattern is swapped out for the important information. Different parts of the phrase, word, or pattern help remind you of different parts of the important information. For example, some people use the phrase “Eat An Apple As A Nice Snack” to remember the 7 continents on Earth: Europe, Asia, Africa, Australia, Antarctica, North America, and South America.

Create your own mnemonic devices for remembering the 8 planets orbiting our sun in order: Mercury, Venus, Earth, Mars, Jupiter, Saturn, Uranus, and Neptune. You can find worksheets for this activity and more sun lesson plan materials in my Sun Unit!

12. Eclipse Model

Eclipse model – model a solar eclipse using two orbs on sticks and a flashlight. Place the smaller orb (Moon) between the light source and the larger orb (Earth) to make a shadow on the larger orb.

13. Eclipse Viewer Box

Eclipse viewer box – build a solar eclipse viewer box from common household materials! Find a helpful activity guide and download directions and eclipse worksheets.

Bonus: Study the Sun with Wild Earth Lab

Try out my Sun Unit – complete with even more sun and star activities, posters, handouts, worksheets, and much more.

Explore units from Wild Earth Lab:

If you enjoyed the star activities in this post, I know you will love using my environmental science materials in your classroom!


Are you interested in reading more posts with classroom activity ideas? Subscribe or follow Wild Earth Lab using the links below!


Sharing options and discussion for this post:

Posted on — 2 Comments

Stages of a Total Solar Eclipse: a step-by-step guide with diagrams

banner with the text "the 5 main stages seen during a total solar eclipse" and a picture of an eclipse
Photo by Drew Rae on Pexels.com

As you know, the Earth is orbiting the Sun, and the Moon is orbiting the Earth. Every once and a while, the Sun, Moon, and Earth all line up and something very special happens. A solar eclipse happens when the Moon passes between the Earth and the Sun. During a solar eclipse, the Moon totally or partially blocks out the Sun during the daytime.

Stages of a total solar eclipse. Diagram by WildEarthLab.

During a total solar eclipse, the Moon passes directly between the Earth and the Sun and blocks the Sun from our view on the ground. Totality is the phase of the eclipse when the Moon fully covers the Sun. When this happens, part of the Earth is totally in the moon’s shadow. If you are in the shadow, it becomes dark during the daytime. The Sun’s corona is seen behind the Moon during totality.

Stages of a total solar eclipse diagram and worksheet for studying the eclipse. Find them here.

Total Solar Eclipse Stages

Here are the main stages you will observe (through your protective eclipse glasses or homemade eclipse viewer box!) during a total solar eclipse:

First Contact

The leading edge of the Moon begins to cover the side of the Sun. A partial eclipse begins.

Second Contact

The leading edge of the Moon reaches the opposite side of the Sun. The Sun is fully covered. The total eclipse begins.

Totality

Totality is a period during a total solar eclipse in which the Moon completely covers the Sun. However, the Sun’s corona is visible during totality.

Third Contact

The trailing edge of the Moon reaches the side of the Sun. The Sun is no longer fully covered. The total eclipse ends.

Fourth Contact

The trailing edge of the Moon reaches the opposite side of the Sun. The partial eclipse ends.

Solar eclipse print materials

If you enjoyed this post, I know you will love these print materials for learning about the solar eclipse with your students!

Download these solar eclipse classroom handouts and diagrams!

Explore curriculum from Wild Earth Lab:

If you enjoyed this post, I know you will love using my environmental science materials in your classroom!


Are you interested in reading more posts like this? Subscribe or follow Wild Earth Lab using the links below!


References and Further Reading

  1. Lea, R. (2023). The 5 main stages of October’s annular solar eclipse explained. Space.com. Available: https://www.space.com/annular-solar-eclipse-2023-main-stages-explained
  2. NASA (n.d.). Types of Solar Eclipses. Available: https://science.nasa.gov/eclipses/types/
  3. NCAR & UCAR Science Education (2017). 2017 Great North American Eclipse and the HAO Connection (video). Available: https://www.youtube.com/watch?v=rBxymVkpMl8

Sharing options and discussion for this post:

Posted on

Solar System Distances Lab: Try this hands-on math activity to model the solar system!

A banner that says "solar system distances model lab activity" with a picture of worksheets and a measuring tape

In this post, you will learn how to set up your own relative distances lab to teach the relative distances between objects in our solar system! In this fun lab, your students will learn about the vastness of space and the spacing of planets in a hands-on way. To do this, they will perform calculations and mark the locations of planets on a measuring tape. This post includes a materials list and directions for this fun, hands-on math and measurements activity!

During this lab, it may surprise students to see that the planets of the solar system are not evenly spaced out at all, as they are often shown in solar system diagrams. In fact, the inner four planets are grouped much more closely than the outer gas giants. Students will also calculate just how teeny-tiny scale models of planets would need to be if included in the model.

A note for educators: The activity in this post comes from my complete Sun and Stars Unit. You can find the printable directions and worksheets for this activity in my Solar System Relative Distances Lab or in the full Sun and Stars Unit – plus all the other printable handouts, worksheets, and diagrams you need to teach the solar system, the sun, and stars. Plus, every purchase helps support this blog! 💚

You can also find the relevant worksheets and handouts for this activity in my Solar System Distances Lab!

Gather Your Materials

Gather the following materials for the solar system distances lab:

Other Materials:

Set Up

  1. Stretch out a tape measure along the ground.
  2. Tell students that the Sun is located at 0 and Neptune is located at the highest number on the tape measure.
  3. Use a clothespin to attach the Neptune and Sun flashcards to the proper locations.
  4. Go through the example below with your class to learn how to find the locations of the other planets. Find the actual distances from the Sun to each planet in the table below.
  5. Finally, ask students to calculate the model locations of the other planets on the tape measure in small groups.
Approximate distances between the Sun and planets. A printable version of this table and worksheets are included in my Solar System Distances Lab mini study.

Example Calculation

If you have a 5-meter tape measure, then the Sun is at 0 meters, and Neptune is at 5 meters. In reality, Neptune is 4,635,000,000 km from the Sun. We want to know where to mark Uranus on the tape measure. Uranus is 2,881,000,000 km from the Sun.

  1. Set up the equation:

2. Solve for model distance:

3. Put the actual distance (in kilometers) to Uranus into the equation:

4. Find and mark the calculated location on the tape measure.

5. Repeat these steps with the other planets in the solar system.

Download worksheets and handouts for the solar system distances lab activity

Other Suggestions

  • To make this activity simpler, calculate the distances to mark on the tape measure before the lab and provide these numbers to the students. Students can still work through finding the correct locations on the tape measure and marking the location of each planet.
  • For more advanced groups, ask students to start by trying to figure out on their own how they would set up the equation to solve this problem.
  • Pay attention to units while working through the example. Ask students how they know which units to use for their answers.

Problem Questions

  1. Outer space is mostly made of empty space. Planets and stars are relatively tiny compared to the distances between them. But let’s imagine we are trying to make a scale model of the solar system with planets and a Sun that are to scale, relative to the distances between them on our tape measure.
    • If we add a scale model of Jupiter to our tape measure model, what would its diameter be? The actual diameter of Jupiter is 87,000 miles (140,000 km). Show your work below.
    • What is the problem with building this model?
  2. Let’s say we want to build a model of the solar system with both planet sizes and distances between planets to scale. We want to use a marble as Earth. The marble has a diameter of 0.75 inches (1.9 cm). Earth’s actual diameter is 7,900 miles (13,000 km).
    • For this model, what would the distance between the Sun and Earth be? Give your answer in miles or kilometers.
    • For this model, what would the distance between the Sun and Neptune be? Give your answer in miles or kilometers.
    • For this model, what would the diameter of the Sun be? The Sun’s actual diameter is 865,000 miles (1,390,000 km).

Reflection Questions

  1. What is one thing that surprised you during this activity?
  2. Describe the spacing of the planets in our solar system. Are they evenly spaced or not?
  3. Do most images/diagrams of our solar system do a good job representing relative sizes and distances between objects? Why or why not?

This activity comes from my Sun Unit!

Your students will love the illustrated learning materials, plus you’ll support Wild Earth Lab with your curriculum purchase!

Explore more units from Wild Earth Lab:

If you enjoyed this post, I know you will love using my environmental science materials in your classroom!


Are you interested in reading more posts like this? Subscribe or follow Wild Earth Lab using the links below!


Sharing options and discussion for this post: